1. Hardwarea. The Raspberry PiThe project was realized using a Raspberry Pi 3B+ running under the version of the Raspbian OS available to download using the link below: https://files.seeedstudio.com/linux/Raspberry%20Pi%204%20reSpeaker/2021-05-07-raspios-buster-armhf-lite-respeaker.img.xz.
b. The Respeaker 6-Mic Circular Array moduleThe project uses the Respeaker 6-Mic Circular Array module from Seeed Studio. This module is made of two boards:- A main board that plugs on the GPIO pins of the Raspberry Pi and that contains audio amplifiers, converters and connectors. It is the "HAT board".- A second board which contains 6 microphones, a ring of 12 leds and a push button. It is the "Circular Array board".The full specification of the module and a quick-start tutorial are provided by the manufacturer at the following link: https://wiki.seeedstudio.com/ReSpeaker_6-Mic_Circular_Array_kit_for_Raspberry_Pi/
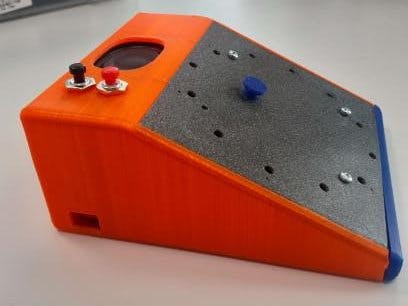
C. The physical buttons 1) The button on the Circular Array board is already connected to the GPIO26 pin of the Raspberry Pi upon connecting the HAT board. It is used as a start button. 2) The Grove connector on the HAT board offers access to the power (5V and GND), GPIO12 and GPIO13 pins of the Raspberry Pi. Using this connector we have soldiered two push-buttons to the GPIO12 and GPIO13 pins for increasing and decreasing the volume of the speaker respectively.
d. The caseThe case that encapsulates the different components of the prototype was designed using Blender and the source files are available in the Attachments section.The case is made if three parts:1) A base that holds the Raspberry Pi, the speaker and the volume buttons. 2) A slide-on top piece that is attached to Circular Array board and is perforated at the positions for the microphones, leds and the button in order to access them. 3) A slide-on front piece that completes the case.
The Blender file contains all the elements that will fit inside the box to have an preview. To export only one element, click on the main box for example, in the File menu - Export - Stl - and select "Selection Only" as shown in the following screenshot:
The preview you will see at the en of this article is not the same as the one you will see in the Blender software. Some templates as the Raspberry card, the buttons and others are shown in Hackster and hidden in Blender by clicking on the "eye" at the top-right corner as you can see here:
2. SoftwareThe software running on the Gladys smart speaker is divided into two main scripts running simultaneously on the Raspberry Pi: - The main script "gladys.py";- The local server from which the main app retrieves questions to be asked and to which it sends the responses to be saved in a database. This server also has a visual interface accessible via a web browser provided you are connected on the same WiFi network as the Raspberry Pi.
a. Gladysa.1. Sound acquisitionSound acquisition is done in the gladys.py python script using the pyAudio python library. Additionnaly, an Audiofile() class was created with the following methods to facilitate the use of the pyAudio functions:- play(): open and read a.wav file. The arguments for calling this methods are the audio file format, the number of channels, the sampling frequency, the device index and "output" which should be set to True, in that order. - stop(): stop the stream opened using the play() method.- record(): open a stream, record sound and save it in a.wav file. It accepts the same arguments as the play() method except for the "input" argument which should be set to True instead of the "output" argument.
a. 2. User Interface (LEDs)A visual user interface with the 12 LEDs on the Circular Array board was designed using the pixel_ring python library provided by seeed studio on the following Github repository: https://github.com/respeaker/pixel_ring.git. The library offers two LED patterns based on the Amazon Echo and the Google Home devices which can be personalized at wish, and a set of lighting sequences with their corresponding methods. - During the setup phase: the 12 LEDs light up with constant brightness with the same color using the wakeup() method. - During the playing of the question by Gladys: the 12 LEDs blink and fade out with the same color using the speak() method.- During the recording of the response: the LEDs light up in a circular rotating pattern with different colors using the think() method.a. 3. Text to SpeechThe gladys.py script retrieves the questions from the server in text form and converts them to an.mp3 file using the Google Text To Speech API. The.mp3 file is then in turn converted into the.wav file format in order to be played by the Respeaker 6-Mic module.
b. Web InterfaceThe web interface of the server is divided into three sections.1) The "Questions" section which can be used to add or delete questions for Gladys to ask the patients. 2) The "Patients list" section which lists the names of the patients who have responded. 3) The "Responses" sections that appears by clicking on the name of a patient on the list and that displays the responses of the patient with the corresponding question. Below are screenshots of the Web interface and its different sections.
- c. Vosk: Speech to textThe patient responses are converted from Speech To Text using the Vosk speech recognition toolkit which is available for download in the following link: https://alphacephei.com/vosk/.


Comments