As mentioned in the contest description, I raided my drawer and found some LoRa modules that I had purchased for my college minor project. These LoRa modules were just sitting idle and unused, so I decided to create something I had wanted to make back when I was a beginner in electronics—a text messenger powered by a communication module with enough range to let me talk to my friend who lives 5 km away.
In my house, there’s a network issue, so I opted to use radio frequency for transmitting and receiving information between my home and my friend's home. I designed a device that connects to my phone via Bluetooth, allowing me to send messages. When I send a message through the Bluetooth terminal, the information is carried, processed in the device I built, and transmitted using the LoRa module.
The device is powered by an Arduino Nano, which I also found in my drawer. This MCU is compact, easy to use, and capable of processing the information before sending it to another identical device located 5 km away. That second device processes the received data and sends it to my friend’s phone via Bluetooth.
This way, we can communicate without relying on cellular networks or Wi-Fi routers, entirely free of cost. The two portable devices I used are identical, with only slight changes in the code for each.
Discussing Failures 😕At first, I tried the NRF24L01, but it didn’t work for long-range communication, so I decided to switch to LoRa, as it provides long-range communication
Also without the 433 MHz antenna, the devices face issues connecting with another user
Getting StartedI am building three identical devices to test two use cases:
- One-to-One Communication: Communication between two users.
- Broadcasting: Similar to a WhatsApp group, where a message is sent to multiple users simultaneously.
All three portable devices are identical, with no changes in the circuit diagram
Here are some key points that I keep in mind when designing a circuit diagram:
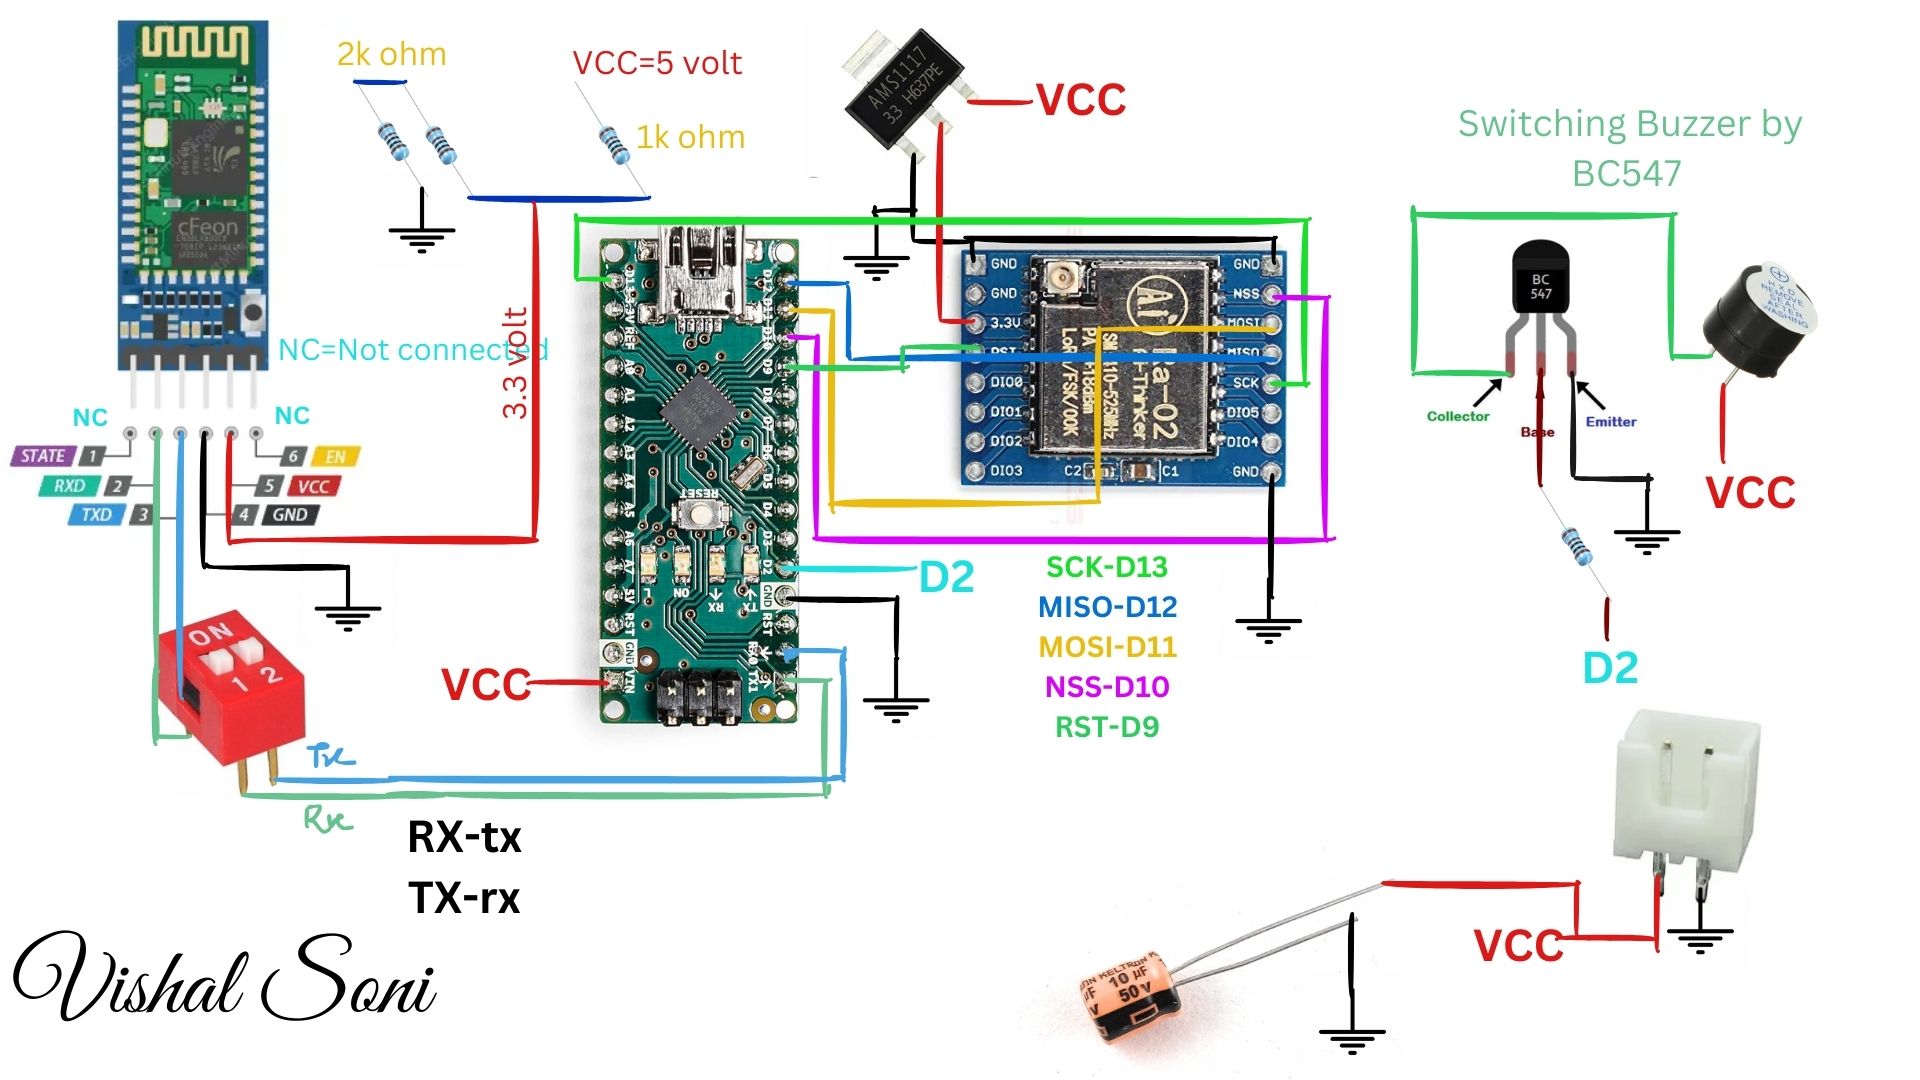
Like LoRa SX1278 and Bluetooth HC05, which have a working voltage of 3.3V and can get damaged with a 5V power supply. Here, I am not using the original Arduino; it is a cheap copy of Arduino. So, I would recommend using an external 3.3V converter like the AMS1117 3.3V voltage regulator.
Initially, I used the AMS1117 for both the HC05 and LoRa, but I faced some noise issues in communication while using the same 3.3V voltage regulator for both the HC05 and LoRa modules. So, I changed the power pathway for both HC05 and LoRa.
In the circuit, you can see I used the AMS1117 voltage regulator for the LoRa module, and for the Bluetooth module, I used a voltage divider circuit. This way, I got two separate 3.3V power supplies, excluding the Arduino’s 3.3V.
And that’s all! The circuit is now working perfectly. 😎
Note: Turn the Dip Switch off while uploading code in arduino nano.
Working of DeviceJust plug battery in to the device and you can see the led blinking
Then connect the device to your phone via Bluetooth
You can use this device very easily! also it can used in remote locations where internet and cellular networks are unavailable, such as a private island far away from the rest of the world.
To get started:
- Turn on the device by plugging in the battery.
- Connect via Bluetooth.
- Send the number "69" — this will make the other device's buzzer start toggling with a "beep beep" sound.
Next, ask your friend to connect their phone to the device via Bluetooth. Once connected, they will be able to see what you’re texting. Even better, they can reply back to you! Sounds fun, right? 😂
Congratulations 🥳! You’ve successfully read the entire manual on how to use this device.
Coding-Woding[connecting two Devices ]
#include <SPI.h> // include libraries
#include <LoRa.h>
byte msgCount = 0; // count of outgoing messages
byte localAddress = 0xBB; // address of this device
byte destination = 0xFF; // destination to send to
change local address to 0xFF and destination to 0xBB for making connection to other device
[Setting Calling Variable]
calling = q.toInt();
//Serial.println(q);
if(calling== 69)
{
digitalWrite(buzzer, HIGH);
delay(1000);
digitalWrite(buzzer, LOW);
delay(1000);
digitalWrite(buzzer, HIGH);
delay(1000);
digitalWrite(buzzer, LOW);
delay(1000);
digitalWrite(buzzer, HIGH);
delay(1000);
digitalWrite(buzzer, LOW);
delay(1000);
calling = 0;}
else
Serial.println(q);
}
I chose 69 to toggle the buzzer on both my device and the other device.
// if the recipient isn't this device or broadcast,
if (recipient != localAddress && recipient != 0xFF) {
// Serial.println("This message is not for me.");
;
for device having destination address 0xFF you have to write 0xFF here
this lines block any other message which is not for this device because this device is now on user to user mode and not in boradcasting mode.
These are some important lines of code I shared above.
Opening the Bluetooth serial appFirst, you need to connect to the Bluetooth module HC-05 bu identifying its MAC address.
Next, simply send the text.
Congratulations! You have completed the project.
As I Tested, it works well within a 2 km range in an open area. Beyond 2 km, it starts losses network and skips some messages.
Stay tuned for the broadcasting tutorial and many more functions, including expanding the range by using a LoRa device as a repeater😉


Comments
Please log in or sign up to comment.