


IoT is definitely the way tech is heading if it is not already there. The Texas Instruments LaunchPad makes IoT very easy with a fast, low power MSP432 microcontroller that easily integrates with the CC3100 BoosterPack to enable internet connectivity and the Educational BoosterPack MKII providing a variety of sensor data and capabilities to the system.
A variety of sensors and internet capability does not make a complete product, however. The system has to be able to do something with the data that it is reading in. Fortunately, the MSP432 paired with Energia makes providing sensor data to a cloud interface over MQTT seamless and easy.
This project will showcase the new Multi Tasking abilities of the MSP432 LaunchPad to package sensor data into a JSON and quickly publish the data through an MQTT client. Then, the data will be read in using an IBM BlueMix server set up with Node-RED. This project shows just how easy it is to publish sensor data to a subscriber so that many devices can rapidly access the information.
Background Info:
Multi Tasking:
Multi Tasking is a new feature included with the MSP432 LaunchPad and Energia. It allows for the user to have multiple .ino files set up in Energia as tabs and, as long as they have different names for their setup and loop functions, they will run simultaneously. This is taken care of by Energia and TI RTOS and takes no additional work from the user. For additional information and examples, go here or here.
MQTT:
MQTT is a publisher/subscriber protocol that allows for one device to act as a publisher and send a message, and many devices to subscribe and receive updates. MQTT is very lightweight and fast which makes it perfect for many IoT applications. More information on MQTT as an overview can be found here.
JSON:
JSON is a text based protocol used to transmit and read messages using key, value pairs. The benefit of using JSON is the format is standardized, so it makes finding preexisting code and libraries very easy. There is a built in JSON library in Energia that we will be using for this project so it is almost effortless form the user side. A quick overview of JSON and additional information can be found here.
Building the Project:
Editing the Code:
Step 1: Make sure you have Energia installed as well as device drivers for the MSP432 if you are on Windows. Download the zip file below (it contains all of the other .ino files that are listed as well) and open it through Energia.
Step 2: Go ahead and read through the individual tabs in the project. It is pretty intuitive to see what each tab is doing. Most tabs are simply initializing some sensor on the Educational BoosterPack and then updating the value read in. The JSON tab is where the sensor data is packaged into a JSON format and then published to an MQTT client.
Step 3: A few edits have to be made to the code to get it up and running. First, change the SSID and password variable is the EDUMKII_IoT tab to reflect the settings for your WiFi connection. Second, in the JSON tab line 29 it reads:
client.connect("EDUMKII");
The "EDUMKII" here is the topic that the MQTT client publishes to and is important for two reasons. First, it is how the subscriber knows the correct publisher and therefor has to be unique to other topics. Second, we will need to remember it later for setting up the cloud side to subscribe to the values.
Step 4: Compile and run the code. At this point the program should be publishing the data successfully to an MQTT topic reflected in the serial monitor. Go ahead and try and interact with the pushbuttons and joystick and make sure the changes are reflected in the JSON being printed out. If the client is not successfully publishing but the code is running, try changing the topic name as there might be conflict.
NOTE: The click select for the Joystick shares the reset pin on the CC3100 WiFi booster pack so unfortunately it cannot be used for this example.
IBM BlueMix Setup:
First get set up with a BlueMix trial account so that you can develop a quick cloud app.
Step 1: Navigate to the BlueMix Console and select a Node-RED Starter. This makes developing a cloud app very easy since it is visual and takes little coding.
Step 2: Setup a Node-RED app giving it a memorable name so that you can navigate to it later.
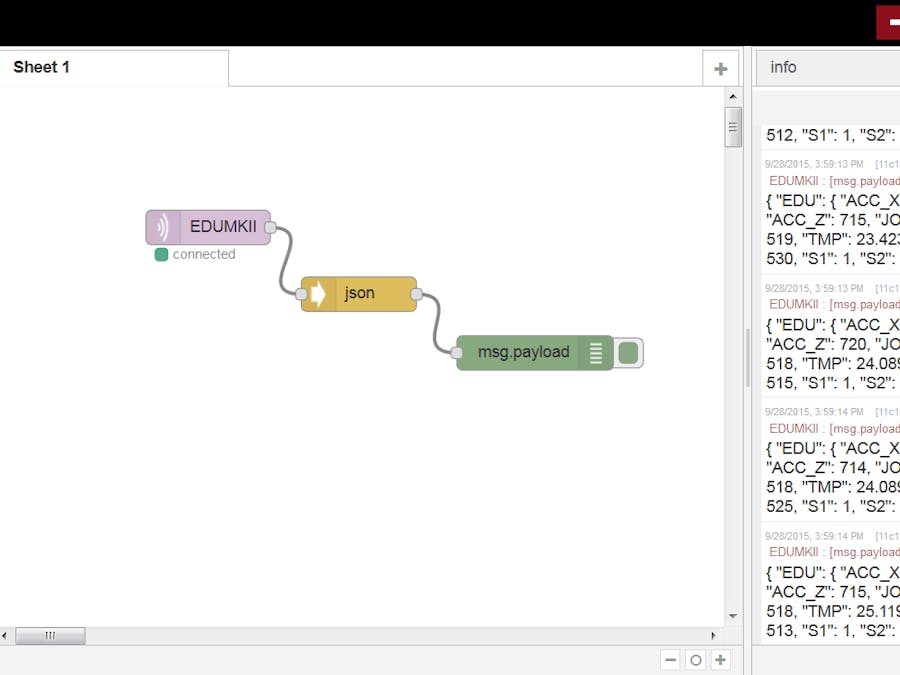
Step 3: After the project is done initializing, open it up in a web browser. For this example, we are simply going to subscribe to the MQTT broker and the print out the information in the console.
Step 4: We want an MQTT to be the input for our application so drag that to the work space. This is where we will have to configure the subscriber to match the publishers settings we initialized int the Energia portion.
Step 5: We then want to pass our input through the json function so add that to the workspace as well. This lets the application know what the input actually is.
Step 6: Finally, add a debug for the output to the work space. This will print the JSON information to the console so we can see what we are publishing from the LaunchPad.
Step 7: Deploy the code and open up the debug console. Assuming the LaunchPad is publishing you should be able to see the sensor information being read into the debug console!
NOTE: If the debug console is coming up blank, try a different browser. Google chrome can be problematic.
Takeaway:
This project shows how easy it is to lay the groundwork for an endless amount of projects. Being able to read in sensor information to the cloud quickly and easily opens many doors. For example, sensor information could be used to trigger an event across all subscribers such as alarms when it gets too hot. Also, being able to read the data to a cloud application allows for data analytics that can use sensor data to develop trends. With the Educational BoosterPack alone, light and temperature data could be used to pull together a quick weather monitoring station. The possibilities are endless!


Comments