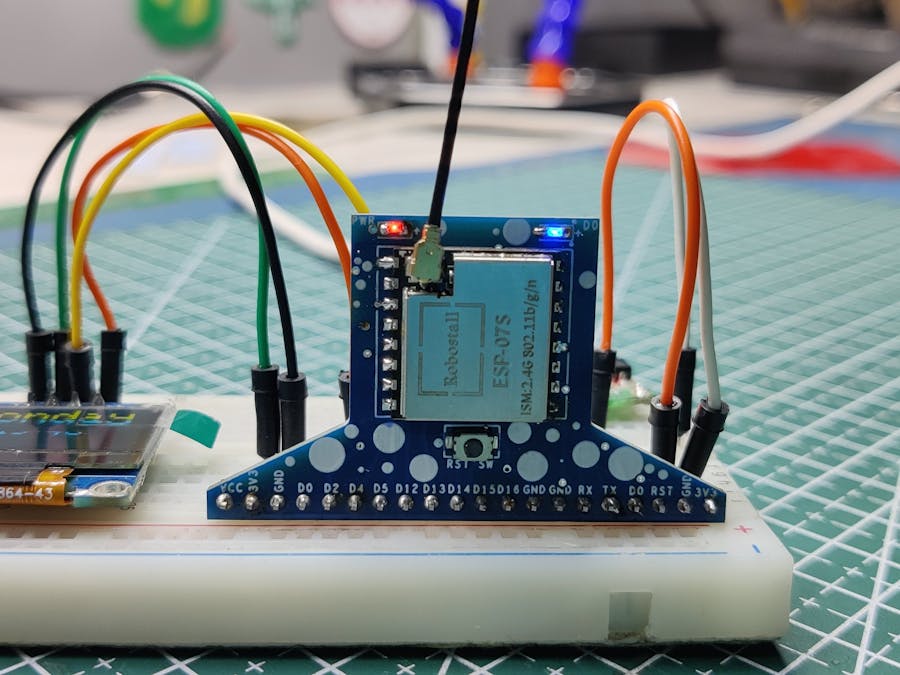
Hey, what's up, everyone? So here's something useful: a custom breakout board for using the ESP07 module for tinkering and testing.
This Custom Board differs from commonly available ESP boards in that it has vertical header pins that allow it to be installed vertically on a breadboard rather than horizontally.
This makes it easier to save pins, which is helpful while tinkering.
The ESP07S Module is an ESP8266-based module with the same internals as regular ESP12S or F modules used in NODEMCU Boards.
This article is about how this board was built and how to use it, so let's get started.
Material RequiredFollowing were the components used in this built-
- ESP07S Module
- Custom PCB
- 10k Resistors 0603 Package
- Blue and Red 0603 Package LED
- SMD tactile switch
- Vertical Header Pin CON20
- AMS1117 3.3V Version
- 1uF Capacitor 1206 Package
- 10uF Capacitor 1206 Package
- M7 Diode
The ESP07S is an ESP8266 Tensilica L106 Based 32-Bit MCU with a 16-bit short mode, clock speed support 80 MHz, 160 MHz, supports the RTOS, integrated Wi-Fi MAC/BB/RF/PA/LNA, and onboard U.FL connector.
I had to first read the MCU's datasheet and prepare the PCB footprint for it, which involved constructing the pads as described in the datasheet and then placing them in accordance with the pin arrangement.
Its operating voltage is between 2.7 and 3.3 volts, and it works at a frequency of 2.4 to 2.5 GHz.
As for its average current, it consumes 80mA at least and 170mA max.
It has 11 GPIO pins that can be used as regular I/O pins.
Below is the datasheet if you need more information about the module.
Datasheet- https://robu.in/wp-content/uploads/2019/12/ESP-07S-ESP8266-Serial-WiFi-Module.pdf
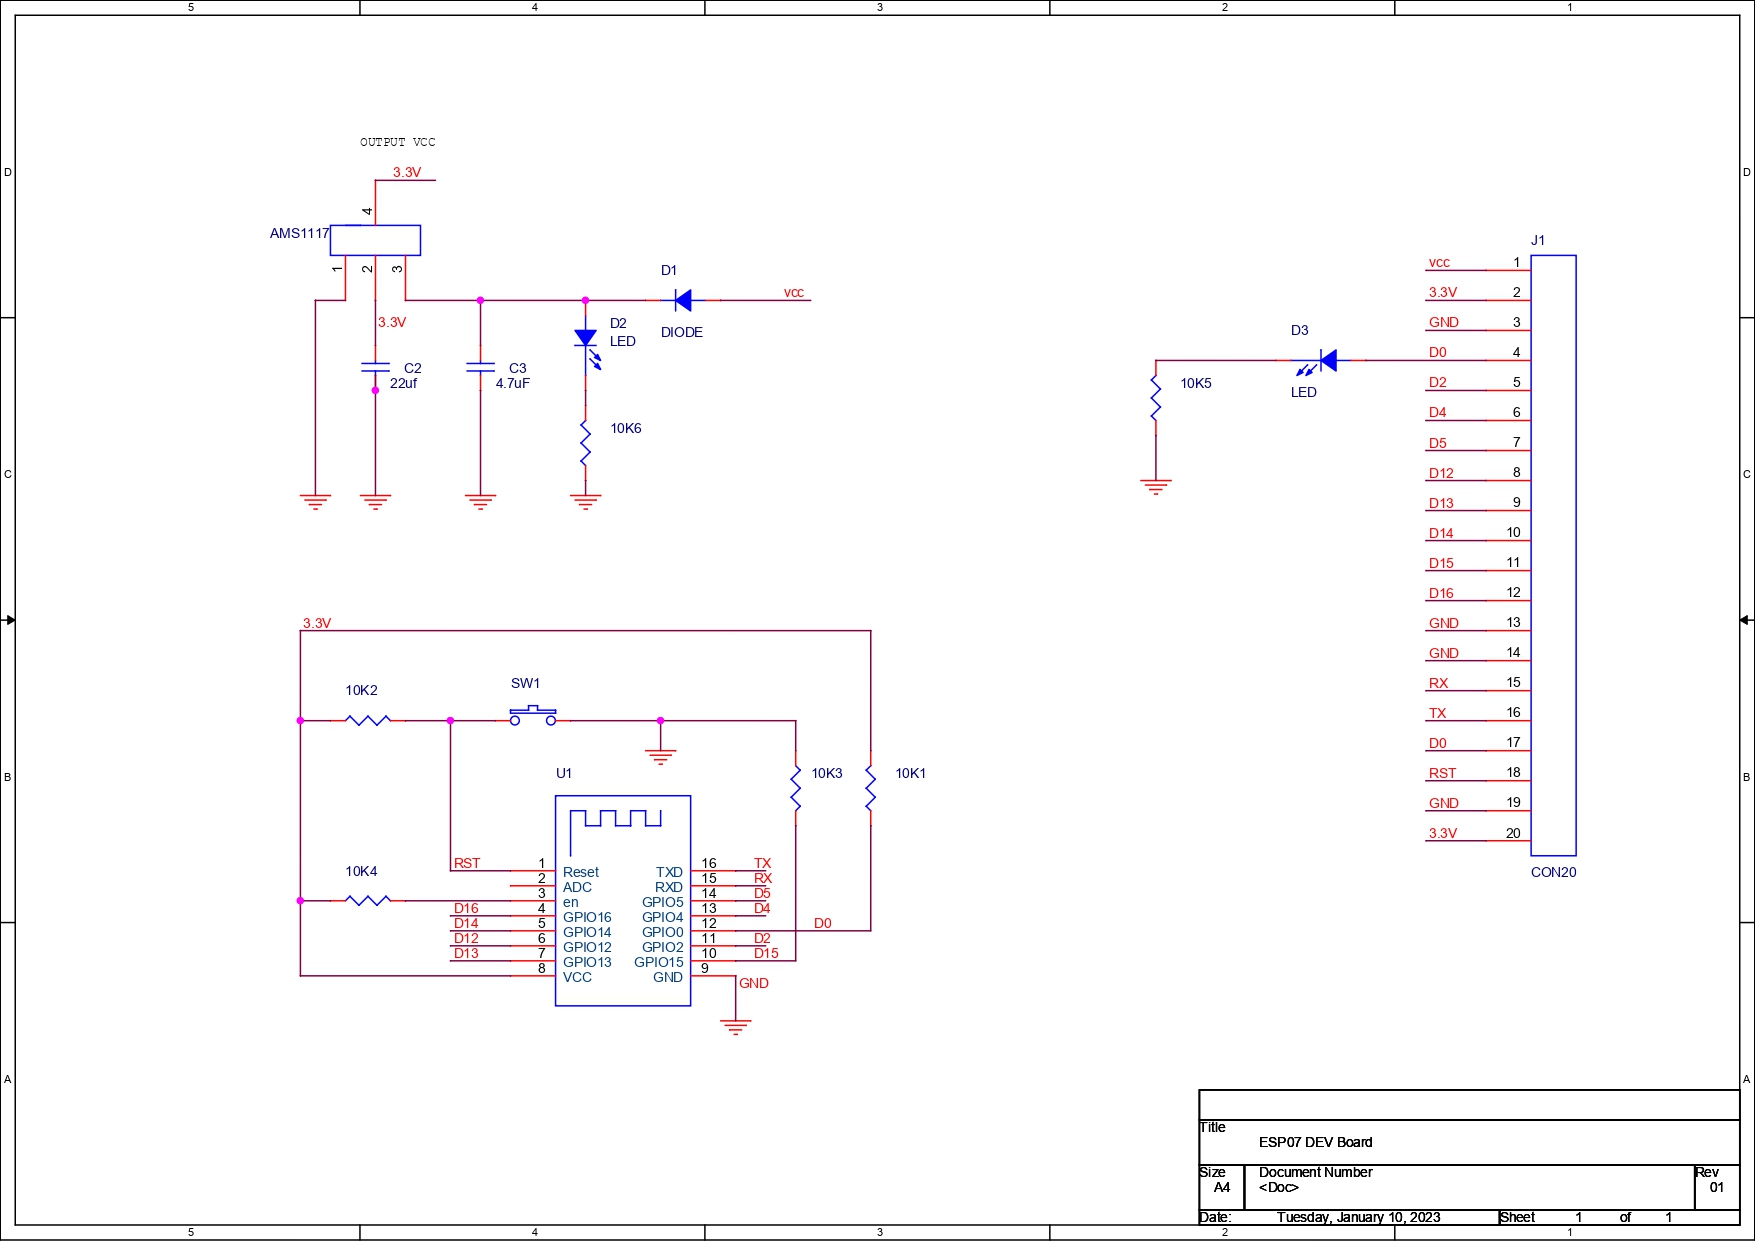
PCB DesignCreating the schematic is the first step in the PCB design process. In it, we add the ESP07S module and add resistors to link some of its pins to VCC and some to GND in accordance with the ESP8266 Minimal setup.
The enable pin and GPIO0 are both pulled up to 3V3 in the design, and two 10K resistors are connected to them.
Additionally, there is a 10K resistor between the reset pin and 3V and between GPIO15 and GND.
A setup for the AMS1117 voltage regulator, an M7 diode, and two SMD capacitors of 1uF and 10uF are added.
There is a CON20 header pin that breaks out each pin for accessing GPIOs.
Two extra LEDs were added to the setup in order to test the design. One LED is connected to the power IN port, and the other is connected to the D0 pin.
After the schematic was complete, I made a PCB with an AMS1117 setup, a few resistors, and a switch on one layer and an ESP07 module and switch on the other.
PCBWAY ServiceAfter finalizing the PCB and exporting the Gerber data, we sent it to PCBWAY for samples and placed an order for a blue solder mask with a white silkscreen.
I received PCBs within a week, and they were excellent, as expected.
I love the quality of PCBs made by PCBWAY. There are other manufacturers available, but their service is always on another level.
check out PCBWay service for getting great PCB service at less cost.
PCB Assembly ProcessThe SMD components on this PCB are all positioned on the board's top and bottom sides.
Before starting the TOP side assembly, we first begin the BOTTOM side assembly.
BOTTOM side Assembly- The first step is to apply solder paste to each component pad.
- We then used an ESD tweaker to carefully pick and place all the SMD components in their assigned places one by one
- After the "pick and place process, " we carefully lifted the whole circuit board and placed it on my new Mini Hotplate.
The hotplate heats the PCB from below up to the solder paste melting temperature. As a result, the solder paste melts and components get solder on their pads.
One side has been assembled, now we start with the second layer's assembly.
TOP side Assembly- TOP side assembly is similar to the bottom side, we add solderpaste to the component pads and then place the ESP Board, LEDs, and SMD Switch in their location.
This board has components on the BOTTOM side, so the normal hotplate that was previously utilized cannot be used to reflow the components.
- In order to melt the solderpaste and solder components to their pads, we use a hot air soldering station, which heats the solderpaste from above at a temperature above 300°C.
- The CON20 Vertical Header Pin is then placed in its proper location and soldered with a standard soldering iron.
The board assembly is now completed.
ResultHere is the final result of this build—a development board based on the ESP07S that is so small that it only uses 20 breadboard pins and leaves the rest of the board free for the placement of XYZ components.
This board does not currently have a programming IC like the CP2102 or FTDI IC.
Let me explain how my plan was to flash the ESP07S Module using my already-existing Nodemcu Board.
Programming the ESP8266 with NodemcuFor programming this board, we could use two methods.
1. Use an FTDI UART Board with Boot Mode Buttons
2. Use a NODEMCU Board without adding any Boot Mode Button
The method that involves programming the board with NODEMCU is by far the best way to program any ESP device or chip.
Nodemcu has an onboard CP2102 chip, which is a UART chip for programming the MCU through TX and RX pins.
Nodemcualso has two transistors that put the ESP into boot mode, which terminates the manual process of adding external buttons and pressing them during the uploading process.
Previously, I made a programmer board that broke out these pins from the NODEMCU board.
- 3v
- GND
- RST
- GPIO0
- TX
- RX
Before the main wiring, we add a jumper between the ENABLE pin of the nodemcu and GND. This will put the ESP8266 board of NODEMCU to sleep, and we can connect an external ESP8266 board with the onboard CP2102 chip.
We connect the ESP07S's 3V, GND, RST, GPIO0, TX, and RX pins with the same pins of the nodemcu.
- First, we connect the nodemcu Board's header pins to the ESP07 pins in the right order.
- Next, we open Arduino IDE and plug the USB into nodemcu.
- we then go to the Tools menu and select the board that is being used which is in this case NODEMCU1.0 board.
- we select the right com port and hit upload.
To test this board, we first use the NODEMCU Board technique to upload the Fade sketch into the ESP07S.
We load the Fade sketch from the example menu in the Arduino IDE and change the LED Pin to 0 which is for D0 Pin of the ESP07 board. This board has an LED connected to one of the ESP07S's IO Pins which is D0.
This was the sketch-
int led = 0;           // the PWM pin the LED is attached to
int brightness = 0;    // how bright the LED is
int fadeAmount = 5;    // how many points to fade the LED by

// the setup routine runs once when you press reset:
void setup() {
  // declare pin 9 to be an output:
  pinMode(led, OUTPUT);
}

// the loop routine runs over and over again forever:
void loop() {
  // set the brightness of pin 9:
  analogWrite(led, brightness);

  // change the brightness for next time through the loop:
  brightness = brightness + fadeAmount;

  // reverse the direction of the fading at the ends of the fade:
  if (brightness <= 0 || brightness >= 255) {
    fadeAmount = -fadeAmount;
  }
  // wait for 30 milliseconds to see the dimming effect
  delay(30);
}Next, we attach the external U.FL antenna to the ESP07S board's built-in UFL connector to extend the range of the ESP board. For the following sketch, I'll be utilizing WiFi.
https://learn.sparkfun.com/tutorials/three-quick-tips-about-using-ufl/all
Internet ClockHere's a simple setup that involves an SSD1306 OLED Display and WiFi to display the current date and time from the internet.
We place the ESP07S breakout board and OLED on a breadboard and make the following wiring connections:
- 5V of NodeMCU to VCC of OLED Display
- GND to GND
- D4 to SDA
- D5 to SCL
After this, we add the main code into the NodeMCU and you'll see Time and Day displaying on the OLED Screen.
#include "NTPClient.h"
#include "ESP8266WiFi.h"
#include "WiFiUdp.h"

#include <Wire.h>
#include <Adafruit_SSD1306.h>
#include <Adafruit_GFX.h>

#define OLED_WIDTH 128
#define OLED_HEIGHT 64

#define OLED_ADDR   0x3C

Adafruit_SSD1306 display(OLED_WIDTH, OLED_HEIGHT);

const char *ssid = "addyourSSID";
const char *password = "andYourPass";

const long utcOffsetInSeconds = 19800; //Change this according to your GTM

char daysOfTheWeek[7][12] = {"Sunday", "Monday", "Tuesday", "Wednesday", "Thursday", "Friday", "Saturday"};


WiFiUDP ntpUDP;
NTPClient timeClient(ntpUDP, "pool.ntp.org", utcOffsetInSeconds);

void setup(){

  display.begin(SSD1306_SWITCHCAPVCC, OLED_ADDR);
  display.clearDisplay();
  Serial.begin(115200);
  WiFi.begin(ssid, password);

while ( WiFi.status() != WL_CONNECTED ) {
delay ( 500 );
Serial.print ( "." );
}

timeClient.begin();
}

void loop() {
timeClient.update();

display.clearDisplay();
display.setTextSize(3);
display.setTextColor(WHITE);
display.setCursor(13, 0);

display.println(daysOfTheWeek[timeClient.getDay()]);

display.setTextSize(2);
display.setTextColor(WHITE);
display.setCursor(38, 28);
display.println(timeClient.getHours());

display.setTextSize(2);
display.setTextColor(WHITE);
display.setCursor(60, 28);
display.println(":");

display.setTextSize(2);
display.setTextColor(WHITE);
display.setCursor(70, 28);
display.println(timeClient.getMinutes());
//display.println(":");
//display.println(timeClient.getSeconds());


display.display();
delay(1000);
}The AMS1117 chip is one feature I added to this board that allows you to connect any power source up to 15V and levels down the voltage to 3.3V so the ESP07S Module can operate because it is a 3.3V Tolerant Device and will short out if the provided voltage is higher than 3.3V.
I connected a 13.3V LiFePo4 battery to the ESP07S Breakout Board's VCC and GND ports to test things out.
Since ESP seemed functional, we can now monitor the input voltage with a multimeter: 13V at VIN and 3.3V at AMS1117's output pin.
ConclusionThe end result of this build is a super useful ESP8266-ESP07S-based board that is capable of driving all sorts of power-required stuff like driving displays, an LED matrix to play some custom animation, or small projects like an LED badge.
I'm planning to use this ESP-07 development board in an upcoming home automation project.
I hope this article was useful and serves as a basic guide for using the ESP07S module.
Special thanks to PCBWAY for supporting this project; do check them out for great PCB service at a lower cost.
Thanks again, and I will be back with a new project soon.


Comments
Please log in or sign up to comment.