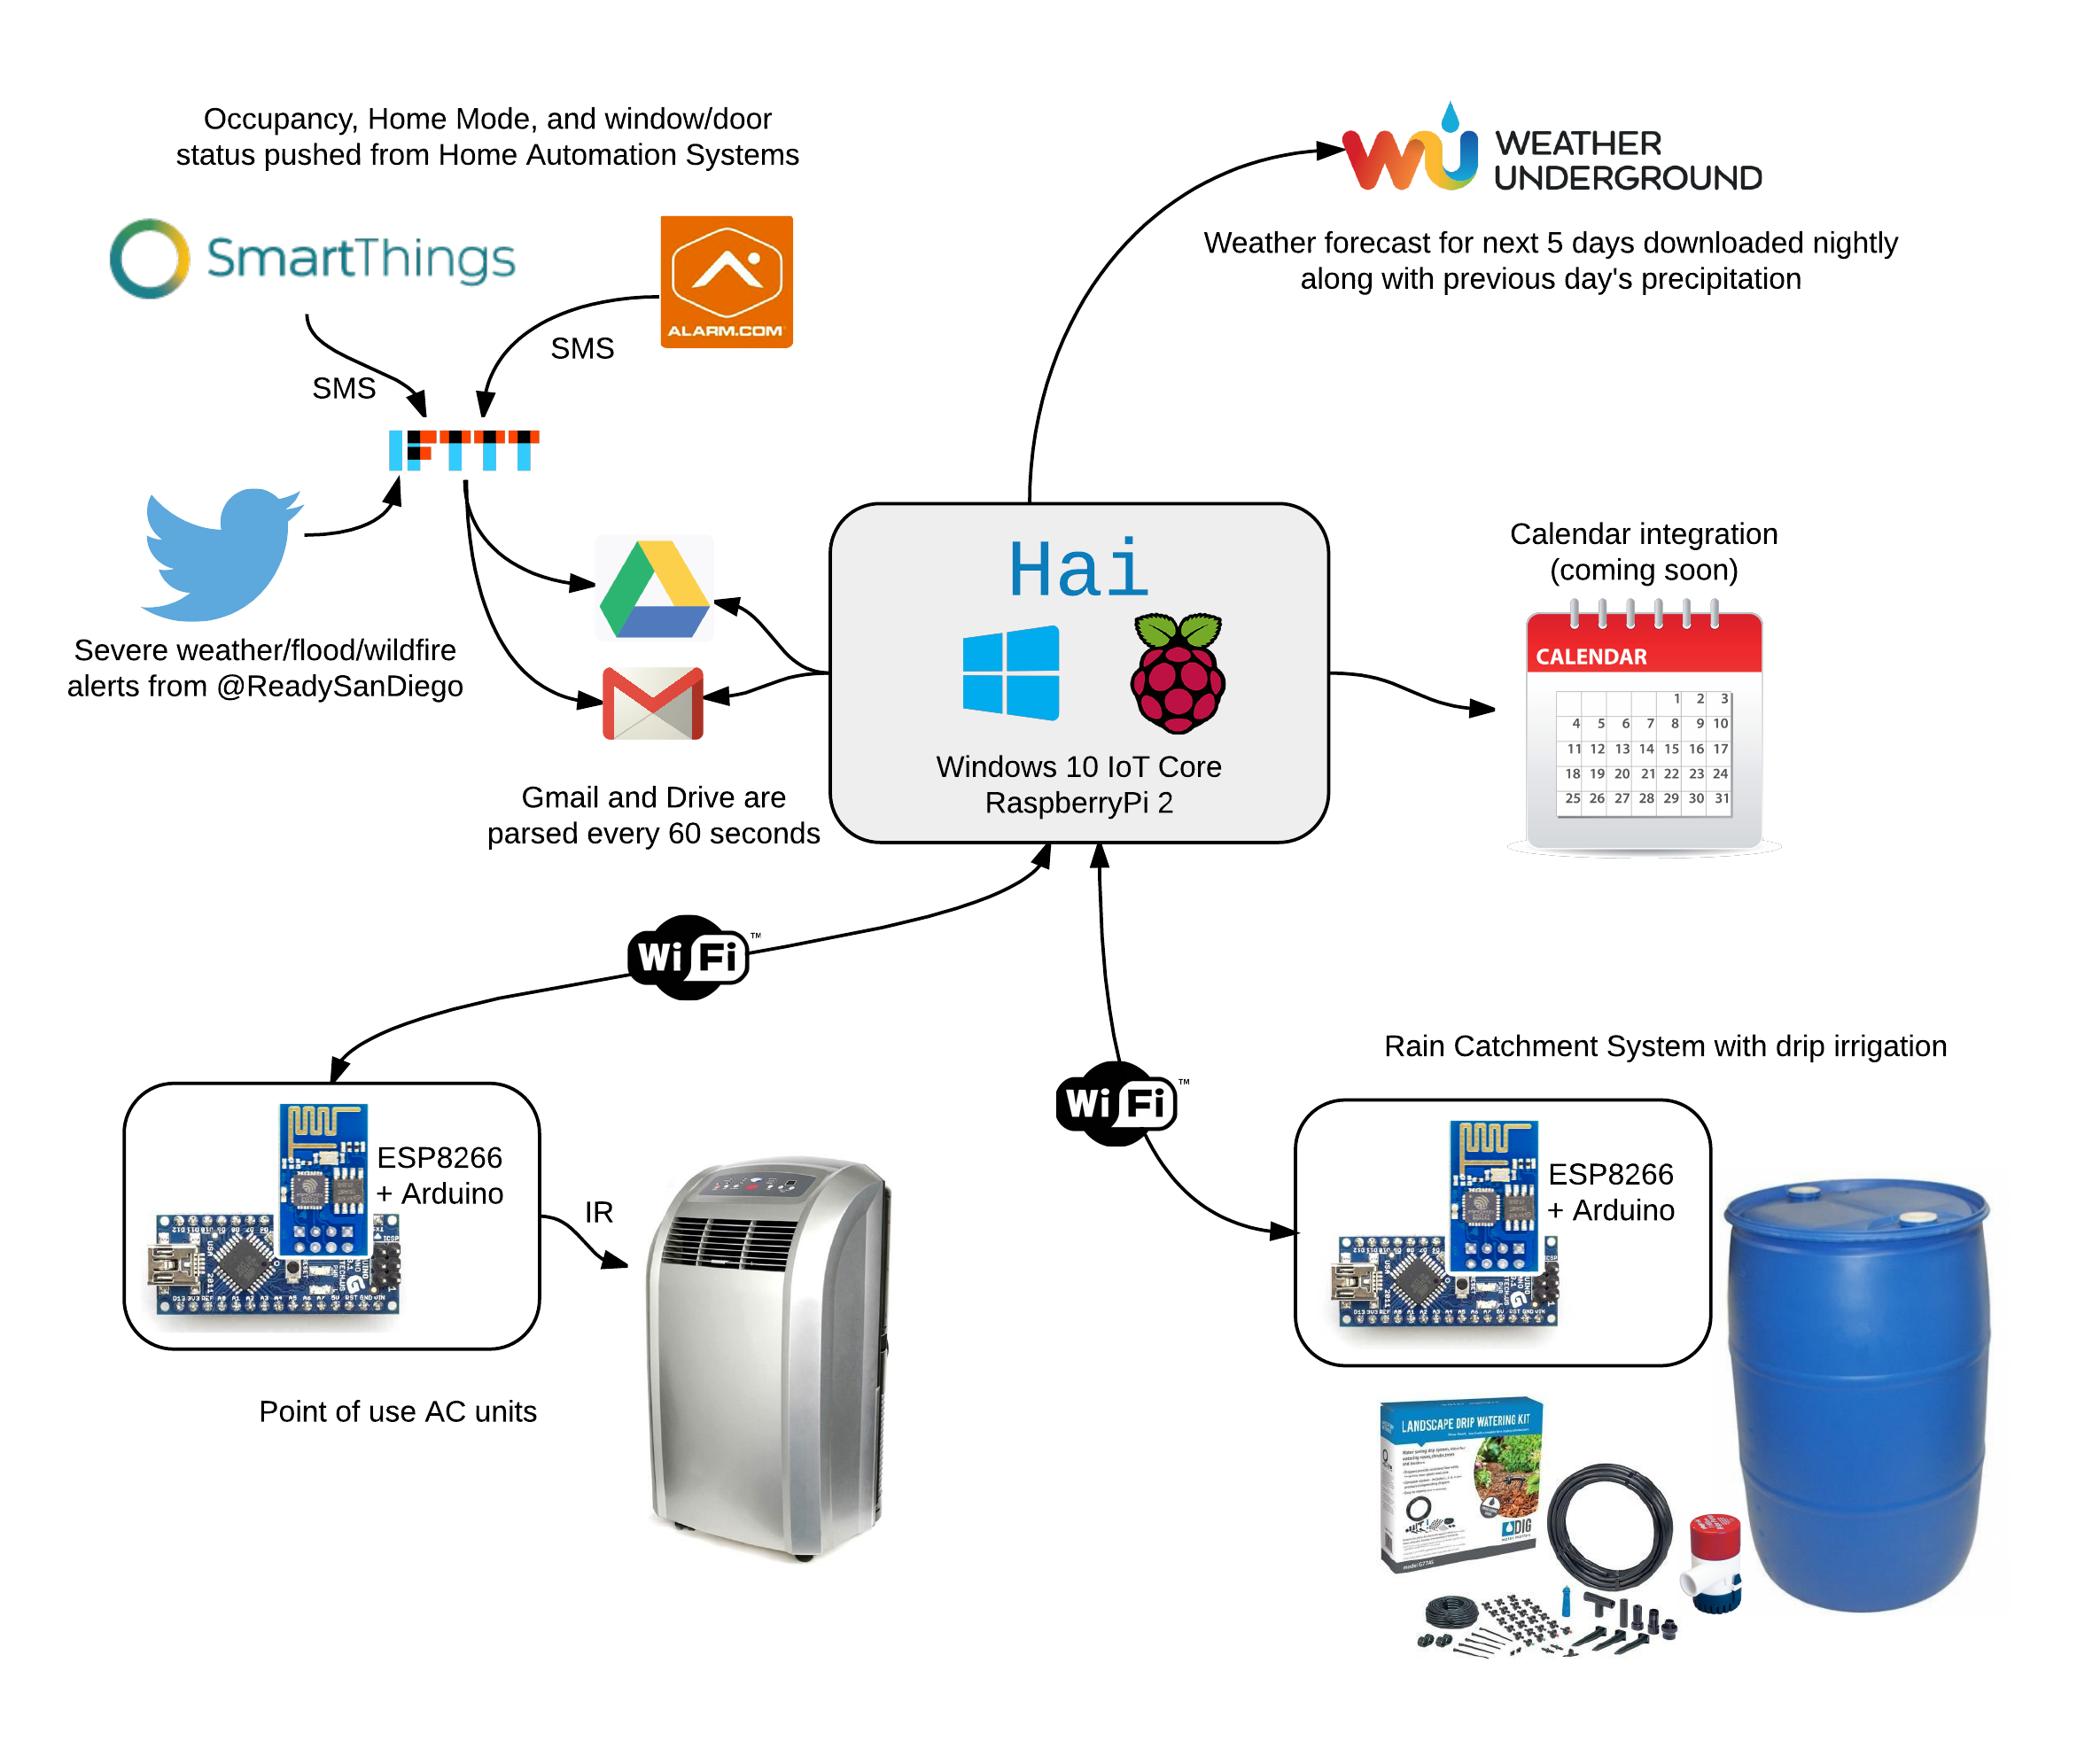
Hai ('hi') is an integration point for several stand alone smart home technologies. Hai runs on the Raspberry Pi and can be adapted to optimize electricity consumption (lighting/HVAC) and water usage (irrigation/rain collection) in a number of ways. Hai was originally envisioned for any Pi running Raspbian OS, but is also being ported over to utilize the new Windows IoT Core on a Raspberry Pi 2.
I live in Southern California, where one of the worst droughts in recent memory is currently taking place. Our Summers are typically warm with dry winds, but this year it has been uncharacteristically humid and the evening ocean breeze hasn't been enough to cool us down. With electricity at 4x the national average ($0.42 per kWh and increasing again next year), I can't afford to run the AC all day; and now with water rationing, our garden has seen better days.
I don't know how everyone else is handling this, but I'm going to fix it the only way I know how...with a gratuitous use of technology!
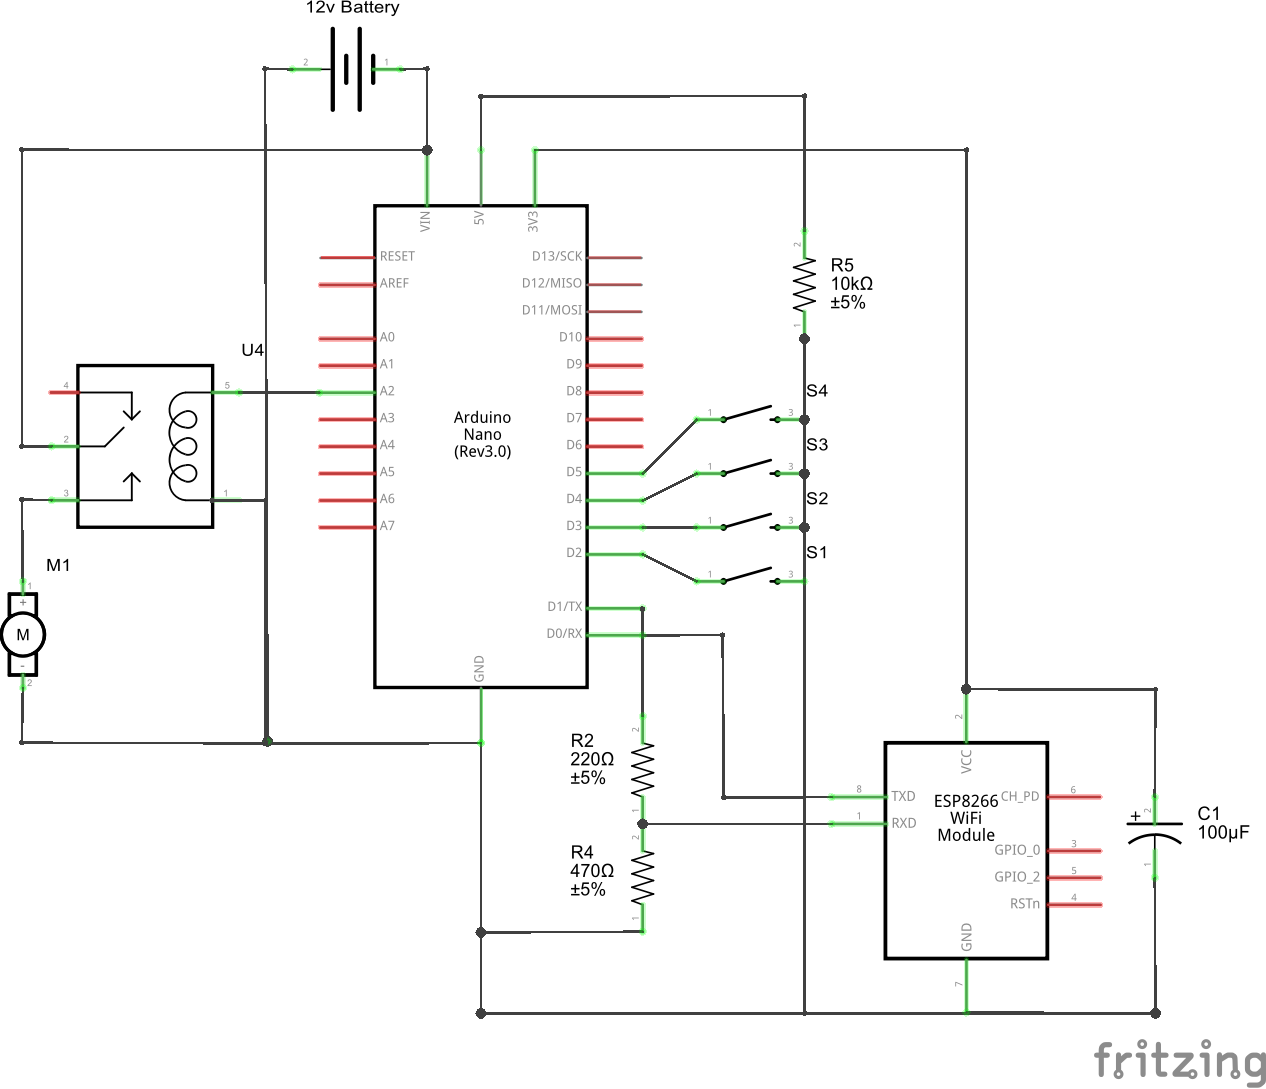
After a freak summer storm last month I decided to build a rain catchment system. The rainwater collected from our roof should supply enough water for our garden year-round (our 2,000sq/ft roof provides about 1,200gal per 1" of rain). I'll be chronicling that build in another project, so I'll just give a high level overview here. Basically all our gutters are tied into a large water reservoir that uses a built in bilge pump to water all my drip irrigation on a schedule using an arduino. I have added a water level indicator (series of float switches) and an ESP8266 to allow central management and logging from 'Hai'.
Hai pulls weather forecasts from the wunderground API to see if there will be any precipitation in the next 1-5 days using both 'Probability of Precipitation' and the 'Quantitative Precipitation Forecast'.
In addition to a normal rain delay to prevent double watering, Hai will also switch to the minimum water needed leading up to a storm. Hai can also proactively ramp up watering of the garden prior to a storm if my reservoir is nearly full. This ensures I can collect the maximum rainfall but also prevents certain fruits and veggies from suffering from over watering (like tomatoes which will split).
Using a Raspberry Pi 2 just to send weather stats to my irrigation controller is a bit overkill, so I extended Hai's reach to my HVAC system to cut back on my electricity usage.
I already have a home automation (SmartThings) and monitored home security (FrontPoint) system that tracks house occupancy, door/window state's, motion, temperature and also controls the lighting. This, along with all LED bulbs, has cut our electricity bill in half. The largest expense now is Air Conditioning even though we use it sparingly. We have small, point of use AC units upstairs and downstairs and a portable unit in my office.
Having the ACs on dumb thermostats means they will wait until the room is already hot, and then kick on in the middle of the day and try its best to cool down the house. They have no idea if there are people in the room, or if there is even anyone home. If a window was left open from the previous night, we could be paying to air condition the neighborhood. Air conditioners also have to work much harder when the outside temp is higher, so kicking them on earlier in the day to drop the temps would take less energy than waiting until the mid-day highs.
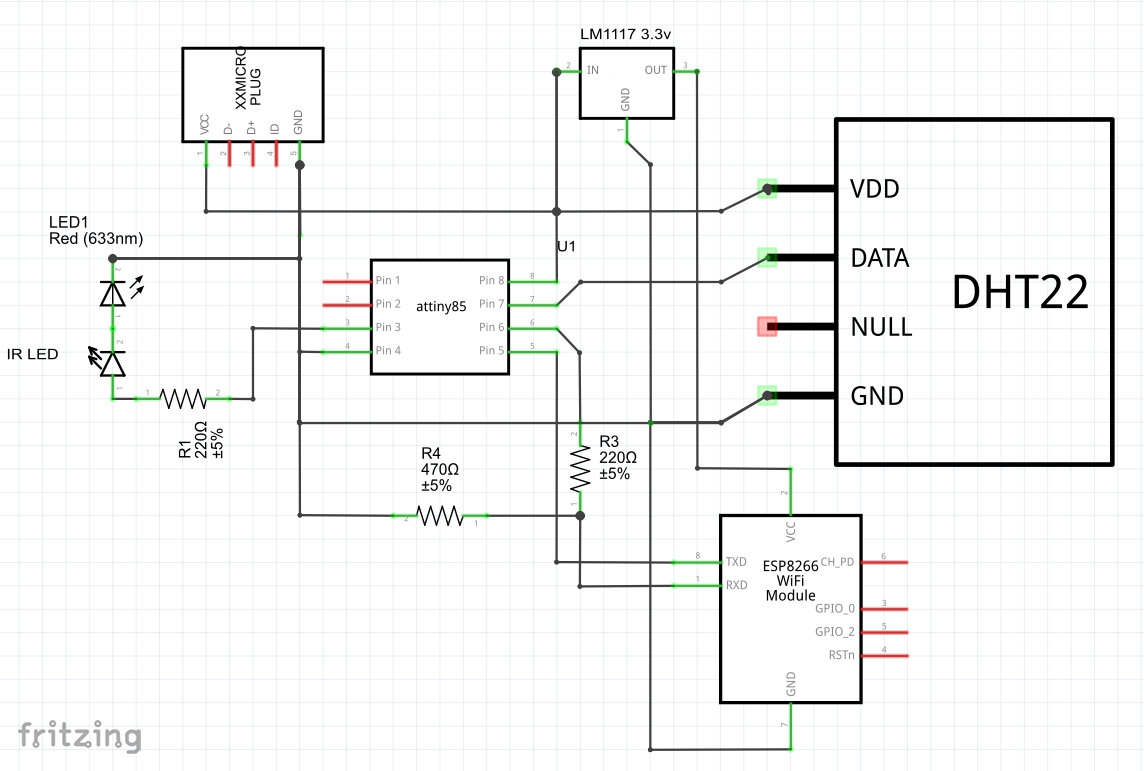
I recently created an arduino controlled IR blaster that can turn our AC units on/off from across the room. It has a DHT22 temperature/humidity sensor on board so it can get a good idea of the 'real feel' and isn't just looking at the temp right next to the AC. There is one for each AC unit and they all connect back to Hai with an ESP8266.
Since Hai pulls the weather forecasts, she can let our AC units know when they would need to kick on to keep the room at a desired temperature. She can also tap into SmartThings/FrontPoint to make sure all the windows are closed if it's looking like a hot one and will text us a reminder before we leave for work. Since SmartThings also knows who's home, and in which rooms, Hai can adapt when I work from home or if my wife is home sick and plan an AC schedule accordingly.
Knowing when the house is occupied at a given moment is a good start, but ideally Hai should be able to control the house temp based on whether we will be home or not. By integrating with our calendars, she would know if we were going to be away from home all day or having people over, and plan accordingly.
I want to build a local (solar powered) weather station that monitors rainfall, temperature, humidity and soil moisture. Hai would still use wunderground for forecasting, but these hyper localized metrics can be used as a feedback loop to make the algorithm more accurate. The soil moisture alone will be extremely helpful in fine tuning the watering, and used with the temp/humidity sensor can correlate evaporation rates throughout the day. This could be used with the forecasted temp/humidity to make the watering predictions very accurate.
An inline rainfall water gauge would be nice to have in order to log water as it enters the reservoir. Currently I'm relying on a float valve to log when it's full in conjunction with estimates based on roof size and reported rainfall. I can use the same mechanism as the weather station to get extremely accurate readings.
Maybe I'll give Hai a UI attached directly to the RaspberryPi to display current status, weather reports, water/power usage, etc. Since she's already tied into the home automation and security systems, I might be able to give a whole house overview with recent alerts and camera feeds.
Porting over to Windows 10 IoT Core has been slow going. Hai is essentially a web server with DB backend that pulls/parses content from other online services. This is simple to set up on Rasbian with a LAMP server, so I figured I could just as easily use IIS/MSSQL. Unfortunately, IoT Core isn't full Windows and the apps written specifically for it aren't quite at the same maturity as the Linux distros for the Pi.







Comments
Please log in or sign up to comment.