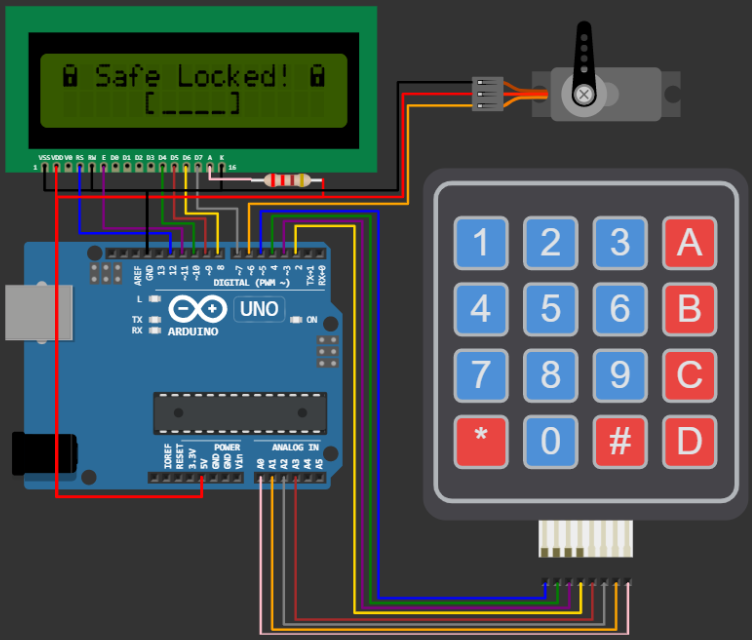
You will be able to create an Arduino project using Servo motor, keypad, Arduino UNO and wires. The project is simple yet challenges you to develop a working code. It involves EEPROM operation as well to save the keys. In this project, the code needed for the Electronic Safe, wiring diagram as well as the simulation code is provided in this article.
Please feel free to share the project as well as tinker with the code to produce your version of the project!
Getting startedLearn how to create a simulation for the Arduino UNO based electronic safe using Arduino style coding. This project will use the following components.
- Servo motor elements to simulate the lock
- Keypad matrix to enter the secret key
- Arduino UNO
- LCD display to show the status
- wires
An electronic safe is a simple Arduino project. The project will allow the user to enter the secret key. If the key matches, Arduino will open the lock (operate the servo motor). The key can also be updated if needed. The key is stored in the EEPROM location of the Arduino. EEPROM is chosen so that, even when the power goes off, the keys will be stored securely.
Wokwi Arduino Simulator tool RefresherKnowing a bit about the menus and the controls 🕹 in the Wokwi Arduino simulator will help in the future.
Wokwi Arduino Simulator window definitions
In the order of the numbers mentioned in the image
1. the sketch, which always has ".ino" extension
2. a ReadMe file, which can be used to share more details about the project. can be left empty or even omitted
3. additional supporting files for the sketch. Wokwi Arduino simulator supports projects which contain multiple files as well. This is one such example
4. diagram.json is a special file. You can add, modify, delete the simulation elements (Arduino, LEDs, Motors, buttons etc)
5. the Simulation window, where all the action takes place. You can make it full screen when the sketch is running
6. The Editor window, where you add, update the Arduino code.
7. Timer - This shows the time elapsed with respect to the simulation. The simulation cannot run exactly at the same speed as the code runs in the real hardware. Hence, you might experience a slower time to sometimes a faster one.
8. This performance meter will show the relative performance of the simulator when compared to the actual hardware one
9. Click this button to RESTART the simulation
10. Click on this button to STOP the simulation
11. Clicking on this button will PAUSE the simulation. You can always resume it by clicking on the same button once more
12. SAVE button. Click here to save the code you just created or modified. Never lose the work :)
13. clicking on this button will give you the shareable code using which you can share your project with your classmates or friends or even on the social media
14. Not but not least, this gives you a little information about the Author and the project name
Here is the sketch for the Electronic safe game/**
Arduino Electronic Safe
Copyright (C) 2020, Uri Shaked.
Released under the MIT License.
*/
#include <LiquidCrystal.h>
#include <Keypad.h>
#include <Servo.h>
#include "SafeState.h"
#include "icons.h"
/* Locking mechanism definitions */
#define SERVO_PIN 6
#define SERVO_LOCK_POS 20
#define SERVO_UNLOCK_POS 90
Servo lockServo;
/* Display */
LiquidCrystal lcd(12, 11, 10, 9, 8, 7);
/* Keypad setup */
const byte KEYPAD_ROWS = 4;
const byte KEYPAD_COLS = 4;
byte rowPins[KEYPAD_ROWS] = {5, 4, 3, 2};
byte colPins[KEYPAD_COLS] = {A3, A2, A1, A0};
char keys[KEYPAD_ROWS][KEYPAD_COLS] = {
{'1', '2', '3', 'A'},
{'4', '5', '6', 'B'},
{'7', '8', '9', 'C'},
{'*', '0', '#', 'D'}
};
Keypad keypad = Keypad(makeKeymap(keys), rowPins, colPins, KEYPAD_ROWS, KEYPAD_COLS);
/* SafeState stores the secret code in EEPROM */
SafeState safeState;
void lock() {
lockServo.write(SERVO_LOCK_POS);
safeState.lock();
}
void unlock() {
lockServo.write(SERVO_UNLOCK_POS);
}
void showStartupMessage() {
lcd.setCursor(4, 0);
lcd.print("Welcome!");
delay(1000);
lcd.setCursor(0, 2);
String message = "ArduinoSafe v1.0";
for (byte i = 0; i < message.length(); i++) {
lcd.print(message[i]);
delay(100);
}
delay(500);
}
String inputSecretCode() {
lcd.setCursor(5, 1);
lcd.print("[____]");
lcd.setCursor(6, 1);
String result = "";
while (result.length() < 4) {
char key = keypad.getKey();
if (key >= '0' && key <= '9') {
lcd.print('*');
result += key;
}
}
return result;
}
void showWaitScreen(int delayMillis) {
lcd.setCursor(2, 1);
lcd.print("[..........]");
lcd.setCursor(3, 1);
for (byte i = 0; i < 10; i++) {
delay(delayMillis);
lcd.print("=");
}
}
bool setNewCode() {
lcd.clear();
lcd.setCursor(0, 0);
lcd.print("Enter new code:");
String newCode = inputSecretCode();
lcd.clear();
lcd.setCursor(0, 0);
lcd.print("Confirm new code");
String confirmCode = inputSecretCode();
if (newCode.equals(confirmCode)) {
safeState.setCode(newCode);
return true;
} else {
lcd.clear();
lcd.setCursor(1, 0);
lcd.print("Code mismatch");
lcd.setCursor(0, 1);
lcd.print("Safe not locked!");
delay(2000);
return false;
}
}
void showUnlockMessage() {
lcd.clear();
lcd.setCursor(0, 0);
lcd.write(ICON_UNLOCKED_CHAR);
lcd.setCursor(4, 0);
lcd.print("Unlocked!");
lcd.setCursor(15, 0);
lcd.write(ICON_UNLOCKED_CHAR);
delay(1000);
}
void safeUnlockedLogic() {
lcd.clear();
lcd.setCursor(0, 0);
lcd.write(ICON_UNLOCKED_CHAR);
lcd.setCursor(2, 0);
lcd.print(" # to lock");
lcd.setCursor(15, 0);
lcd.write(ICON_UNLOCKED_CHAR);
bool newCodeNeeded = true;
if (safeState.hasCode()) {
lcd.setCursor(0, 1);
lcd.print(" A = new code");
newCodeNeeded = false;
}
auto key = keypad.getKey();
while (key != 'A' && key != '#') {
key = keypad.getKey();
}
bool readyToLock = true;
if (key == 'A' || newCodeNeeded) {
readyToLock = setNewCode();
}
if (readyToLock) {
lcd.clear();
lcd.setCursor(5, 0);
lcd.write(ICON_UNLOCKED_CHAR);
lcd.print(" ");
lcd.write(ICON_RIGHT_ARROW);
lcd.print(" ");
lcd.write(ICON_LOCKED_CHAR);
safeState.lock();
lock();
showWaitScreen(100);
}
}
void safeLockedLogic() {
lcd.clear();
lcd.setCursor(0, 0);
lcd.write(ICON_LOCKED_CHAR);
lcd.print(" Safe Locked! ");
lcd.write(ICON_LOCKED_CHAR);
String userCode = inputSecretCode();
bool unlockedSuccessfully = safeState.unlock(userCode);
showWaitScreen(200);
if (unlockedSuccessfully) {
showUnlockMessage();
unlock();
} else {
lcd.clear();
lcd.setCursor(0, 0);
lcd.print("Access Denied!");
showWaitScreen(1000);
}
}
void setup() {
lcd.begin(16, 2);
init_icons(lcd);
lockServo.attach(SERVO_PIN);
/* Make sure the physical lock is sync with the EEPROM state */
Serial.begin(115200);
if (safeState.locked()) {
lock();
} else {
unlock();
}
showStartupMessage();
}
void loop() {
if (safeState.locked()) {
safeLockedLogic();
} else {
safeUnlockedLogic();
}
}The simulation link is given here:
https://wokwi.com/arduino/libraries/demo/electronic-safe
A small GIF showing the operationYou can edit the project and play with it on any browsers. Just open the project URL and go to the editor tab. By clicking on the Play button, you will recompile the changes and start the simulations. You can indeed use your smartphone to develop code and play with the simulations.
FinallyIf you have any questions feel free to hop on to the Wokwi Discord server
Also, you can leave comments below and I will be happy to help with your queries.
Share your interesting projects and browse through several curious projects from fellow developers and makers on Facebook Wokwi Group!
Stay Safe!
Don't stop learning!
#wokwiMakes


_ztBMuBhMHo.jpg?auto=compress%2Cformat&w=48&h=48&fit=fill&bg=ffffff)


Comments
Please log in or sign up to comment.