


Hardware components | ||||||
 |
| × | 1 | |||
 |
| × | 1 | |||
Software apps and online services | ||||||
 |
| |||||
| ||||||
Hello everyone, this is the second Arduino tutorial on how to program without writing any line of code, using Ardublock, which is an extension of the Arduino IDE for visual programming. If this is the first time you use Ardublock, please visit the first part of this project in this link:
https://www.hackster.io/Hulkco/learns-or-teaches-arduino-without-any-line-of-code-bc0b4a
This time, you will learn how to program Arduino, so that when you press a button and while this remains powered LED lights.
You'll also use new programming blocks such as:
- Store values in a variable.
- Conditional If / else.
- Read a digital input
- Write a digital output.
It looks complicated, but really that Ardublock be very simple.
Things Used in this Project.1 SparkFun Redboard (Arduino/Genuino).
1 330 Ohm Resistor.
1 10 Kohm Resistor
1 Led
1 PushButton
1 Breadboard
4 Wires
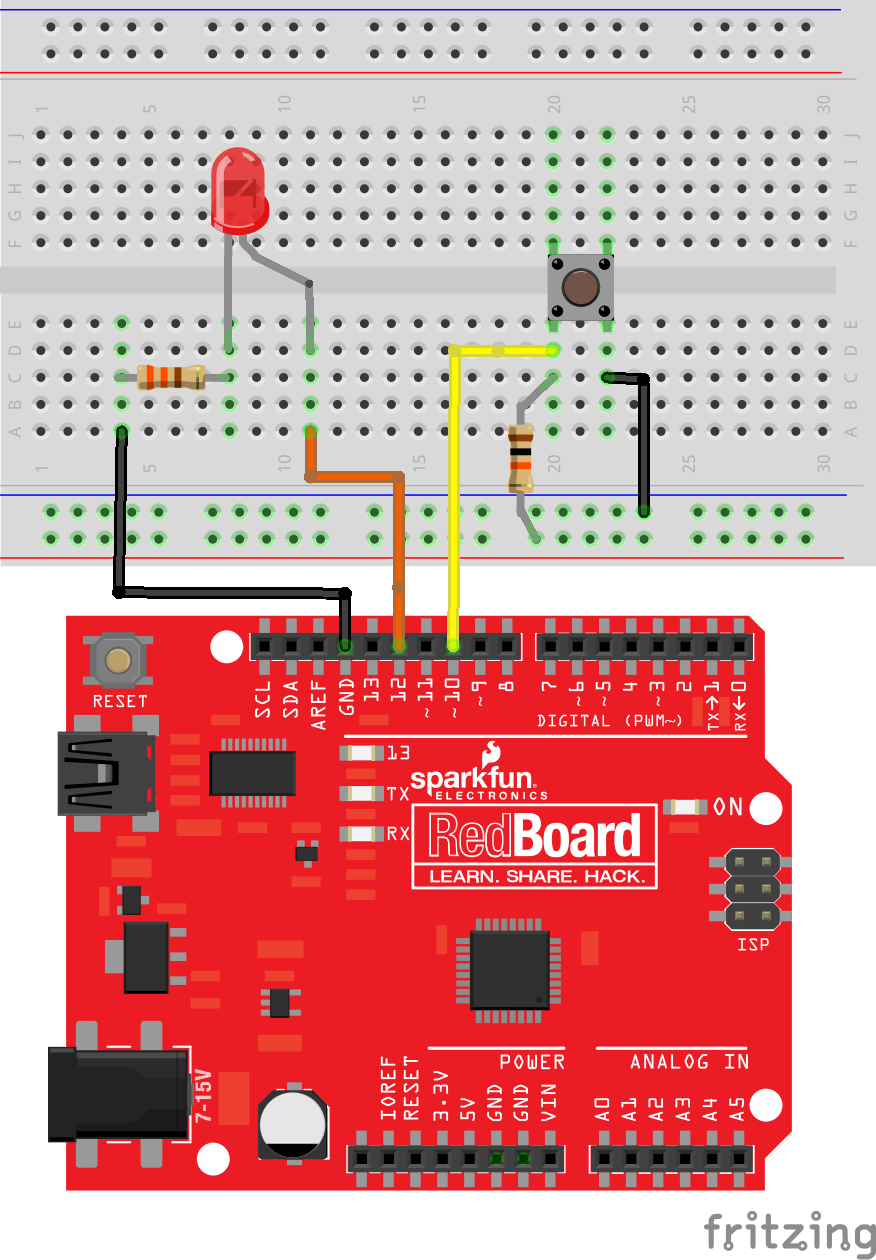
This is an illustration of how the completed circuit should look.
Components like resistors need to have their legs bent into 90° angles in order to correctly fit the breadboard sockets.
Ready to start hooking everything up? Check out the Fritzing diagram and hookup table below, to see how everything is connected.
Warning:
Pay special attention to the component’s markings indicating how to place it on the breadboard. Polarized components can only be connected to a circuit in one direction.
1.- Start Arduino IDE
2.- Select the Board and Serial Port – Just as you would if you were using Arduino, make your board and serial port selections from the “Tools” menu.
3.- Open ArduBlock by clicking Tools > ArduBlock. If you don’t see an entry for ArduBlock here, double-check to make sure your directories are all correctly typed and cased.
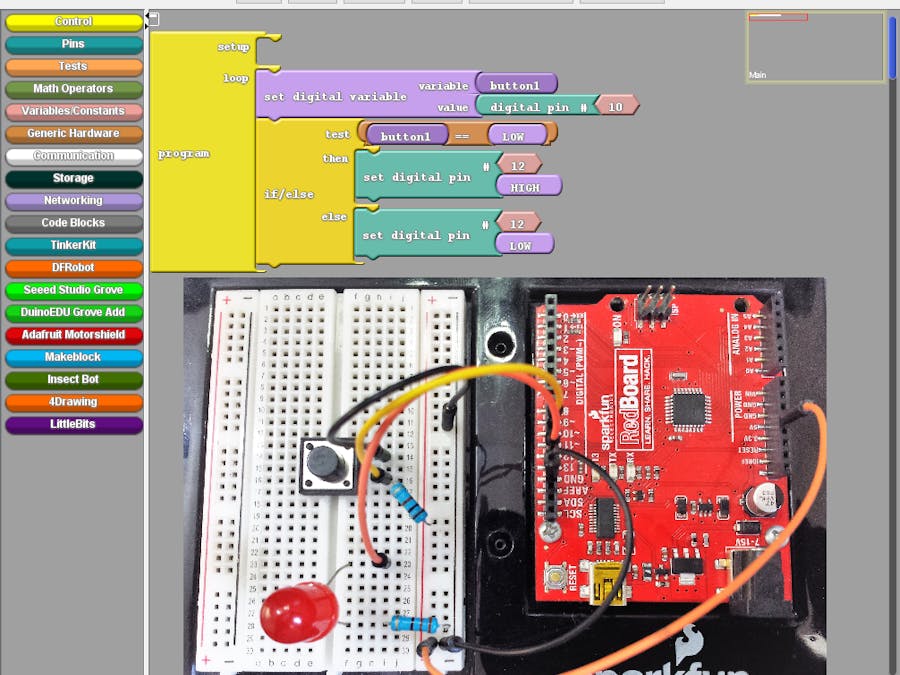
Ardubloc will open in a second window, as shown in the following figure.
Caution Ardublock depends of Arduino IDE, do not close it.
Now you will create the program to Light a LED with a pushbutton.
1.- Click the category Control And drag the block Program.
2.- Click the category Control And drag the block if/else, under the block program.
3.- Click the category Variables/Constants And drag the block set digital variable.
4.- Set the digital variable name to button1.
5.- Drag the block if/else under the digital variable name, until join.
6.- Click the category Pins And drag the block Digital pin #, and change de value to 10.
7.- Drag and Drop the block HIGH, somewhere in the RIGTH panel, don't delete, you need them more later.
8.- Put the block digital pin # in the value space of set digital variable until join.
9.- Click the category Test And drag the block == (equal to) Comparison Operator.
10.- Clone the block button1 and drag to the first position of the Block == (Equal to).
11.- Change the Value in the block HIGH to LOW and Drag to the second position of the Block == (Equal to).
Note.- There are two types of pushbuttons, normally open and normally closed, will have to change the value to HIGH or LOW as appropriate.
12.- Click the category Pins And drag the block set digital pin #, and change de value to 12.
13.- Clone block set digital pin #, and change de value HIGH to LOW.
14.- Now put all together in the block if/else, as show in the figure.
15.- Drag the block set digital variable, over the block if/else until them join.
16.- Finally drag the set of blocks in the loop section of the main "program" block.
And that’s all my friends, now upload the program and try to Light a LED with the pushbutton.
Regards
P.D. Thanks to all persons they saw and follow my projects on hackster.io, this motivates me to do more.
If you pay attention, they listen to the voice of a nice girl in the video!


_3u05Tpwasz.png?auto=compress%2Cformat&w=40&h=40&fit=fillmax&bg=fff&dpr=2)
Comments
Please log in or sign up to comment.