


Hardware components | ||||||
 |
| × | 1 | |||
_copy_P5AWOdT4dX.png?auto=compress%2Cformat&w=48&h=48&fit=fill&bg=ffffff) |
| × | 1 | |||
| × | 1 | ||||
Software apps and online services | ||||||
 |
| |||||
With Walabot and its software kit for Windows/Linux, we can develop applications to see through walls, track objects, monitor breathing patterns, and more. For personnel monitoring, it is quite usual that some physical devices shall be attached to the body to achieve continuous monitoring. However, it is quite inconvenient and uncomfortable to carry around additional devices, especially for old people.
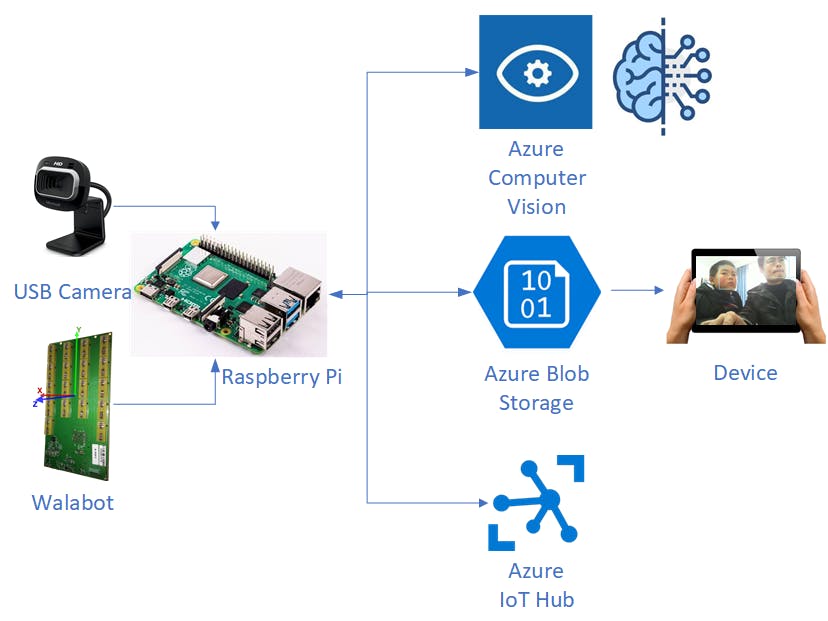
In this project, the idea of contactless monitoring with Walabot and Azure Cognitive Services is proposed and implemented. The system architecture is shown in figure 1 as follows.
First of all, the location of the target can be collected continuously by Walabot device, which provides cutting-edge technology for Radio Frequency (RF) tridimensional (3D) sensing and image processing. With Walabot SDK for Raspberry Pi, the 3D coordinates of the object can be collected. Hence, the distance between the Walabot and the tracking object can be expressed as the Root Mean Square(RMS)of the distance X, Y and Z. Once the distance is smaller than the low threshold, or larger than the high threshold, the USB camera will be activated to take the picture and transmit it to the Azure Computer Vision to identify the faces in the image. As soon as the return results are obtained, the identified faces will be marked with green rectangles on the image, which will be uploaded to the Azure Blob Storage for remote access. Additionally, the coordinates, the distance and the amplitude of the target will be sent to Azure IoT Hub for further use.
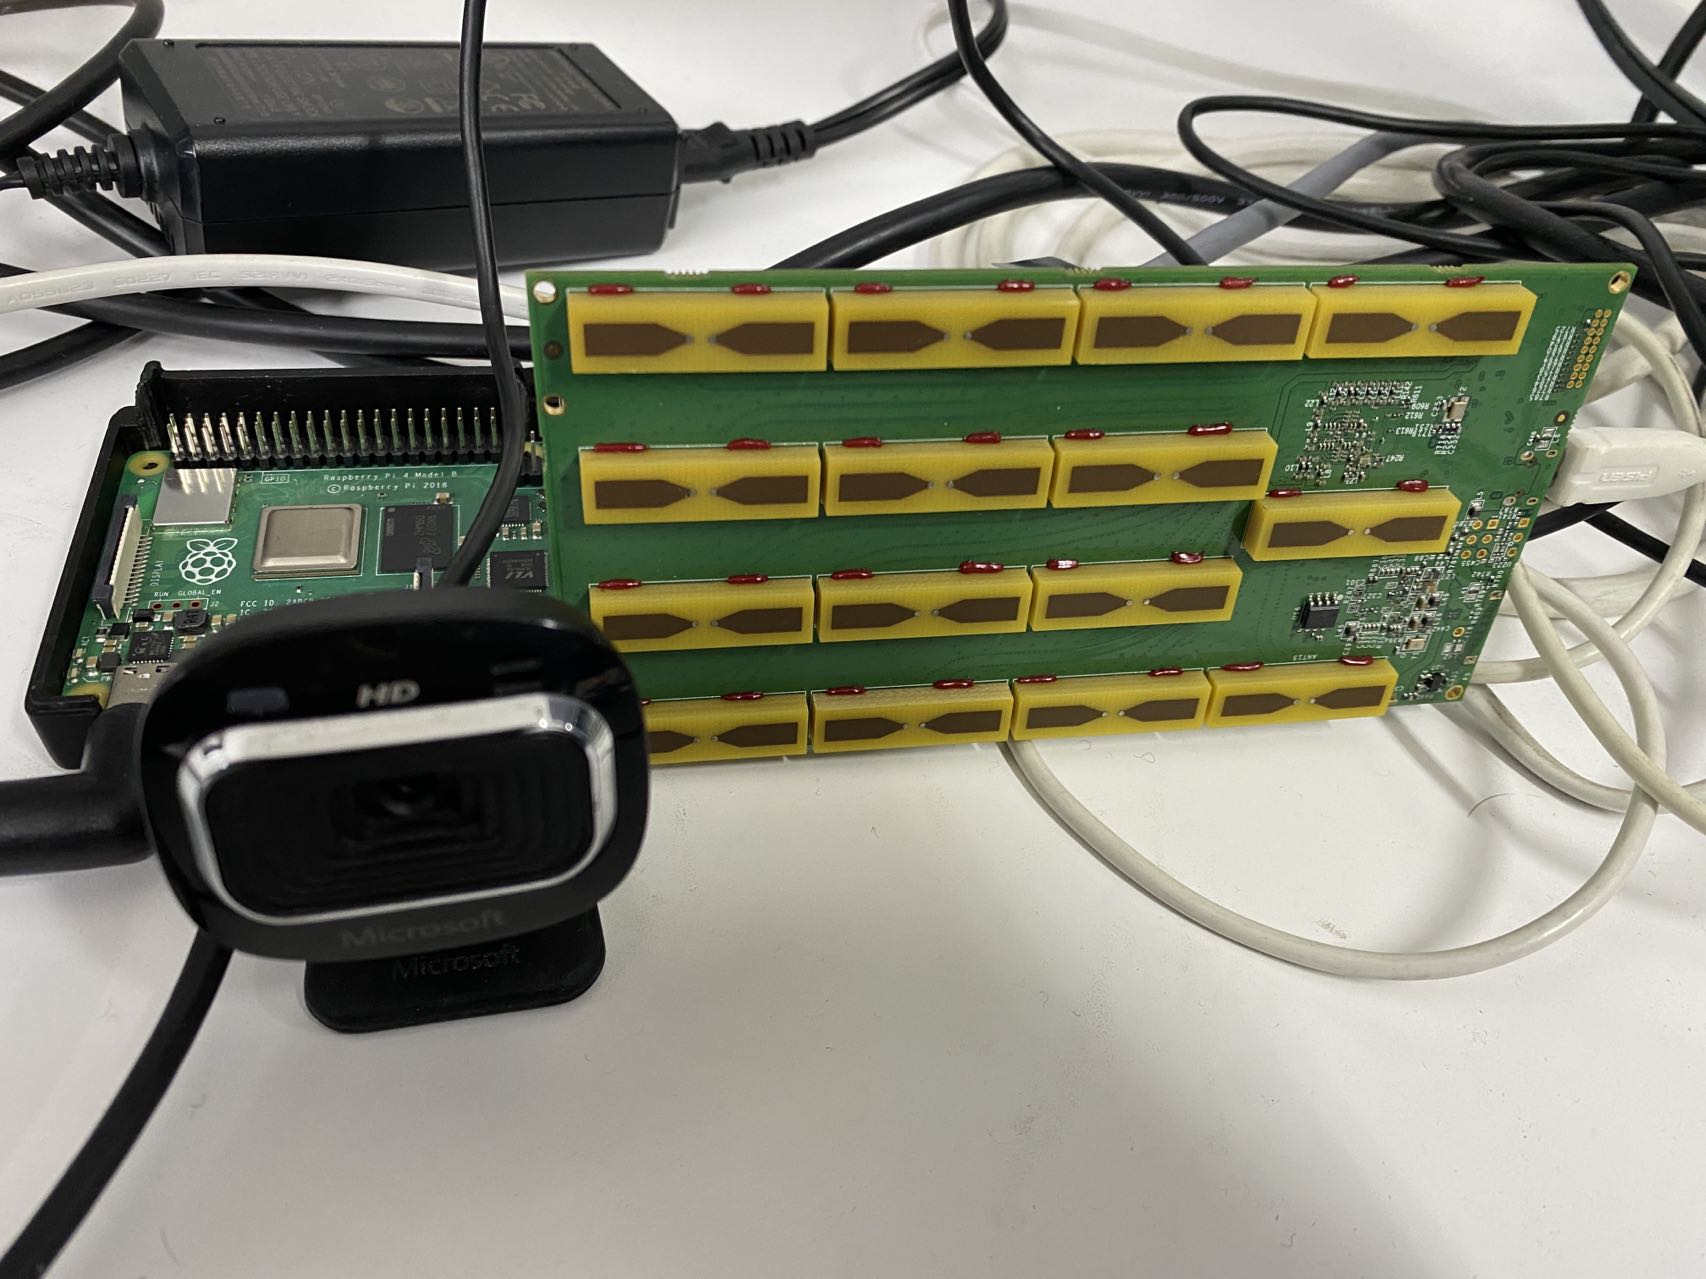
Project InstructionsStep 1: Connect the Walabot and USB camera to Raspberry Pi 4Time: 5 minutes
Parts: Walabot Creator, USB Camera, USB cable, Raspberry Pi 4 B
In this project, a Micro USB to USB Cable is used to connect the Walabot Creater and Raspberry Pi 4 B. Please note that the Walabot Creater only has one Micro USB port, which is used for both power supply and signal exchange. In order to provide enough power, please make sure that the USB cable is ideal for high current transmission. In this project, we use Microsoft LifeCam HD-3000 USB web camera. This true HD camera features 720p HD video chat for a true HD-quality experience and TrueColor technology that automatically delivers a bright and colorful video.
Step 2: Give more power to USB port on Raspberry PiTime: 10 minutes
Parts: Raspberry Pi 4 B
We know that Walabot Creator will cost more power to transmit wireless signal and analyze the received signal to get the location of the target. However, the default power supply of USB port on Raspberry Pi 4 B is not enough for Walabot Creator. So, we can find the file under “/boot/config.txt” and add the following line of code:
max_usb_current=1
Step 3: Create Azure Cloud Services on Azure PortalTime: 30 minutes
Parts: Azure Subscription
Microsoft Azure provides a variety of cloud computing services including artificial intelligence, machine learning, IoT, storage, security, networking, media, integration and so on. In this project, Azure Cognitive services, Azure IoT Hub and Azure Blob Storage are used.
Azure Computer Vision provide advanced algorithms that process images and return information based on the visual features you're interested in. Optical Character Recognition (OCR), Image Analysis and Spatial Analysis are three typical services that commonly used. Additionally, Azure Computer Vision provides capabilities to detect human faces within an image and give out rectangle coordinates for each detected face. The official docs “Quickstart: Create a Cognitive Services resource using the Azure portal” is a good start to create your own computer vision services. You will need the key and endpoint from the resource you create to connect your application to the Computer Vision service. The free pricing tier (F0) is enough for you to try the service.
We can create an IoT hub using the Azure Portal. Please refer to the “Create an IoT hub” section on this page: Connect Raspberry Pi to Azure IoT Hub. Then, in order to send the data to Azure IoT Hub, we should register a new device in the IoT hub. The “Register a new device in the IoT hub” section is available to help you with this. After the device is created, open the device from the list in the Devices pane. Copy the Primary Connection String. This connection string will be used by Python code to communicate with the hub.
Azure Blob storage is Microsoft's object storage solution for the cloud. Blob storage is optimized for storing massive amounts of unstructured data, for example, images, documents, video and audio files. We can create an Azure Storage Account using the Azure Portal. Please refer to the “Create a storage account” section on this page: Create a storage account. Then, in order to send the files to Azure Storage, we should get the connection string. The “View account access keys” section is available on this page Manage storage account access keys to help you with this. This connection string will be used by Python code to communicate with the Azure Storage.
Step 4: Install Azure Cloud Services SDK for Python on Raspberry PiTime: 10 minutes
Parts: Raspberry Pi 4 B
Power on your Raspberry Pi 4 B, open your Raspberry Pi terminal and run the following commands to install Azure Cloud Services SDK for Python.
pip3 install azure-cognitiveservices-vision-computervision
pip3 install azure-iot-device
pip3 install asyncio
pip3 install azure-storage-blobTime: 5 minutes
Parts: Raspberry Pi 4 B
Download the file “SensorApp.py” under folder “MonitoringWithWalabotAndAzure” (you can find here https://github.com/shijiong/MonitoringWithWalabotAndAzure), substitute the Computer Vision Key & endpoint, connection string for Azure Blob Storage, as well as Azure IoT Hub connection string with yours that you created in step 3. You can find the code from line 18 to 27 presented in Fig. 2 as follows.
Time: 10 minutes
Parts: Walabot Creator, USB Camera, USB cable, Raspberry Pi 4 B
Currently, there are several Python IDE on Raspberry Pi. Thonny Python IDE is bundled with the Raspbian OS. We can launch it by click Programming -> Thonny Python IDE. Then open the python source file “SensorApp.py” with Thonny.
Press Run or Debug button to start the process. We first initialize the Walabot, web camera and Open CV. In the loop, we will continuously monitor the target with Walabot and get the coordinate information. For each detected target, we will calculate its distance according to the X, Y and Z information. The raw information including the coordinates, the distance, the amplitude will be sent to Azure IoT Hub, which is shown in Fig. 3 as follows.
If the distance for any one of them is smaller than the threshold, we will capture the image by web camera and transmit the image to the Azure Computer Vision service to detect the faces in the image. The identified faces will be marked with rectangles by OpenCV. Furthermore, the gender and the age will also be noted above the identified faces. After that, the image will be shown on the local screen. Fig. 4 shows the sample image.
Finally, the image will be transmitted to Azure Blob Storage. We can use Azure Storage Explorer to check it. Choose the Blob Containers that you created. And then click Reflash. We will see the uploaded image file as soon as the Raspberry Pi send out. It is shown in Fig. 5.
In this project, we have presented how to achieve contactless monitoring with Walabot and Azure Cognitive Services. The Walabot device is leveraged to track the target in real time. Once the distance exceeds the threshold, we will send the captured image to Azure Computer Vision, mark the identified faces with rectangle according to the returned results, upload the marked image to Azure Blob Storage and send the number of the faces to Azure IoTHub for further use.


Comments
Please log in or sign up to comment.