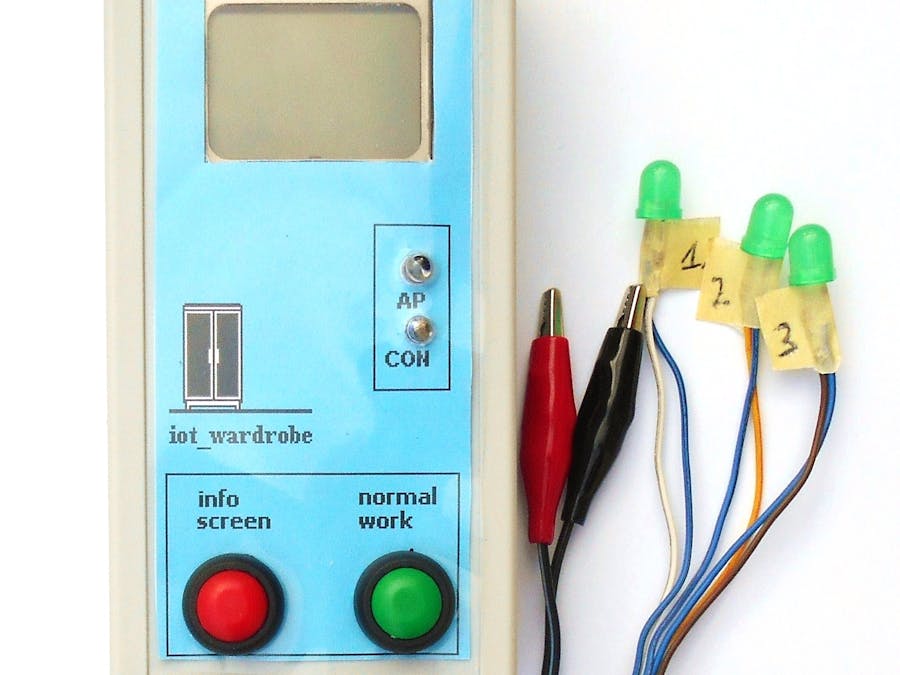
The primary function of the iot-wardrobe controller is to bring the user of clothing adapted to the weather conditions. In the present version of the driver were programmed three items of clothing: umbrella, scarf, sunglasses. Functionality can be extended with additional elements (jacket, hat, boots, etc.). Additionally the controller can be used as a weather station.
hardware
Device iot-wardrobe is based on cc3200 Launchpad module. Launchpad module is supply from external power supply ( voltage 3.3 V max current 500 mA ). Module LaunchPad is mounted in Z-52 box (dimension 73 mm / 146 mm / 40 mm). Additionally LCD driver was mounted (monochromatic, resoloution 48x84, driver pcd8544 ), two function push buttons ( red and green), two function diodes ( red and yellow) and three information diodes ( all green). Device iot-wardrobe is shown on picture 1.
Module CC3200 Launchpad controls work of the LCD display, push buttons and diodes. Electrical diagram of the peripheral circuits was shown in figure 1.
Construction you should start of milling in the box holes for the LCD, diodes and buttons. Next you should mounting LCD, diodes and buttons. Finally you should connected all peripherals with cc3200 lines ( microcontroller lines are extended on two Launchpad 2x20 connectors).
functionality
Iot-wardrobe driver can work in one of three modes:normal work, info screen, check access point.
Normal work mode (activation by pressing the green button) – in this mode controller connects to the Access Point. After that controller connects to the meteorological server openweathermap.org and sends a request for data from a weather forecast (service called: 5 day / 3h forecast). The server returns data in XML format (header and a weather forecast for five days with a resolution of every 3 hours). When an error occurs the yellow LED is activated. When data is read properly the controller work is continued. Microcontroller cc3200 analyzes read weather forecast data. From the header is read times of sunrise and sunset. Next is read weather forecast fot the next nine hours (3 times for 3 hours).Each 3-hour weather forecast is detailed analized. For every 3-hour weather forecast on the LCD screen are presented two screens with weather data (weather phenomena, wind power, temperature, pressure, humidity, precipitation, cloud cover). Next wardrobe selection alghoritm is activated. If the defined conditions are met (umbrella - rain, scarf - the temperature below 5 ° C, sunglasses - cloudiness below 10%) for the 60 seconds informational green LED is on. Enabled LED informs the user with the wardrobe item he should choose (eg .: diode near umbrella means rainfall you should take an umbrella).
Info screen mode (activation by pressing the red button) – in this mode device working similar like in normal work mode. Except that the device dont connect to Acccess Point and dont read data from weather forecast server. Device use data read in normal work. Data presentation and wardrobe selection alghoritm are the same like in normal work mode.
Check access point mode ( activation after microcontroller start ) - in this mode connection to the Access Point is checked. If cc3200 can’t connect with Access Point information LED is activated ( red diode AP ).
Device work is shown on picture 2. In normal work and info screen modes weather forecast data screens are show three times ( weather forecast for 9 hours – 3 times for 3 hours).
software
Project was made in CCSv6. Software was written in C language. In project iot-wardrobe freeRTOS framework SimpleLink and drivers for cc3200 are used. In thread system (file system.c ) the most interesting is procedure SystemNormalWorkTask (normal work mode implementation ).
At the begin Weather Forecast screen is displayed. Next connection with the Access Point is executed (procedure Connect2AccessPoint ). When an error occurs the yellow LED is activated.
When connection with the Access Point is done device is reading IP address from weather forecast server ( procedure Network_IF_GetHost_IP ). In this case DNS lookup method is used. When an error occurs the yellow LED is activated. Next device making TCP connection with weather forecast server ( procedure CreateConnection ). In procedure TCP socket is created and next connection with weather forecast is maked. When an error occurs the yellow LED is activated. Next cc3200 reading weather forecast from server openweathermap.org ( procedure WeatherForecastGet). In this case HTTP POST method is used. When wether forecast was readed data parsing procedure is executed ( procedure WeatherForecastParse ). Both procedures WeatherForecastGet and WeatherForecastParse are available in weather.c file. When weather forecast was read cc3200 microcontroller disconnect with meteo serwer ( TCP socked is closed ) and closed connection with Access Point ( procedure Network_IF_DeInitDriver ). At the end wardrobe selection procedure is executed ( procedure WardrobeWork ). Source code of SystemNormalWorkTask procedure is available in wardrobe.c file.
start
Iot-wardrobe source code is available on github. You should download code and configure device parameters. In configure.h file you should set Access Point SSID name, password and you should define transmission coding algorithm. Additionally you should set location of iot-wardrobe driver ( city name or GPS coordinates). Weather forecast is read for place defined in location parameter. In default city name is used but if you want change location method to GPS coordinates you should change project settings. In tab Predefined Symbols fom Undefine NAME you should delate LOCATION_GPS value and in Pre-define NAME you should add LOCATION_GPS value.
After all changes you should rebuild project (Project -> Build All). Binary file iot_wardrobe.bin will be created. Using CCS UniFlash application you should program S-FLASH memory.
Finally you should mount driver in wardrobe. You should mount information diodes and connect it with wardrobe ( 1- umbrella, 2 – scarf , 3 - sunglasses ). After power supply connection iot-wardrobe device is ready to work. Example of implementation is shown on picture 3.
Łukasz Krysiewicz, Poland


Comments
Please log in or sign up to comment.