


Hardware components | ||||||
 |
| × | 1 | |||
 |
| × | 1 | |||
| × | 1 | ||||
| × | 1 | ||||
| × | 1 | ||||
 |
| × | 1 | |||
 |
| × | 1 | |||
 |
| × | 1 | |||
 |
| × | 2 | |||
| × | 2 | ||||
Hand tools and fabrication machines | ||||||
 |
| |||||
'A cigar is as good as the memories you had when you smoked it.'
I can agree on that, but a sharp and bitter cigar will probably make it a lot less enjoyable. That's why I wanted to build myself a Humidor. Storing a cigar at the right temperature and humidity is very important. Especially for long filler cigars like Cubans.
In the Netherlands it's much more common to smoke short filler cigars. Most of them are produced here in the Netherlands. They don't have to be stored in a humidor but it is recommended.
Why post this Humidor-building project in the Arduino community? Because the humidor's humidity will be automatically controlled by an Arduino. Calling it 'the Humiduino.'
For the optimal storage of cigars you would want a box with a so called 'Caribbean' climate inside; warm and very humid. Translated in numbers that would be 21 degrees Celcius (70F) and 70% relative humidity. That climate has to be maintained to ensure the optimal storage of cigars. No matter what the outside climate is.
Most humidors you can buy are equipped with 2 essential parts. A humidifier and a hygrometer. Both used to maintain the right humidity. They don't bother to cool or heat the humidor to the right temperature because it's assumed that the humidor is going to be placed inside your house where central heating or cooling will maintain the temperature.
The hygrometer is used to monitor the humidity. The humidifier is used to add moisture to the air. The moisture is manually added by adding a little water to the humidifier. IMPORTANT: It has to be distilled water! Tap water might contain minerals and bacteria that might influence the humidor, or worse, your cigars.
1.1 In-Depth: Maintaining humidity levelsWhen is just finished my humidor the climate in the Netherlands was quite extreme. A long and dry heatwave caused my living room to be at a temperature of 30 degrees Celsius around 14:00. Relative humidity was around 93% at night and 60% during the day. I was unable to maintain the perfect climate in the humidor and it made me think that my hand made humidor wasn't any good. But being new to the whole humidor thing turned out to be the main reason.
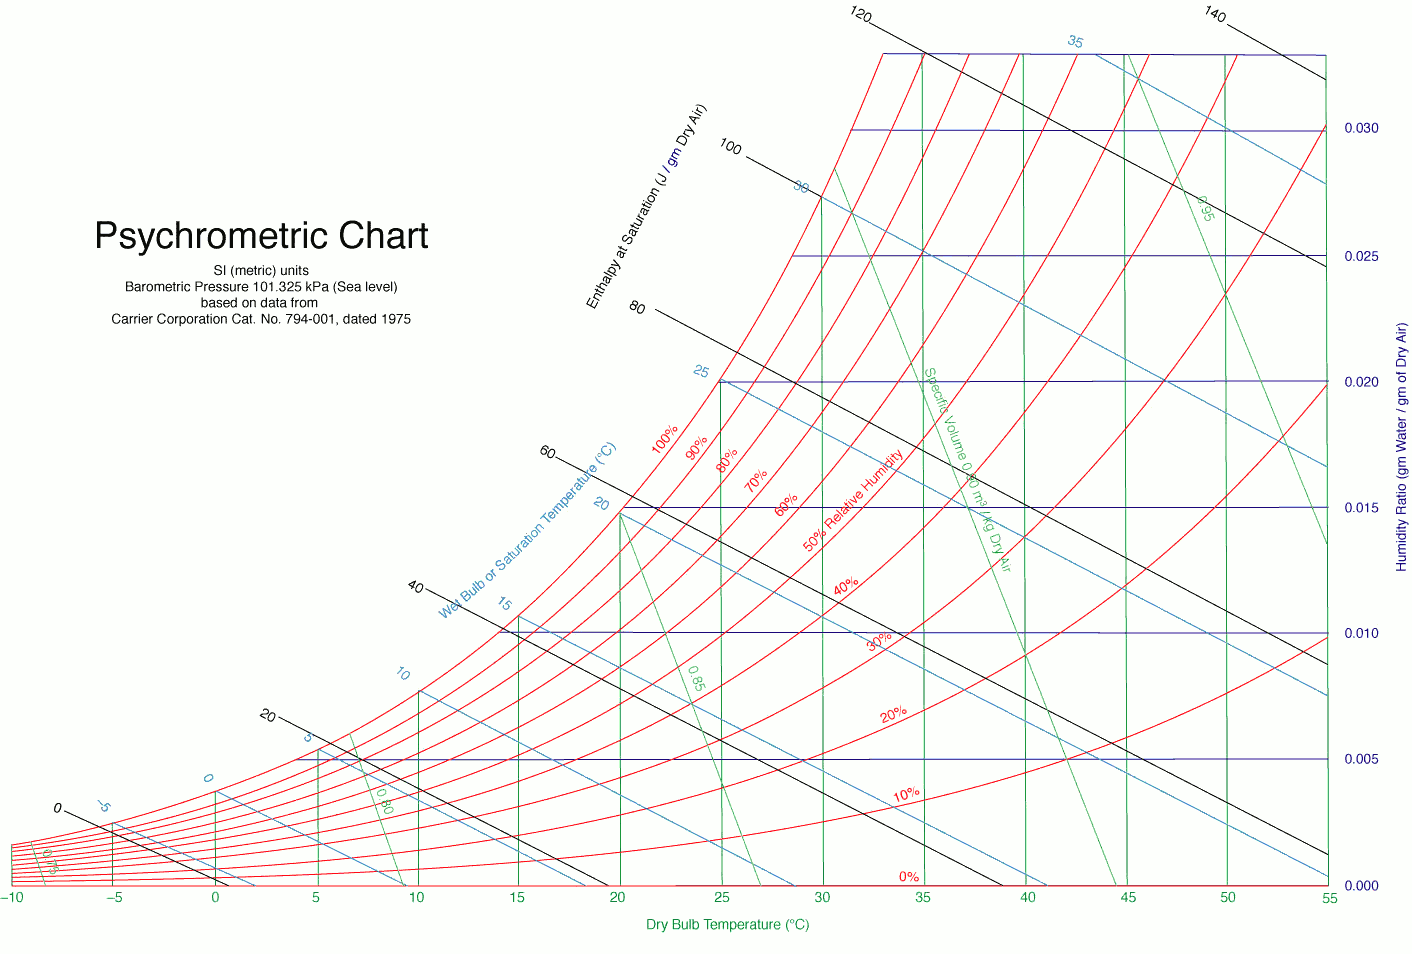
Assuming that the humidity levels would be easier to maintain because the warm temperature was partly true. Warm temperatures make it much easier for moisture to evaporate into the air. Though warmer air also means that the same volume of air can contain much more moisture. The humidity in the humidor was around 64% and my humidifier was using a lot of moisture. I wanted to reach the 70% so kept adding moisture. Until I found out. The rule of 70/70 does still apply but has to be adapted if the temperature is higher. There is simple chart for that:
So, seeing this chart, it turns out that at the extreme temperatures in the Netherlands it would be impossible to maintain a perfect climate. (Temperature of 75F and a humidity of 70%) The only way was to lower the temperature in the humidor or to add a enormous amount of moisture to the humidor.
A simple calculation will show you the amount of moisture in the air at 26 degrees Celsius and a humidity of 65%. The chart reads 0.013g of water per gram of air. Doing the same with 21 degrees Celsius and a humidity of 70% reads 0.011g of water per gram of air. So my humidor was way to humid.
To prevent the automated system from making the same 'mistake' as I did I have to implement a new set of instruction. The humidity inside the humidor does not have to be 70% at all times but should be lower or higher depending on the temperature. Not the 70/70 rule but a new 11g/1kg rule.
There are some pictures above of the building of my own humidor. And because i'm posting this in the Arduino community I won't share the details of the building here. For those interested I will make the building plans available under the CAD drawings. If you would like the instructions you can use these. Or request a more detailed one by sending me a message.
This is of course a community with electronics enthusiasts but there might be more people like me that want to give woodworking a try. I've listed some reasons for you to decide if you should try building one yourself.
First of all I learned that humidors can be quite expensive. The prices vary from 35 euros to multiple thousands. Based on the fact that I wanted to include all the electronics and a water reservoir in the humidor itself I figured that I would need quite a large one. The humidor had to be around 30*40 centimeters. And then they became too expensive for me as a student at around 500 euros. You might find a cheaper one on the internet but I had other reasons not to buy a machine made humidor.
Secondly I didn't like the finish used on most humidors. They where to glossy and had a unnatural feeling.
Thirdly there was chance that adding the electronics to a existing humidor might restrain the possibilities in my design. Constructing both the humidor and electronics myself made much more sense.
The final reason is that I made this project as an study assignment so it was a nice addition to construct the humidor myself.
Because it was a study related project I had access to a workshop with all the needed equipment. It is impossible to make the humidor by hand. Figure out if you can get access to the two following machines; a saw table or saw bench, a benchtop cut-off saw. I would say they are essential.
3. ElectronicsSo I started of using a normal Arduino Uno which I used to make the prototype. But using a normal Arduino made it quite hard to fit all the components in. Every time when a small adjustment needed to be made I had to take out all the components and fit them back in. Cables snapped of and I kept repairing things. Finally it was all working and then I found out that my 5V USB power supply wasn't sufficient to power both the Arduino and the motor. I decided to re-design the whole thing. Make it smaller, easier to connect all parts and use a new power supply.
First of all, power supply. Using a 9V 1A power supply to power both the Arduino and the pump. I first tried to use USB to power both but that didn't work. In theory, as far as I now, it should work. But this happened. If you have any idea why it doesn't work I would really like to hear it.
After switching to a 9V power supply some changes had to be made. The Arduino can work with with a input voltage of 9V. The pump however can work with a maximum of 6V. I added a 7805 voltage regulator with two 10 uF capacitors on both the input and output, just to be sure. That is going to be the power supply for the pump.
There is also a simple voltage divider for the pump motor. I want a small amount of water to be pumped. Providing it with the full 5V will make it harder to control the amount of water pumped. I added 2 1W resistors to make the voltage divider. The internal resistance of the motor is calculated to be 24 Ohm. I put 2 parallel resistors with a total resistance of 18 Ohm. The motor will get around 3V and the resistors around 2V. It is a waste of energy, for the resistors will dissipate the power into heat, but the pump will not be turned on a lot. Never longer then 180ms and I expect it to turn on once a day at the very most. I'm waiting for log results to come in before I can give a better estimation.
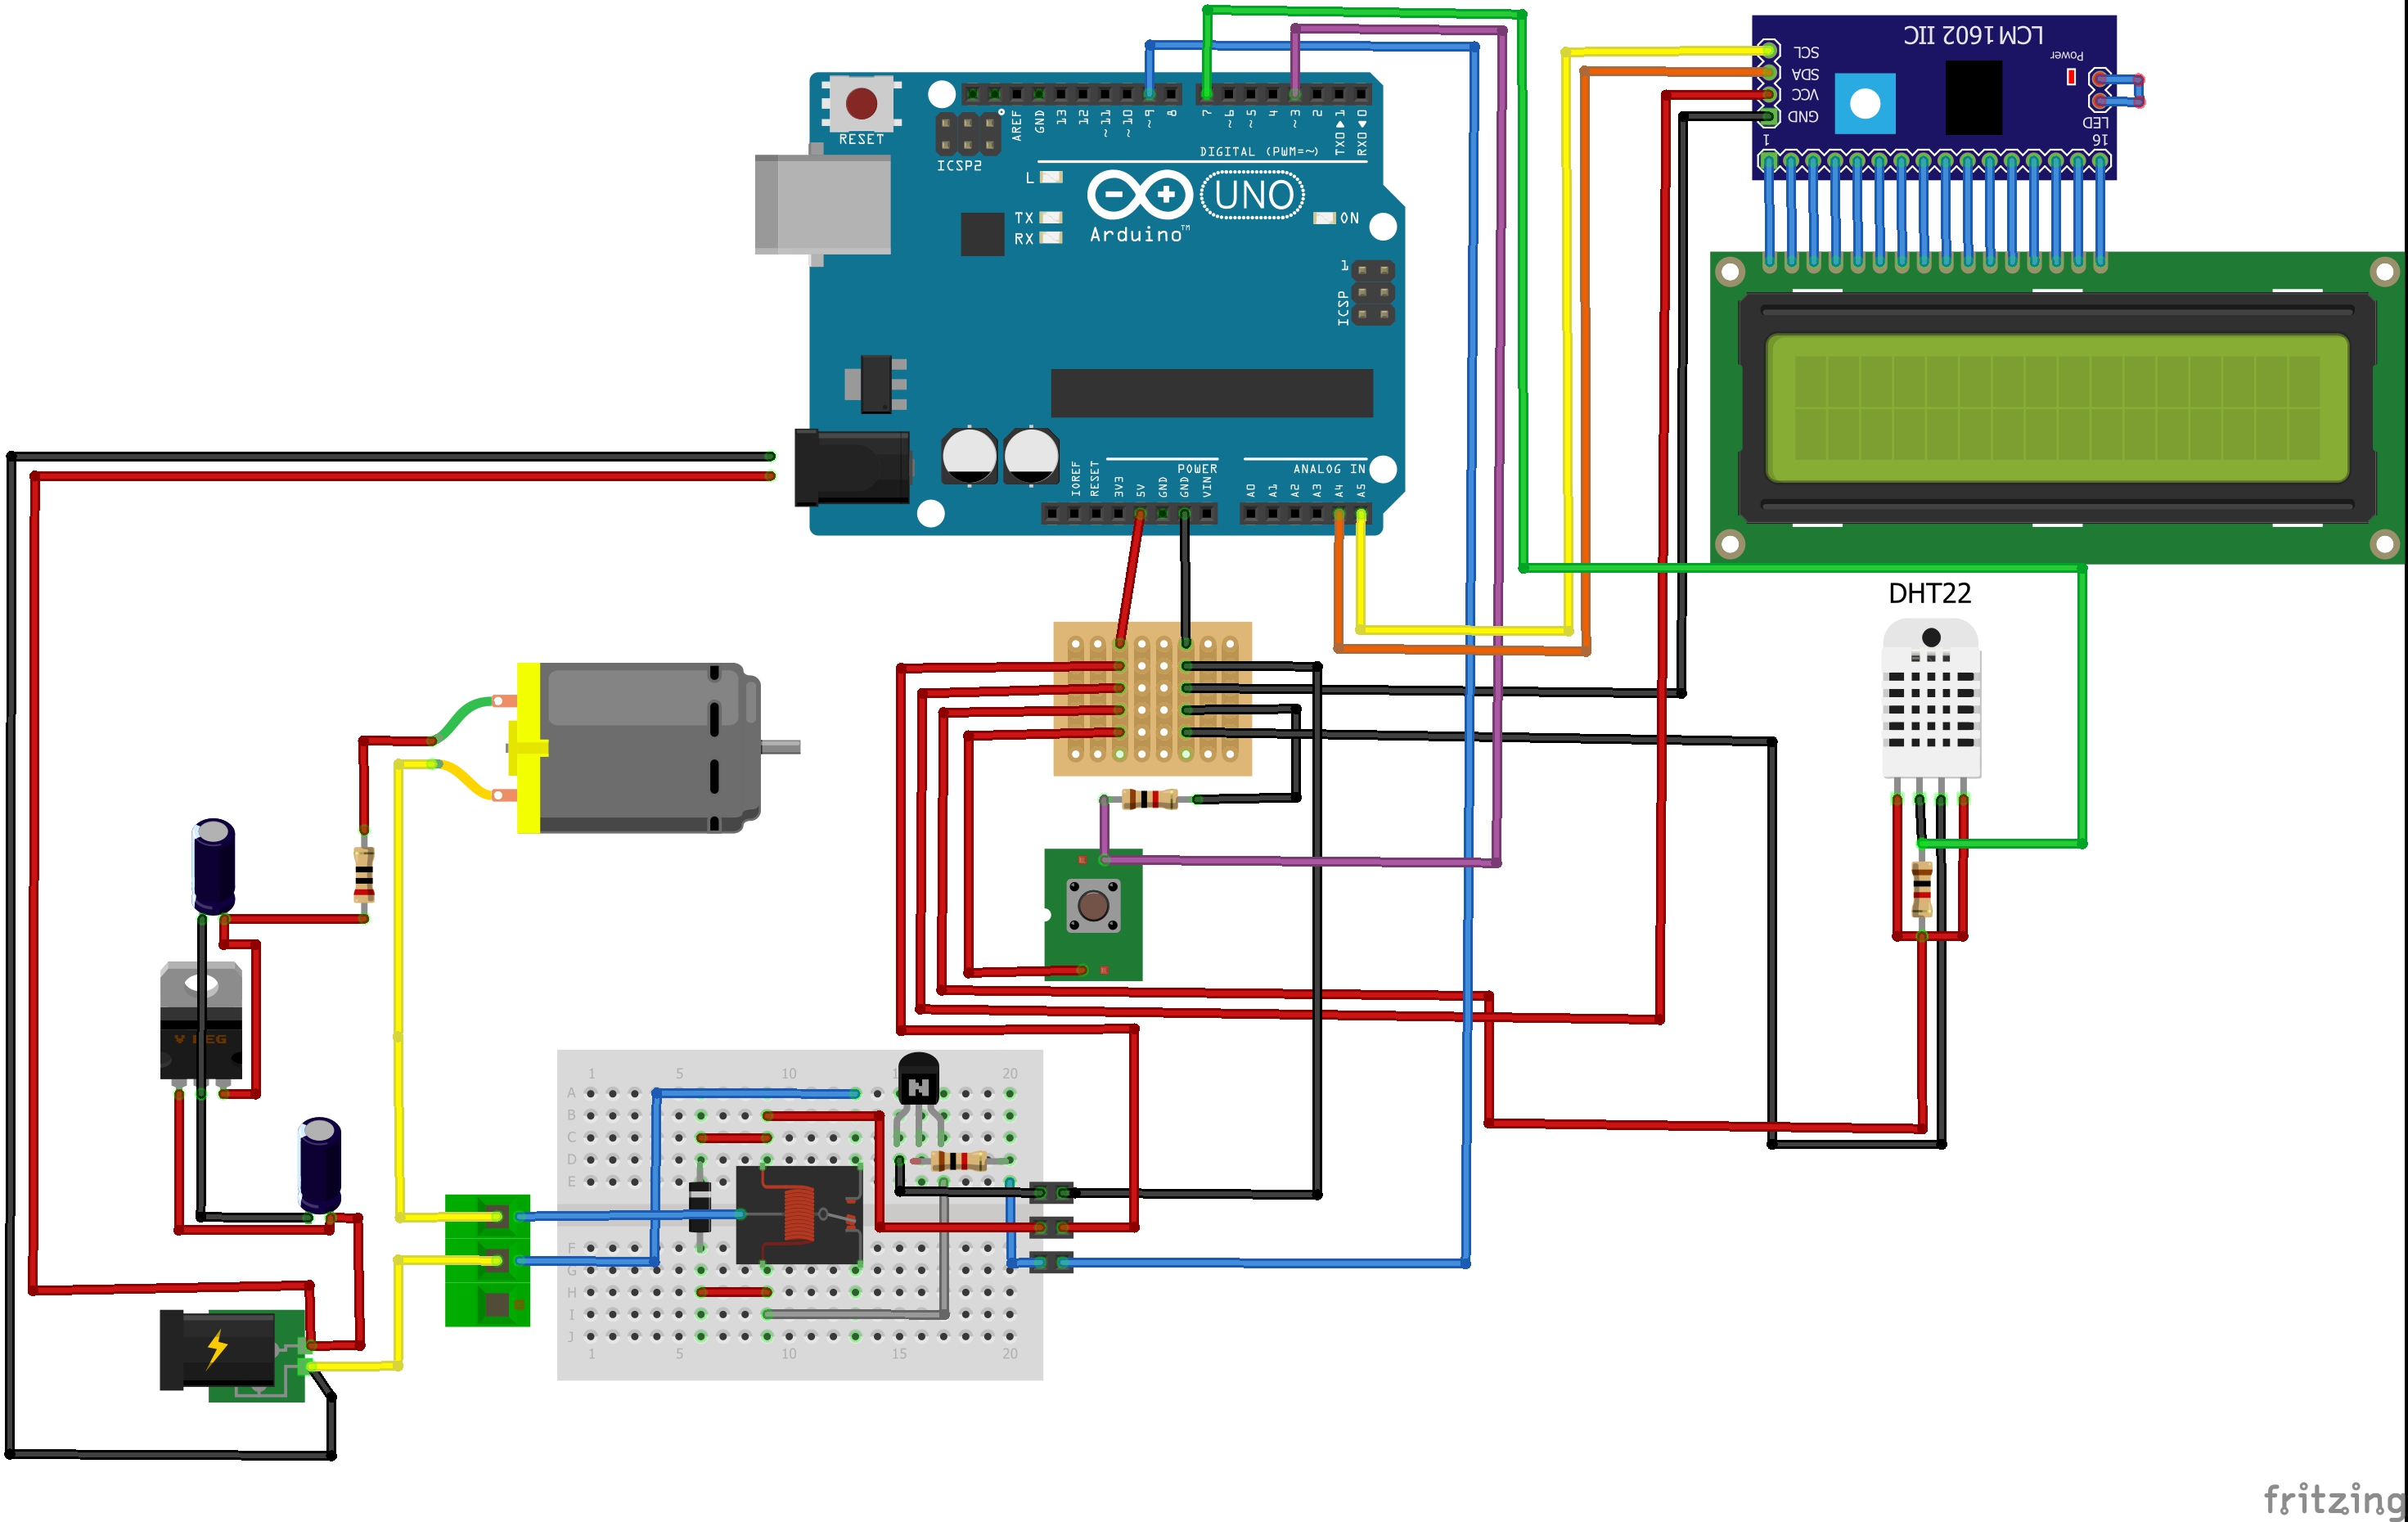
I decided to solder a Arduino Nano into the pcb board. This way I could still plug in jumper cables on the top and also solder cables from the bottom pins. Don't look at the wiring, I know it isn't very nice.
In the picture above you find a overview of all electrical components.
- 1. The SD card used for logging the sensor data. It is connected to 9. Optional.
- 2. The button used to turn on the LCD screen for 5 seconds. Connected to 6.
- 3. LCD pins, connected to 6.
- 4. The relay, connected to the motor and the output from the 7805 mentioned above.
- 5. Power in, 9v, connecting to number 8.
- 6. Pins in, number 3 and 2 connected to these pins.
- 7. Connected to the DHT22 which is not visible on this picture.
- 8. Pins for the power supply.
- 9. The SD card is connected to these pins. The SD card is optional but useful if you want to log data and make some improvements.
#include "DHT.h"
#include "Wire.h"
#include "LiquidCrystal_I2C.h"
Libraries used: You can download the first an last from the project files. The second can be included and is already on your computer.
#define DHTPIN 7
#define DHTTYPE DHT22
Define what pin your DHT is on an what type of DHT you are using.
const int buttonPin = 3;
const int pMotor = 9;
int buttonState = 0;
int timeT = 0;
int countPump = 0;
float hum;
float temp;
float htCalcA;
float htCalcB;
float htCalcC;
float htCalcD;
float htCalcE;
DHT dht(DHTPIN, DHTTYPE);
LiquidCrystal_I2C lcd(0x3F, 2, 1, 0, 4, 5, 6, 7, 3, POSITIVE);
void setup()
{
}
My LCD is on address 0x3F. You can find your LCD address using this tool.
void loop()
{
The calculations are based on the formulas that are also used for the psychrometric chart. If you have a way to do it all at once please let me know. The values should correspond with the excel table I put in the explanation of humidity.
if (htCalcE < 10.70 && countPump >=47)
   {
     digitalWrite(pMotor, HIGH);
     delay(180);
     digitalWrite(pMotor, LOW);
     countPump = 0;
   }
So htCalcE should be around 10.85. If it's too low water must be added to the humidifier. But not too often, water evaporates slowly and we must make sure the humidifier doesn't overflow. Therefore a count is added: countPump. If the count reaches 48 and the humidity is below 10.70 the pump will turn of for 1 second. You may want to change the count (now 48, meaning it will take four hours, will explain this later) and he amount of water that is pumped.
 else if (htCalcE > 11.05)
   {
     digitalWrite(pMotor, LOW);
     countPump = 0;
   }
If the humidity is above 11.05 the count is set to 0 again. Meaning it will take at least four hours again before the pump can add water. That's no problem since the humidity is too high.
 else
   {
     digitalWrite(pMotor, LOW);
     countPump ++;
   }
If the humidity is between 10.70 and 11.05 the count will go up.
while(timeT < 1200)
   {
   // start while loop
   buttonState = digitalRead(buttonPin);
   if (buttonState == HIGH)
     {
     temp = dht.readTemperature();
     hum = dht.readHumidity();
     lcd.backlight();
     lcd.clear();
     lcd.setCursor(2, 0);
     lcd.print("Humi= ");
     lcd.print(hum);
     lcd.print("%");
     lcd.setCursor(2, 1);
     lcd.print("Temp= ");
     lcd.print(temp);
     lcd.print("C");
     delay(5000);
     lcd.clear();
     lcd.noBacklight();
     timeT +20;
     }
   else
     {
     timeT ++;
     }
   delay(250);
This is the while loop that constantly checks if the button is pressed. If it is is will turn of the LCD for 5 seconds and will show the temperature and humidity. After 300 seconds the while loop is done and the whole loop start again. Earlier is was telling you that the pump can only add water once in four hours. This is why; The countPump has to be 48 and every while loop takes 5 minutes.48*5= 240 minutes or 4 hours.
A lot of values to change to make sure the humidor will maintain the perfect climate. My advice is to manually add water the first couple of weeks. In the meantime I suggest logging a lot of info to a SD card to analyse the behavior of the code. If you are sure a the values are right you can fill your reservoir with distilled water and let the Arduino do the rest.


Comments
Please log in or sign up to comment.