I have been wanting to do a project with an Etch A Sketch for some time. There are plenty of cool projects out there, from a self shaking clock to drawing raster images. But, nothing interested me. Then I saw a drawing machine.
Mechanical drawing machines have been around for a while. Early versions included the Marvelous Wondergraph, Hoot Nanny, and the popular Spirograph. Newer versions from Joe Freedman include the Hypnograph, Cycloid Drawing Machine, and the brand new Cycloid Pro (which is on my xmas list, hint, hint). KrazyDad created a Processing version of this lovely device here. I thought the Etch A Sketch would be a good platform for a drawing machine.
DISCLAIMER:- There is no warranty expressed / implied with this free software.
- Do not leave this plugged in or unattended. Stepper motors can get very hot if not setup properly and may start a fire.
- It is not my responsibility if it makes ugly pictures, burns down your house, becomes sentient and starts World War 3, etc.
- Do not use this program for commercial / resale use.
BUILD:You don't have to use my method of mounting the stepper motors. You can use your own idea or one from the internet. The program has settings so you can make it work.
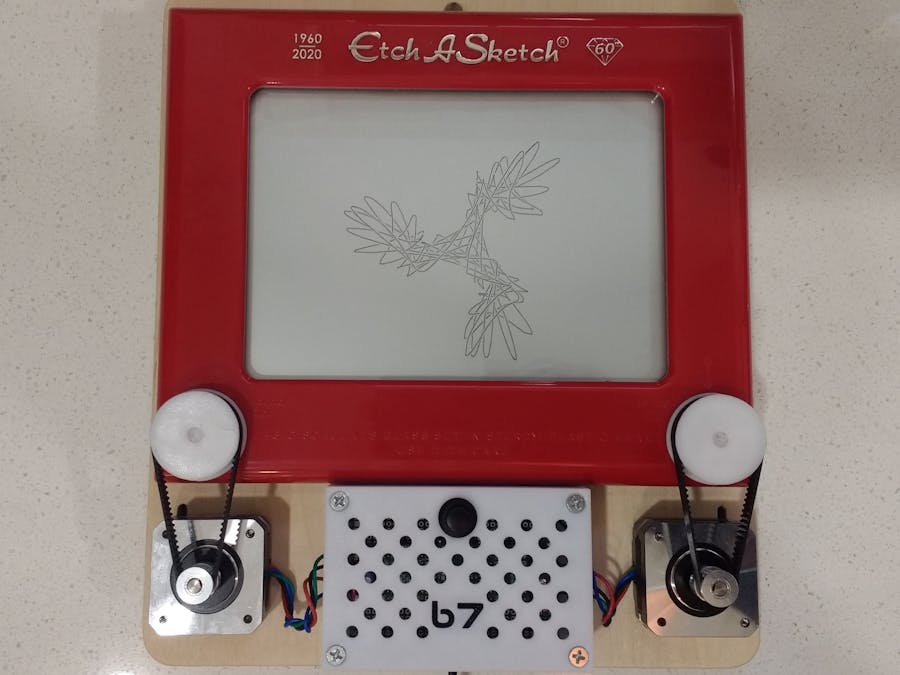
To start, make a board to mount everything. I used 1/2" baltic birch plywood. Slot the stepper motor holes to apply tension to the belts (only use 2). Add pockets to the back of the slots so the screw heads/washers sit underneath the surface. Use epoxy to attach the Etch A Sketch to the board.
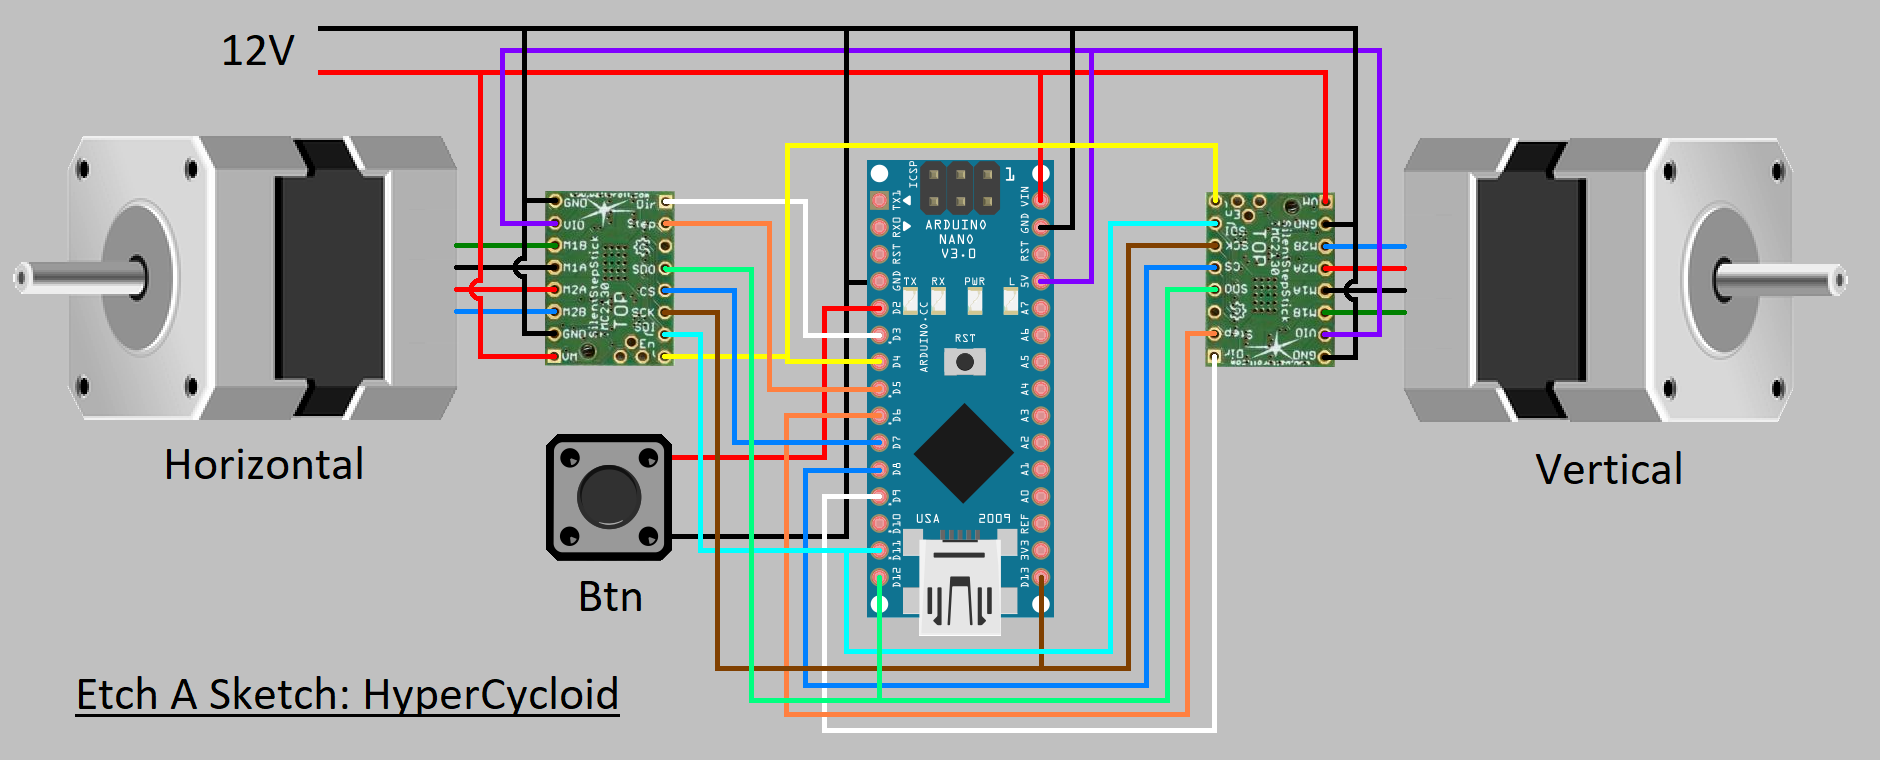
3D print the box, lid, and large pulleys. The existing knobs on the Etch A Sketch are easy to pop off and replace. Wire everything up based on the schematic. Use headers on the Nano so the holes line up on the box.
SOFTWARE:The program emulates a simplified drawing machine. Here is how it works:
- Manually move the cursor to the top left corner of the screen. On the first power up, leave it in the center so you can get the motor directions correct.
- Press the button to create a seed for the random numbers.
- Two gears are created at random locations. The gears can be a fixed location, gear with a crank arm, or a gear with a planetary gear.
- A rod connects the two gears. The first gear has a pivot connection to the rod. The second gear has a slide connection.
- A pen is created at a random location. It is connected to the pivot end of the rod.
- The program will go thru several iterations (without drawing) to calculate a scale factor to fill the screen.
- A line is drawn from the top left corner to the pen position. Once it stops, you have X seconds to turn the Etch A Sketch upside down and shake.
- The program will now go thru the main drawing loop:
- 1) Rotate everything a small angle around the center. Unlike the drawing machines, the turntable stays still and the gears rotate around. This includes rotating the gears around their center based on the teeth ratio.
- 2) Calculate new rod position.
- 3) Calculate new pen position.
- 4) Draw a line to the new pen position.
NOTES:- I have used Trinamic TMC2130 drivers for the stepper motors. You should be able to use other drivers (ex: A4988), but I have not tested them. You should also be able to use different stepper motors.
- Unfortunately, there is a lot of backlash/slipping in the Etch A Sketch mechanism. And it is very inconsistent. I have added backlash compensation to the code, but it can only do so much. I keep telling myself that this is just a toy, but I want it to be perfect. On the positive side, the slop can sometimes make a simple repeating pattern more interesting.
- You will get a lot of "fugly" drawings. I believe the trick to getting the best drawings is having the right combination of gears. The program randomly picks the gear teeth from arrays. I'm sure there is room for improvement. Try your own numbers or use prime numbers.
- Think of the gears as being belt driven. The planet gear doesn't rotate thru its sun gear. It is directly connected to the turn table.
- The serial monitor will show all of the setup info used to make the drawing.
- The serial monitor will also print the X/Y coordinates of the pen. I included a simple/dirty Processing sketch that will plot them in real time on your PC screen. This is a good way to make sure the Etch A Sketch is working OK. It can also be fun just to test new teeth combinations without waiting on the Etch A Sketch (they are prettier too). Comment out the "drawLine" calls to make it work faster. Make sure the Arduino IDE is closed.
- The end of the code has a subroutine where you can input your own values and skip creating random ones. This is useful to save settings that you like.
- If you build this project, please post your best drawing in the comments. This is your payment for the project.


Comments
Please log in or sign up to comment.