One day I woke up. I thought, why can't my windows be opened from my pc?! Why I have to get up from bed to get a bit of light?
- Then the ispiration arrived.
- 7.30 AM.
- The alarm goes off.
- You stop it. Then open your pc, one click and there is it.
- You can open your windows, turn on and off your lights, control every electronic device you want!
That's just some basic that you can apply wherever you want... hope you have fun trying it! Ok, so here's what you have to do. First, the uploading of the code to the ESP8266.
Use a FTDI Board like this:
Be sure that it is 3.3V output!
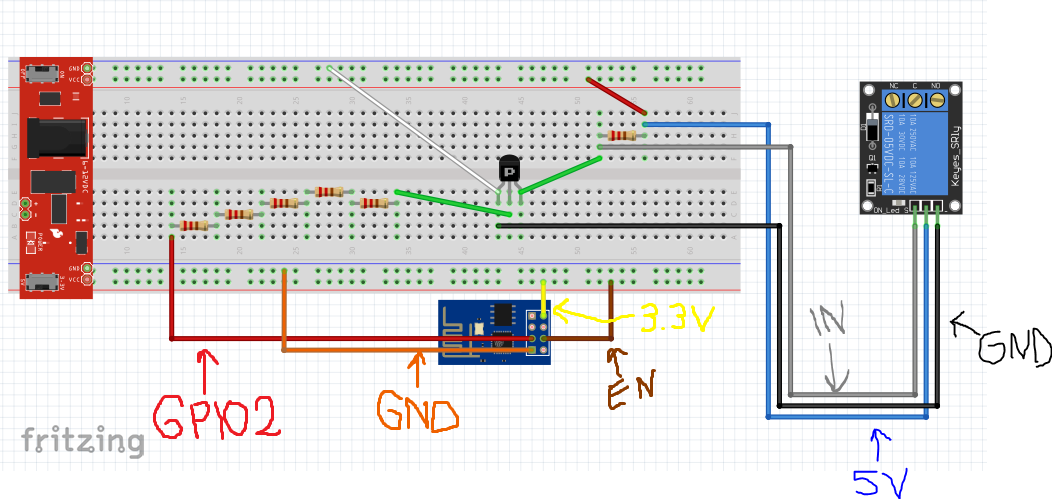
The ESP01 can't stand more than 3.3V, so with 5V you will damage (permanently) it. Follow the schematics you can find down and upload the code for the ESP8266.
You can also find this project on PCBWay.com at this link!
First step: upload a code to the ESP8266;If you wired it correctly, the upload should go smoothly. Just check "Generic ESP8266 Module" in "Board", and the correct COM port. Be sure to have the library "ESP8266WiFi" before compiling and uploading the code.
If any error occurs, just try connecting the "RST" pin on the ESP to the GND for a second. The re-connect the GPIO0 while uploading the code, and it should go. Just comment if you have any other problems.
Second step: Configuring the EasyIoT Web Interface.So, that's it. Follow these steps correctly and you shouldn't encounter any problem.
At this point, you should have all your breadboard schematics set up and plugged in. Both the ESP01 and the Relay should be on. Then you can continue;
- Click here to download the EasyIoT server. Then run it as administrator, a DOS window should open.
- To access the EasyIoT Web Interface you need to put your IP Address (that you can find in cmd with the "ipconfig" command) in your browser.
Paste or write it in the URL tab and press Enter.
- An Interface should appear, and you will be asked Username and Password.
They are "admin" and "test" by default, but you can change later if you want. For now, just focus on the following indications.
- Now we need to add a new module in Web Interface.
Go to "Configure" -> "Drivers" -> "Virtual Driver" and press the button "AddNode". Enable Virtual Driver and press button "Add Node". An address should appear, something like "N21S0" or similiar. Write it somewhere because we'll need it later.
Press "Close", go back to "Group and Modules" and select "Virtual". Now press "More" and then "Add module". Select the module we added before (you'll recognize it by the address, that is the one you wrote somewhere.
Press "Add" and name it as you like. WHATEVER YOU LIKE.
Change module type from "Generic" to "Digital Output (DO)" and press "Update module"; If you did everything correctly, you should see your module on the front page in the "Virtual" group.
- Now it's time to add an Automation Program to the Web Interface.
Click on "More" and "Add new program". Name it, again, AS YOU LIKE. Leave "Cron job" empty. Now press "Edit program" to upload the code to your program, which should be disabled. You should see something like this:
/*
This code is running one time when the program is enabled.
*/
public void setup()
{
}
/*
This code is running periodically when program is enabled.
Cron job determine is running period
*/
public void loop()
{
}
Now paste the code i already uploaded, with the name "Code for the EasyIoT Web Interface". Enable the program and go in EasyIoT Web Interface front page. When you press "ON" and "OFF" in your Web Interface it should turn on and off your Relay.
Sponsor Link: Utsource.net
Reviews: It is a trustworthy website for ordering electronic components to complete projects!
Let me know if it works and if there any problems!


_3u05Tpwasz.png?auto=compress%2Cformat&w=40&h=40&fit=fillmax&bg=fff&dpr=2)

Comments
Please log in or sign up to comment.