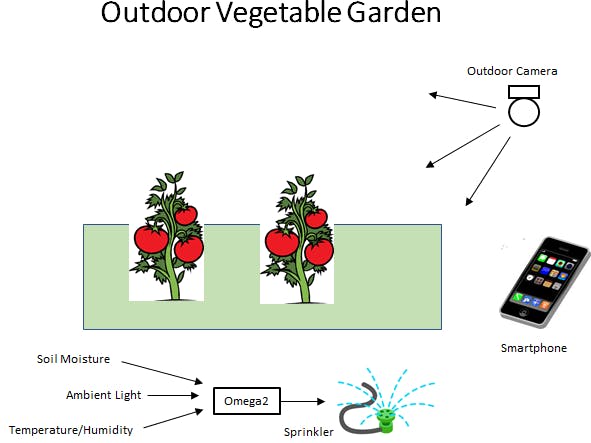
We have a raised garden bed that needs to watered when we go on extended trips. In Oregon the weather is fairly unpredictable so regular scheduled watering is not effective. The intent of this project is to implement a smart control system that uses multiple sensors to determine when to water and also uses a camera to allow remote monitoring to verify conditions.
The Omega2 used in conjunction with IBM Watson IOT platform creates a very capable WiFi system to monitor sensors and provide sprinkler control, alerts, and snapshots. The Arduino Dock is added to provide analog input capability.
Project OverviewSprinkler System
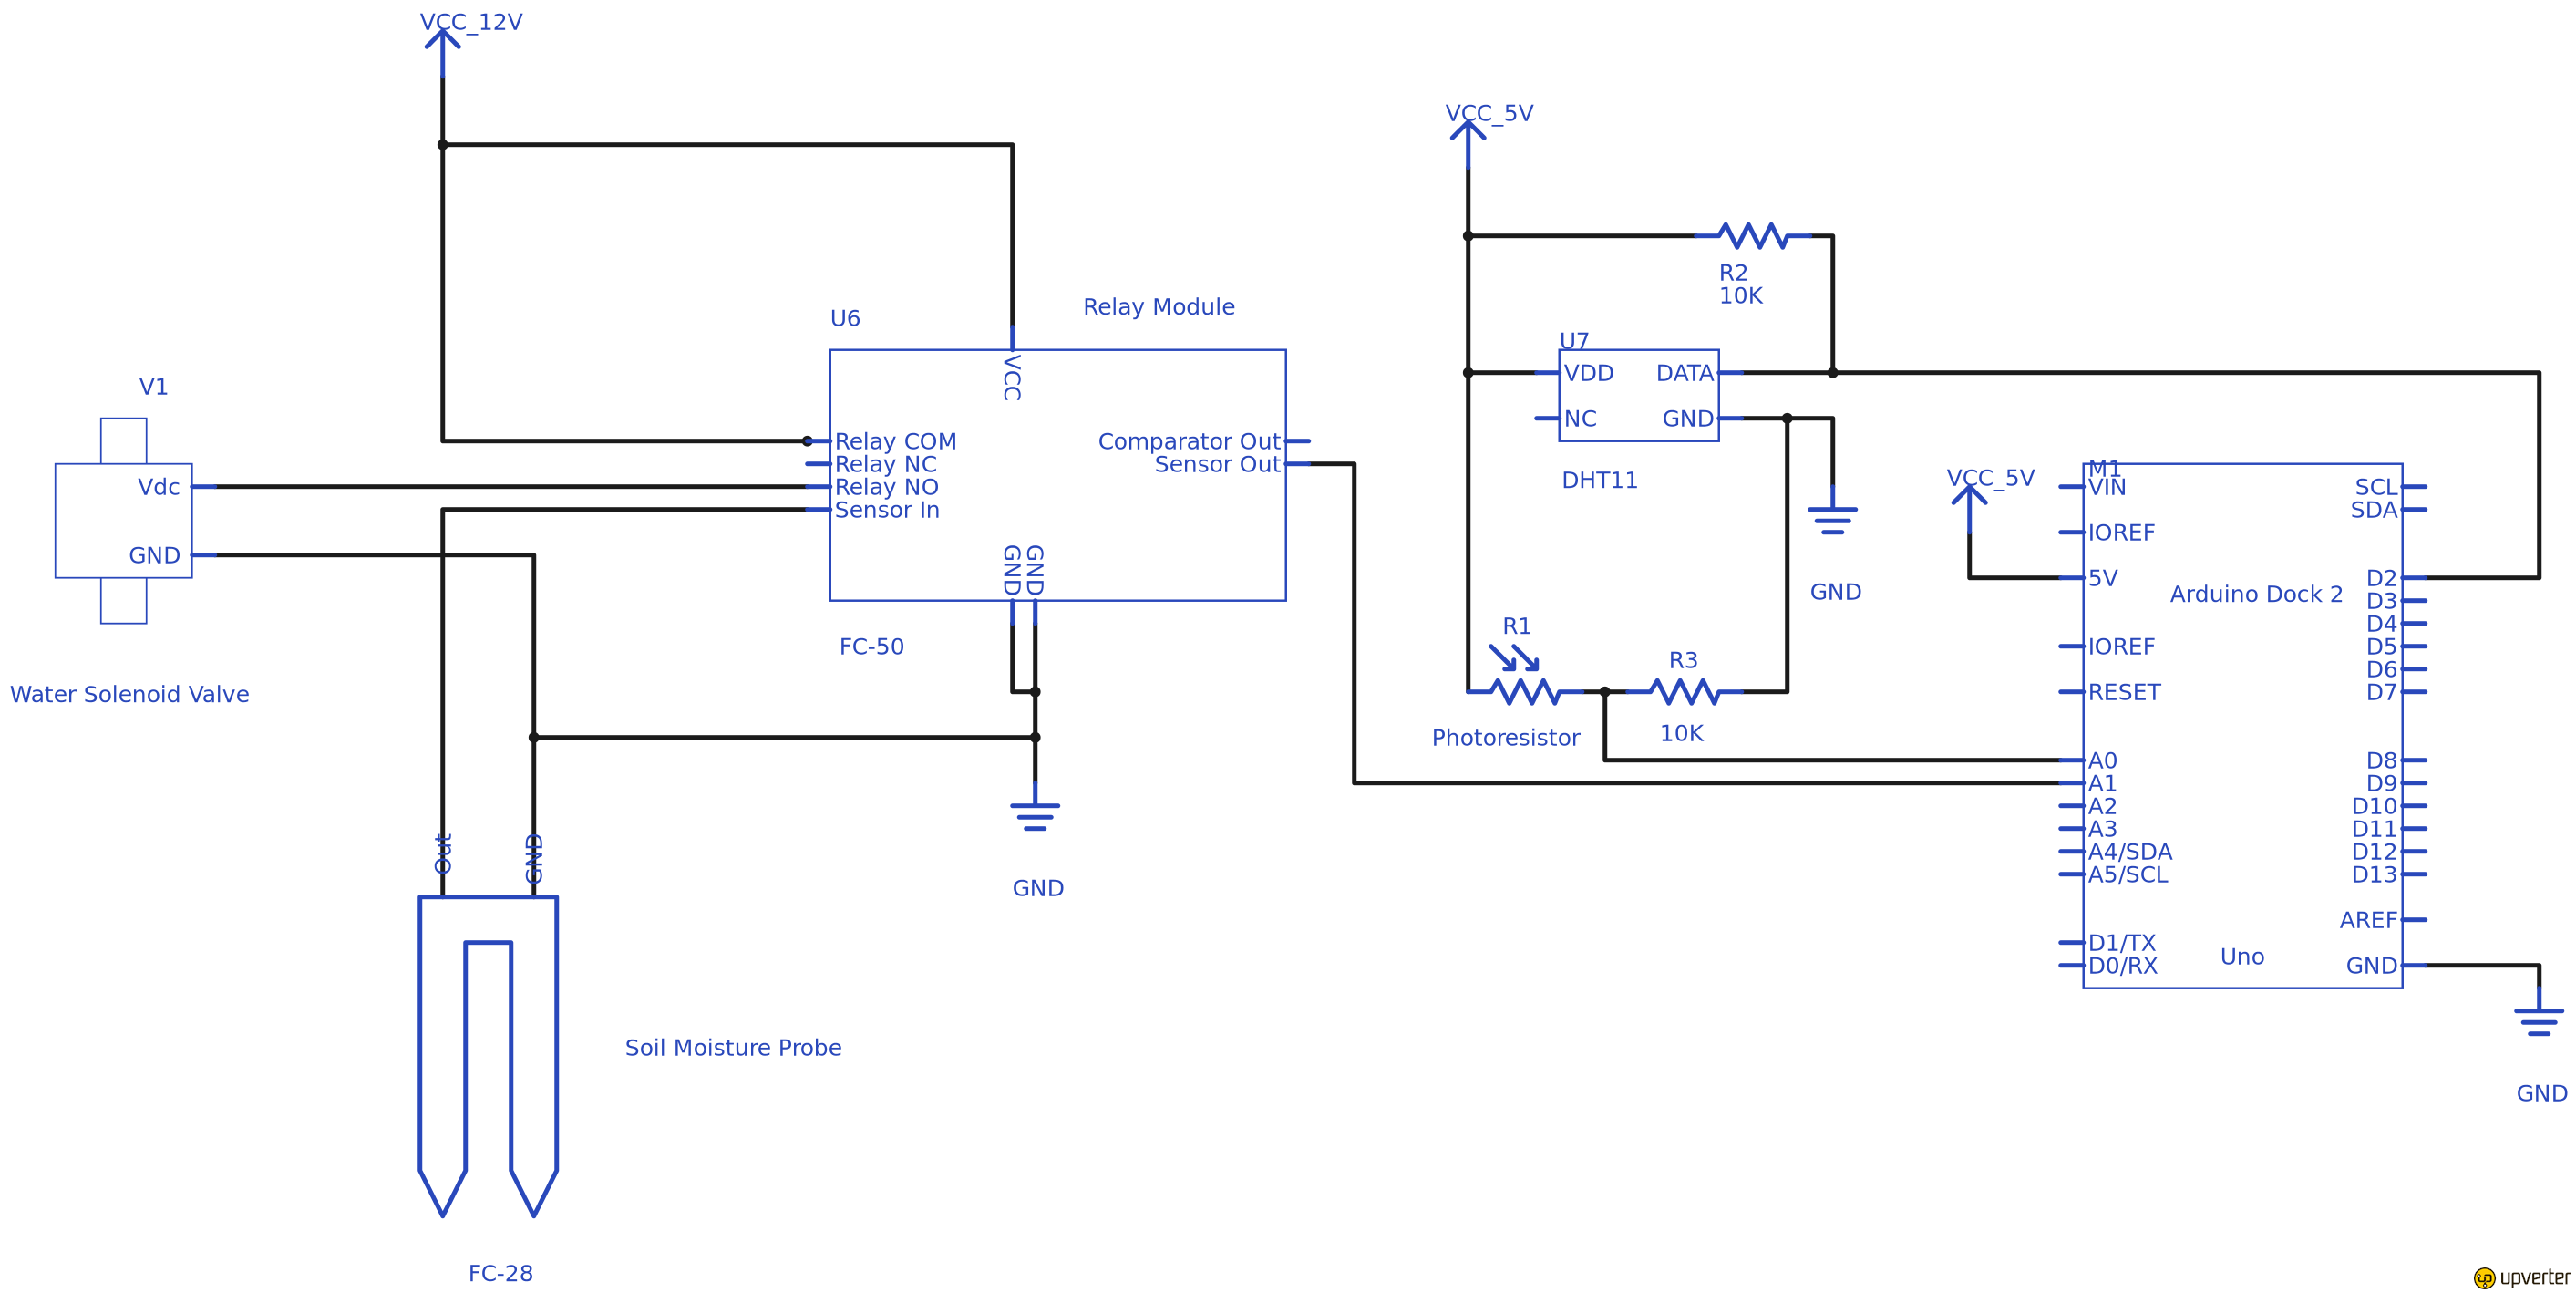
The sprinkler system is implemented using a set of low flow misting heads. This reduces the water flow rate to allow time for sensor feedback to prevent over watering. Control is provided using a 12V solenoid valve in-line with the water hose. I wanted the system to be fail-safe against the loss of internet connectivity, so I used an FC-50 Soil Moisture control module which has an integrated LM393 comparator and an onboard relay to operate the water valve. I modified the wiring to the module so that I could feed the moisture sensor output to the Arduino Dock for monitoring. I did not have time before submitting the project, but I am also going add a control output in parallel with the comparator output so that the Arduino can also turn on the valve (using feedback from Watson).
Sensors
- Ambient temperature/humidity using DHT11
- Ambient light (length of daylight) using photoresistor
- Soil moisture level using FC-50 module with FC-28 probe
I used the setup from the Onion-Omega2-Project-Book-Vol1 Weather Station as the basis for the sensor integration with Watson. I was able to use the Omega Python code directly. I modified the Arduino code to use a DHT11 and add the light and soil moisture sensors.
Camera
- Logitech C525 for snapshots
I had originally intended use an outdoor IP camera to monitor the garden. I was not able to get that to work in time, so I am temporarily using a USB webcam attached to the Arduino dock to take the snapshots. Again I was able to leverage the Time-Lapse Camera from the Omega2-Project-Book. My final solution will use the outdoor camera.
Hardware
- Onion Omega2+ with Arduino Dock 2
- External Power Supplies
I am currently using a micro-USB power adapter for the Omega2/Arduino Dock and a separate 12V supply for the Relay Module and Water Valve. My final solution will use a 12V adapter in conjunction with a 5V regulator that will be integrated into a custom electronics housing.
Software
- IBM Watson IOT Platform (Bluemix) for monitoring and alerts
- Arduino IDE to program Arduino Dock
Monitoring
The Watson Platform is being run in a Chrome web browser. Alerts are sent via email and the snapshots are available using the web interface on the Omega2. So, technically the functionality is available via a browser on a smart phone but I'd like to create an app for the iPhone.
Building the ProjectStep 1: Assemble the water supply system.
Step 2: Test the control module.
Step 3: Assemble misting heads on PVC frame and verify operation.
Soil moisture probe is inserted in dirt near base of plant.
Step 4: Assemble sensor interface for Arduino Dock.
Wire the sensor interface protoboard per the schematic.
[All the following steps assume that the Omega2+ has been initially set up on a WiFi network with Internet connectivity per the Onion documentation: https://docs.onion.io/omega2-docs/index.html. I will be using the puTTy ssh terminal to interface to the Omega2.]
Step 5: Load the Python code on the Omega2+.
The project code is available on GitHub: https://github.com/OnionIoT/iot-weather-station.git
Step 6: Upload the Arduino code.
Set up the Arduino IDE according to the Arduino Dock2 instructions: https://docs.onion.io/omega2-docs/flash-arduino-dock-wirelessly.html#flash-arduino-dock-wirelessly
Open the gardenController.ino sketch. Verify/Compile/Upload.
Step 7: Connect Omega2+ to IBM Watson IoT Platform.
https://developer.ibm.com/recipes/tutorials/connect-an-onion-omega2-to-ibm-watson-iot-platform/
Step 8: Start sending data to Watson.
On the Omega2+ cd to the project directory and type the following command:
python main.py
The published data will now be visible in the terminal window.
Step 9: Create the Watson Interface.
Create a Garden Controller Board type.
Create new cards to monitor sensors: line charts for temperature/humidity, ambient light and soil moisture; and value cards with the current readings.
Step 10: Create Watson Rules.
Create email alerts for high ambient temperature and dry soil conditions.
Step 11: Verify Webcam operation.
Install the fswebcam utility per instructions for the Time-Lapse Camera project. Create a storage directory: mkdir /root/photos. Link the directory to /www so that photos can be accessed by a web browser using command: ln -s /root/photos /www/photos. Create a script in photos directory to take snapshots: snapshot.sh.
#!/bin/sh
fswebcam --no-banner -r 1280x720 -S 20 `date +"%Y-%m-%d_%H%M%S"`.jpg
Make it executable:
chmod 755 snapshot.sh
Create a cron job to take snapshots at 8 am, noon and 8 pm using
crontab -e: 0 8,12,20 * * * /root/photos/snapshot.sh
Restart the cron daemon with /etc/init.d/cron restart.
Use web browser to view pictures at http://omega-xxxx.local/photos.
Next steps:I was not able to complete all that I wanted in the timeframe required by contest submission. I definitely want to have more interactive control from Watson and I'd like to also have snapshots or video uploaded to Watson. I want to implement an IP camera so that I can use the camera's built-in webserver to deliver pictures and video.


Comments
Please log in or sign up to comment.