I am going to give you a tutorial about interfacing the HC-06 Bluetooth module with Arduino. In this tutorial, you will be learning about the module - the basic introduction. You will also learn how to set up the module, connect and interface it.
HC-06 is a Bluetooth module designed for establishing short range wireless data communication (<100 meters). It is very easy to interface and communicate. It can be interfaced with almost all microcontrollers or processors as it uses UART interface.
This module has the ability to transmit files at speed up to 2.1Mbps and works on Bluetooth 2.0 communication protocol. Unlike the HC-05 Bluetooth module, this module can only act as a slave device.
- Operating Voltage: 3.3V - 6V
- Operating Frequency range: 2.402 GHz - 2.480 GHz
You will only be needing the four pins in the HC-06 Bluetooth module.
- RXD: Serial Data Receive Pin. Used for serial input. 3.3V logic
- TXD: Serial Data Transmit Pin. Used for serial output. 3.3V logic
- GND: Ground
- VCC: +5V
To set up your HC-06 Bluetooth module, you will be needing the USB-TTL Serial Converter module. Connect your USB-TTL Serial converter module with your Bluetooth module. The connections are as follows:
- RXD ---> TX
- TXD ---> RX
- GND ---> GND
- VCC ---> 5V
Now, plug in the USB-TTL Serial converter module to your Laptop/ PC. The LED on the converter module should light up if it's working properly. The HC-06 Bluetooth module is permanently configured to be slave and is always in AT mode when not paired to any other device.
Open Arduino IDE and go to Tools, then Serial Monitor.
Set the Baud rate to 9600 and the 'line ending' to 'Both NL and CR'.
Type in 'AT' without the quotes and click send. If the Serial Monitor displays "OK", the module is in AT mode and you are good to go.
Use these AT commands for the corresponding functions:
- AT : Check the connection
- AT+NAME: To check the default name of the module
- AT+VERSION: To obtain the version
- AT+BAUD: To check the default baud rate of the Bluetooth module
- AT+PIN: To obtain the password of the module
- AT+NAME'DESIRED NAME': Changes the default name of the module to the DESIRED NAME
To change the baud rate of the HC-06 Bluetooth module, type in AT+BAUDx, where x has range from 1 - 9, inclusive.
- 1: 1200 baud
- 2: 2400 baud
- 3: 4800 baud
- 4: 9600 baud (default)
- 5: 19200 baud
- 6: 38400 baud
- 7: 57600 baud
- 8: 115200 baud
Sending AT+BAUD3 will change the baud rate from 9600 baud to 4800 baud.
Connecting the HC-06 Bluetooth module with Arduino development board- Arduino Nano - You could use any other development board if you wish
- HC-06 Bluetooth module
- Resistors - 1kΩ and 2kΩ ( I didn't have a 2kΩ resistor with me so I used 2 1kΩ resistors instead)
- Male-to-Male Jumper wires
- Male-to-Female Jumper wires
- Arduino IDE
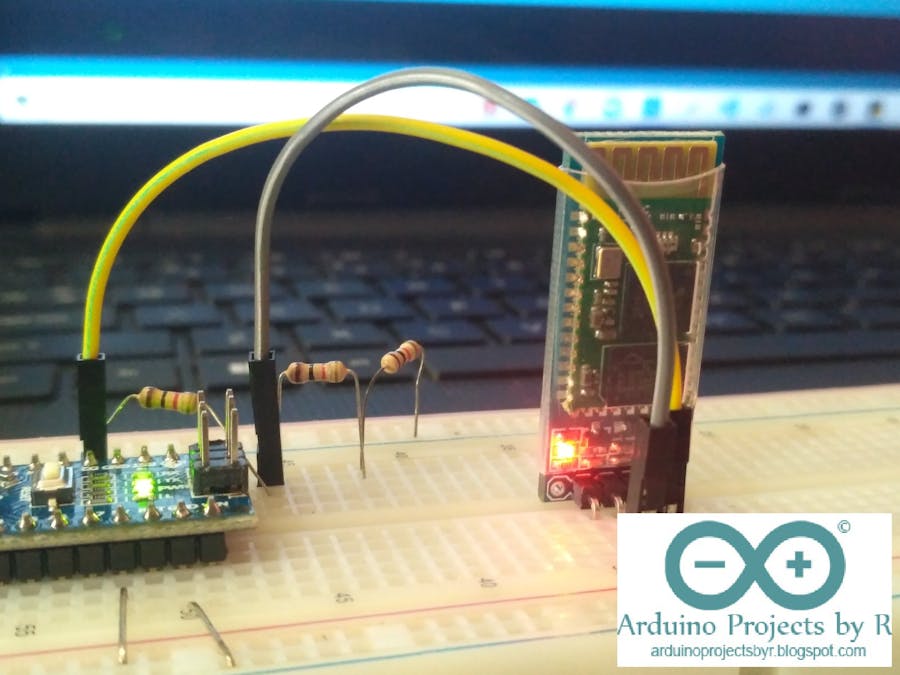
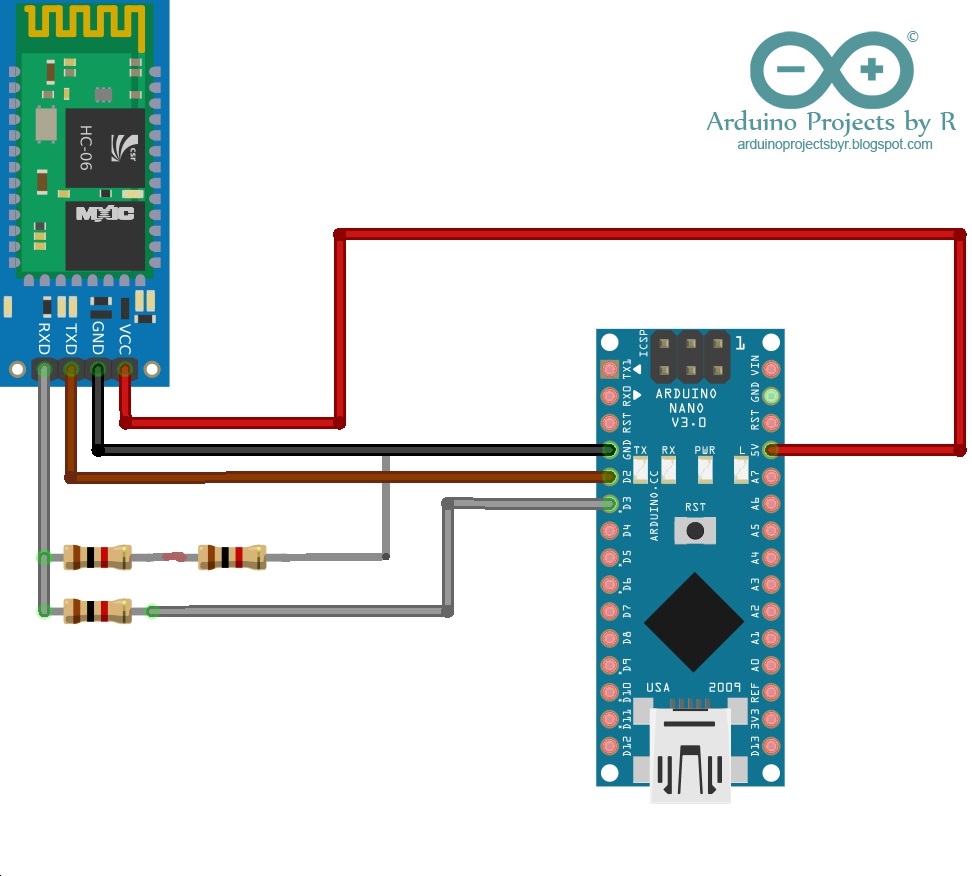
Refer to the schematic to see how the Bluetooth module should be connected with the Arduino development Board.Connecting the HC-06 Bluetooth module with Arduino development boardHardware componentsArduino Nano - You could use any other development board if you wishHC-06 Bluetooth moduleResistors - 1kΩ and 2kΩ ( I didn't have a 2kΩ resistor with me so I used 2 1kΩ resistors instead)Male-to-Male Jumper wiresMale-to-Female Jumper wiresSoftwareArduino IDE
The Arduino boards have a serial port at D0 and D1 and it communicates with these pins as well as the computer via USB. We are using the Serial functions so we cannot use these pins. Therefore, we will be using the D2 and D3 pins for communication with the HC-06 Bluetooth module. D2 pin will be connected to TXD pin of the HC-06 module whereas the D3 pin will be connected to the RXD pin.
The module is connected to +5V standard regulated power supply and the voltage divider is used for converting the 5V logic signal sent by Arduino D3 pin to 3.3V logic signals which is suitable for the module. If you do not understand the voltage divider principle, please refer to the YouTube video in the last section of this post.
If separate power sources are used for the Bluetooth module and Arduino development board, their ground must be connected for voltage reference.
CodeFor this project, you will be needing the Software Serial library. This is an in-built library and does not need to be installed. The library has been developed to allow serial communication on other digital pins of the Arduino and this is why we require the library to be used for this project as we want to enable D2 and D3 pins for Serial communication.
I obtained the codes from this website: http://www.martyncurrey.com/arduino-and-hc-06-zs-040/
Compile and upload the sketch to your Arduino development board.
Testing the Bluetooth CommunicationNow that you have successfully set up the Bluetooth module, let's test the communication between this module and another device. If you have an Android device, such as phone or tablet, go to PlayStore and install 'Bluetooth Terminal' app from Qwerty.
Make sure you have turned on Bluetooth on your device.
Open the menu icon on the top right corner of the screen and tap on 'Connect a device - secure'. As we have not paired the Bluetooth module with the device, tap on 'Scan for devices'. You will see the Name of your Bluetooth module. To pair with your module, the device will ask for the password. After you provide the correct password, you will see that the device and the module are connected. The LED on the Bluetooth module will flash every 2 seconds.
Open the Serial monitor in the Arduino IDE and set the correct baud rate. Send a message from the Bluetooth terminal app and you will see the message displayed on the Serial monitor. Try sending a message from the Serial monitor. If the connection is successful, the message will be received by your Android device.
Summary videoIf you have any questions or suggestions, please feel free to comment below.


Comments
Please log in or sign up to comment.