

Hardware components | ||||||
 |
| × | 1 | |||
| × | 1 | ||||
| × | 1 | ||||
Software apps and online services | ||||||
 |
| |||||
Hand tools and fabrication machines | ||||||
| ||||||
 |
| |||||
At the end of every lunar year, we’ll have an annual party to gather all Seeeders from different offices (Chengdu, EU, Japan, Shenzhen Headquarters, US). One of the very important schedule for our annual party is to reward 10 outstanding Seeeders and Teams of the year with trophies and gifts. As the year 2018 marked the 10th anniversary of Seeed, our HR team wanted to make it a special ceremony, and our engineer Xu and Jie were given the task to make an unique #Seeed10 Trophy.
After 2-week exploring, the two came out this idea to make a blinking Acrylic trophy with the shape of number 10. When the trophy is turned on, it changes the colors of rainbow randomly.
Parts needed- Grove - RGB LED Ring (20 WS2813 Mini)
- Grove - RGB LED Stick (10 WS2813 Mini)
- Wio Link
- Transparent Acrylic
- Black Acrylic:1.6mm, 4.5mm,3mm, 400mm
- Yellow Acrylic: 4.5mm (actually the color of the acrylic doesn't matter.)
- M3 x8mm Studs: 4
- M3 Screw: 4
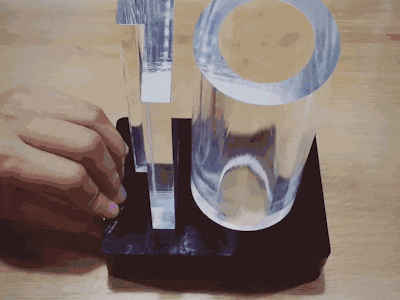
As the main purpose for this trophy is to celebrate the 10th anniversary of our company, it is very natural to regard the number 10 as the design inspiration. We came out of this idea to make it a vertical number 10 with a stand as the trophy. Basically looking like this:
We have a laser cutter and an old CNC milling machine in our office for some daily tinkering and proof of concept. So we have prepared several Acrylic with different thickness and colors for almost all the structure.
2.1 Load the design files of 1 and 0 to the CNC, and mill them out.
2.2 To make the trophy more personalized and customized, we need to engraving the name of the trophy owners and the company logo onto the body of the number 0. We used laser cutter to do that.
2.3 Cut and mill the parts for the trophy stand, including a box, a LED holder, and a bottom cover.
Actually, when we were considering the design of the trophy, we also got the idea to get our two new Grove Led Products involved: the Grove - RGB LED Stick and the Grove - RGB LED Ring, which together could make a perfect 10. We used a Wio Link to control these two LED, programed it with some lighting patterns. In this way, the trophy has the shining waves.
Using the screws, studs and some glue, assembly the trophy is the last step. Here are two pictures that will help for the assembly.
And then it shines at its very unique shape. Happy #Seeed10.


Comments
Please log in or sign up to comment.