Why we made it. Inspiration. Short description:
Most of us know the effects of bad air in meeting rooms and classrooms. You get tired and less alert. Bad air is directly connected to the level of CO2 in a room, due to insufficient ventilation. Just quickly opening a window will remedy the effects of bad air.
Not only do higher levels CO2 make you drowsier, but it also increases the risk of headaches, gives people with allergies a harder time and even decreases our capabilities for strategic and innovative thinking.
After reading this tutorial you will be able to build your own CO2 sensor unit and regulate the level of fresh air at your apartment, office, classroom or wherever.
What you will learn in this project:The following instructions are provided to assist you in developing this CO2 sensor unit that can:
- Measure the CO2 levels in the air.
- Record CO2 at regular intervals (store a value and timestamp).
- Display the current CO2 level being measured, as well as: temperature, air pressure and humidity through our IoT platform “Wappsto” through a wapp.
Optional: It is recommended that before attempting this build you have completed the Blinking and LED tutorial found here: https://wappsto.seluxit.com/led-hello-world/
While working on this circuit, try to enjoy the process and know that troubleshooting is an important part of building circuits and research in general! Even individuals very experienced with micro-controllers and circuits will spend a lot of time debugging.
What you will need for this project:- 1x SCD30 CO2 Sensor Module
- 1x Raspberry Pi3 Model B
- 1x SparkFun Atmospheric Sensor Breakout - BME280
- 1x breadboard
- 5x Female-to-Male and Male-to-Male Dupont wires
- Wappsto (https://wappsto.com/)
The whole process will be split into 5 steps:
- Initial preparations: where we will explain how to set up your device in Wappsto and do a bit of code editing on the Pi
- Assembling: where we show you how to correctly wire up the two sensors to the Pi
- Connecting: where we will show you how to test the wiring of the device
- Installation and reporting: where we will show you what to install and run on the device in order to start receiving reports
- Wapp UI creation: we also provide you with some example and code to create a UI for your device in Wappsto
We will start off by creating our device in Wappsto and download the python code which we will edit and upload to our Pi as we did it our previous tutorial about creating Blinking LED.
Here is the IoT model made in this tutorial.
You can create the whole thing manually by creating a Network, Device and Values and filling out all the required fields.
Or you can create it by copy-pasting this JSON file:https://raw.githubusercontent.com/Wappsto/IoT_RapidPrototyping/master/co2/CO2dataModelSpecification.json
Note: ifyou decide to create the Network, Device and Values and you use different namesmake sure to change them in the code later on, if you are not sure how to continue with this step please refer to our previous tutorial https://wappsto.seluxit.com/led-hello-world/
When we have set up our Network, Device and Values we can download the python code which we will modify a bit and then upload to our Pi.
After you have downloaded the python code open the folder and with an editor of your choice open the peripherals.py and change:
with the following code:
from values import environment
class Peripherals:
   def __init__(self, sendQueue):
       self.env = environment.Environment(sendQueue)
   def get_value_sensors_co2(self):
       return self.env.get_co2()
   def get_value_sensors_temperature(self):
       return self.env.get_temperature()
   def get_value_sensors_pressure(self):
       return self.env.get_pressure()
   def get_value_sensors_humidity(self):
       return self.env.get_humidity()
Then you need to download the following “values” folder containing the following code files:
- bme280.py
- scd30.py
- environment.py
which you can download from our GitHub page
These files represent our two sensors as well as the settings for what the Pi will take from them and when reports with that data will be sent. We will upload this folder to our Pi later in Step 4.
In the “environment” file you can change the interval frequency for receiving the reports from the device.
Note that we have set it up to 5 seconds but inorder to use less data we advise that you increase that number.
You can easily do that by changing self.measurement_interval=5 to the time which you would like to receive the reports (the time is measured in seconds). For more information about the data traffic please refer to the Data plans in the left menu Payment Plan.
Step 2 : AssemblingAfter setting up the device in Wappsto and editing the code we can start wiring our device together.
We have soldered our parts in advance so if you are unsure about how to do that please refer to https://www.makerspaces.com/how-to-solder/ or any other reference you feel comfortable with.
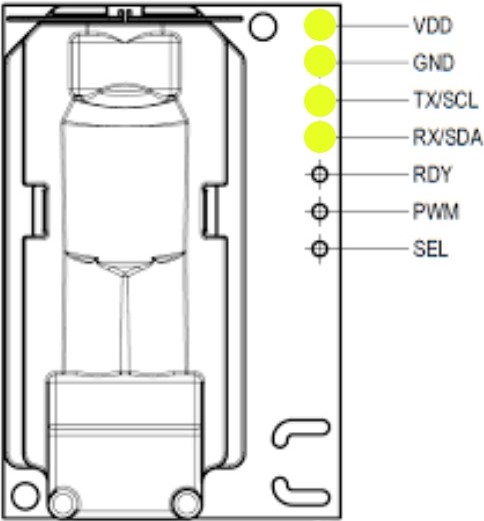
We can start with setting up the SCD30 CO2 Sensor Module, note that we are only using the four pins shown in the following figure 2 (VDD, GND, TX/SCL and RX/SDA):
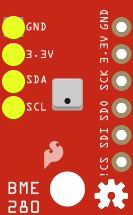
Next, we can set up the BME280, here we will be using again only the four pins on the left side (GND, 3.3V, SDA and SCL) referring to figure 3.
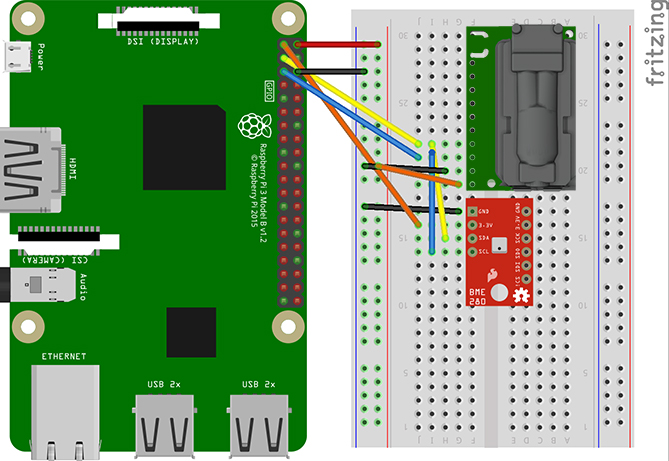
Once we have set up our two sensors on the breadboard, we can start wiring all them along with the Raspberry Pi, refer to figures 3 and 4.
Please follow carefully the wiring in order to avoid errors.
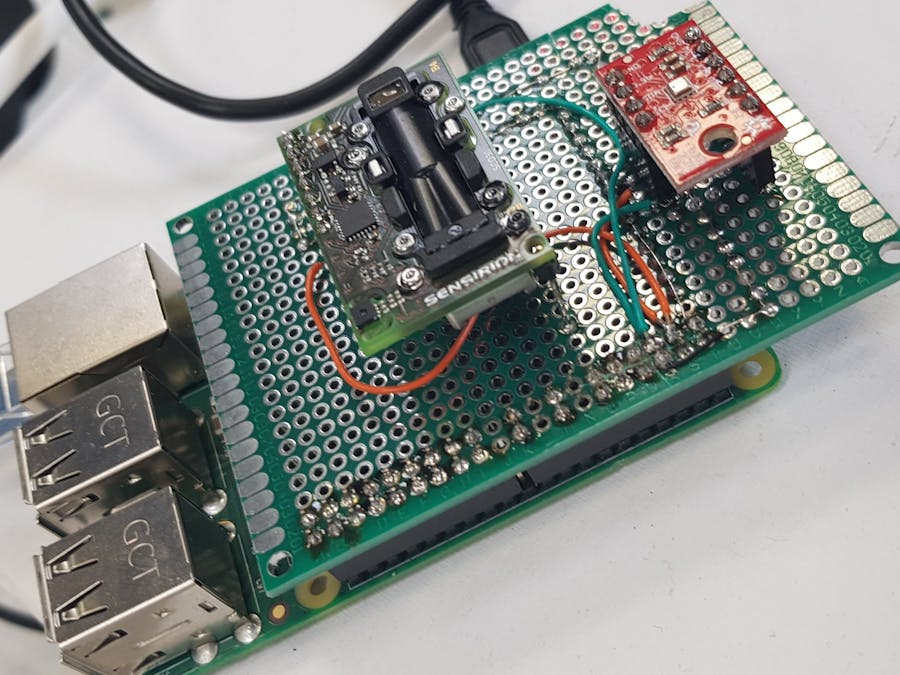
Here is how our CO2 sensor looks. So far so good. We have wired up all our parts and now it’s time to see if we did it correctly, which will we will check in the next Step.
After we have wired up our SCD30, BME280 and the Raspberry Pi3 its time to connect to it and test the wiring.
This tutorial is written for Windows users, however, if you are a Linux or Mac user you can just use a terminal to do "ssh" and "scp" instead of using WinSCP and PuTTY as we have used in this example, which we have shown in our previous tutorial referred here: https://www.seluxit.com/led-hello-world/
Startup PuTTY and connect to your Pi, here we run:
sudo apt-get install rpi.gpiowiringpi python3-dev python3-pip i2c-tools
sudo apt-get update
After that we need to enable the “i2cdetect” option, run:
sudo rasp-configInterfacingOptions > I2C > Yes
After we enable the I2C detect its finally time to test the wiring, run:
sudo i2cdetect -y 1If your wiring was done correctly you should get the following result
Here “61” corresponds to the SCD30 and the “77” to the BME280 sensors. If your results or you don’t see these numbers double check your wiring and make sure all parts and wires are connected and plugged in correctly (pay careful attention to the wiring as any missing line will stop the device from working/being displayed).
Step 4 : Installing and runningSo, after setting up the code, wiring up the device and checking the connection, its time to upload the code to the Pi, install and run our program.
Since this tutorial is made for Windows, start WinSCP and log into your Pi, then upload the “values” folder and upload it to the Pi as shown in the example.
Note that you can change the code just remember to upload the file onto the Pi once you have done so.
Once that is done open up PuTTY and run:
sudo pip3 installsmbus2 numpyAfter that go in the corresponding folder in your Pi like shown in the following example:
cd 12d53bd7-4954-40a0-a5cf-ee9c39c4681aand then run:
sudo python3 main.pyif everything is done correctly you should start receiving reports from your sensors
You can go back to Wappsto > My Data > Co2 (or how you chose to name your Network) and there you can also see the reports and refresh them at any time.
Remember to shut down your Raspberry Pi before unplugging the power cable.Step 5 : Wapp UI creation
We have covered this step in our previous tutorial as well at https://wappsto.seluxit.com/led-hello-world/
Once we have our device connected and set up, we can make a simple or complex (depending on your personal preferences) wapp UI for our connected device see figure 5 as an example.
You can find some example files for one of our sensors on our GitHub page
You can now measure the levels of CO2 in ppm, as well as temperature in Celsius, air pressure in Pa and humidity in %. You can make different versions of this sensor and add additional sensors, lights, or even a display, your imagination is the limit.
You can see some of our other CO2 devices here: https://www.seluxit.com/firefly/https://github.com/Wappsto/wapps/tree/master/smart-home-sensors/foreground
And finally, the next question which needs to be answered is: How will we solve this problem when the CO2 level of the atmosphere is much higher?
You can read a few very interesting articles and discussions on that topic by Daniel Lux here:
http://co2brains.org/https://medium.com/swlh/does-co2-harm-your-body-d20b4a0d03c1
Combating CO2:
https://www.youtube.com/playlist?list=PLBygmqSJrqK5dgCpmIugTUSskb7dNr07n
Thank you for the read and participation!


_3u05Tpwasz.png?auto=compress%2Cformat&w=40&h=40&fit=fillmax&bg=fff&dpr=2)
Comments
Please log in or sign up to comment.