

Hardware components | ||||||
 |
| × | 3 | |||
| × | 1 | ||||
 |
| × | 1 | |||
 |
| × | 1 | |||
Software apps and online services | ||||||
 |
| |||||
In this tutorial, we will be controlling a micro servo motor TS90M using Surilli Basic M0. We are going to program our Surilli with a very fundamental Arduino default example known as "Sweep." This program sweeps the servo arm to and forth going from 0 degrees all the way up to 180 degrees and then returning to zero position. This will provide us with some basic understanding about servos and how it works like a charm with Surilli. ;-) So let's get started!
What Is a Servo Motor?A servo motor is a small device that has an output shaft. This shaft can be positioned to specific angular positions by sending the servo a coded signal. As long as the coded signal exists on the input line, the servo will maintain the angular position of the shaft. As the coded signal changes, the angular position of the shaft changes.
In practice, servo motors are used in radio controlled airplanes to position control surfaces like the elevators and rudders. They are also used in radio controlled cars, puppets, and of course, robots.
STEP 1: Set Up Arduino IDE for SurilliMake sure you have selected the right port, board and processor for the Surilli as shown in the picture below and it is programmable (compile and upload “Blink” from File>Examples>Digital>Blink onto your Surilli to check if everything is working fine).
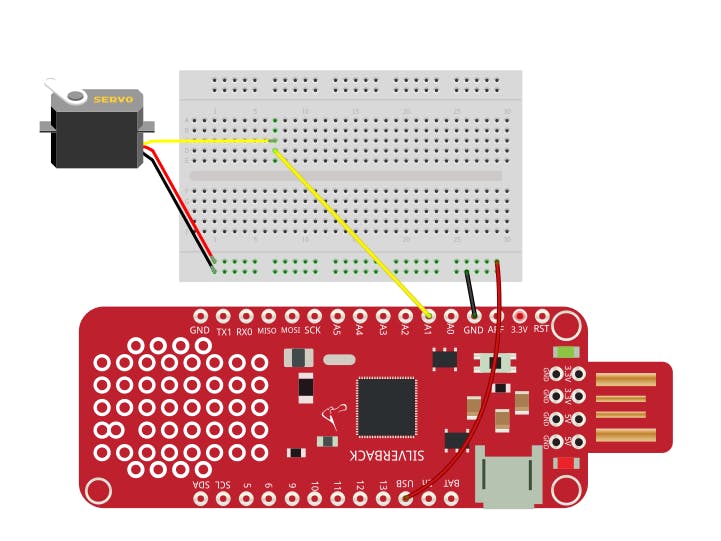
STEP 2: The CircuitryThe circuitry is very simple. It's mostly the programming and your logic behind a servo that matters. Still, follow Figure 1 to set up your hardware.
- Now you have completed setting up your hardware and Arduino IDE. Copy and paste the Arduino sketch given below into your Arduino IDE and hit upload.
- After it is uploaded, the servo motor will start going to and forth about its axis as shown in the cover GIF! That's it.
Complete Arduino Sketch:
#include <Servo.h>
Servo myservo;                   // create servo object to control a servo
                                // twelve servo objects can be created on most boards
int pos = 0;                     // variable to store the servo position
void setup() {
myservo.attach(A1);             // attaches the servo on pin A1 to the servo object
}
void loop() {
for (pos = 0; pos <= 180; pos += 1)
                            // goes from 0 degrees to 180 degrees in steps of 1 degree
{
  myservo.write(pos);              // tell servo to go to position in variable 'pos'
  delay(15);                       // waits 15ms for the servo to reach the position
}
for (pos = 180; pos >= 0; pos -= 1) { // goes from 180 degrees to 0 degrees
  myservo.write(pos);              // tell servo to go to position in variable 'pos'
  delay(15);                       // waits 15ms for the servo to reach the position
}
}
Play with the program to see how it reacts to different values and logic. This will develop your understanding about servo motors so you can use them in your practical application. If you make something fun and interesting do share it with our community :)
That’s all for now. If you have any queries, visit surilli.io or contact our support. Stay connected with Surilli family for more amazing stuff. :-)


Comments
Please log in or sign up to comment.