


Hardware components | ||||||
 |
| × | 1 | |||
 |
| × | 1 | |||
 |
| × | 1 | |||
 |
| × | 1 | |||
 |
| × | 1 | |||
_ztBMuBhMHo.jpg?auto=compress%2Cformat&w=48&h=48&fit=fill&bg=ffffff) |
| × | 1 | |||
Software apps and online services | ||||||
 |
| |||||
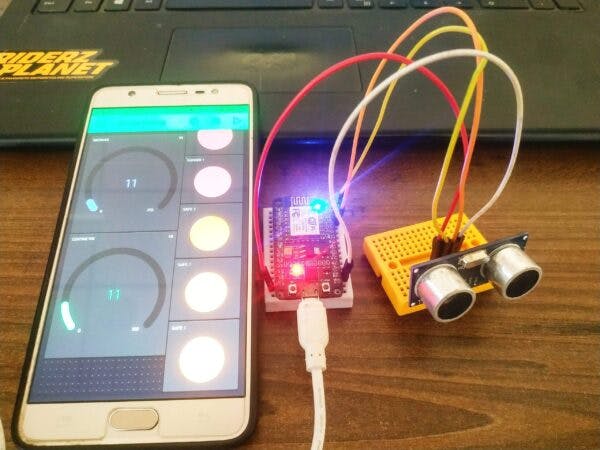
Hello guys, We brought the latest project for you on the IoT this time. We are going to make a smart parking system using IoT. There is an ultrasonic sensor in this project which is used to calculate the distance of the obstacles from your care. If the gap between the obstacle and car decreases below a fixed value then you receive the notification on your mobile phone. Make sure that your smartphone is connected to the internet. We are also sharing the circuit diagram and code for this project. For more information regarding this project please visit the original post of this project also bookmark TECHATRONIC.COM as all my further projects and tutorials will be pre-uploaded there.
In this smart parking system, there is an ultrasonic sensor that is controlled by the nodemcu. You can see the real-time values that are captured by the ultrasonic sensor on the Blynk app. We will see the space when we parked our car on our mobile phone with the alert notification so when we parked our car we will not collide because we know how much distance the object from our car. Please set up the Blynk app first and also provide the SSID and password of the hotspot in the code. There is a gauge meter in the app in which you can see the distance values. This project is very interesting and cheap too.
Components Required:-- Nodemcu(esp8266)
- Jumper wire
- Breadboard
- Ultrasonic sensor
- Mobile phone
NOTE: this is the code for this project, please upload it to the nodemcu.
//TECHATRONIC.COM
// BLYNK LIBRARY
// https://github.com/blynkkk/blynk-library
// ESP8266 LIBRARY
// https://github.com/ekstrand/ESP8266wifi
#define TRIGGER D0
#define ECHO  D2
// NodeMCU Pin D0 > TRIGGER | Pin D2 > ECHO
#define BLYNK_PRINT Serial  // Comment this out to disable prints and save space
#include <ESP8266WiFi.h>
#include <BlynkSimpleEsp8266.h>
// You should get Auth Token in the Blynk App.
// Go to the Project Settings (nut icon).
char auth[] = "Whobi6tSCicbj4W654WdBeo7O4D6Ajw4"; //Auth code sent via Email
// Your WiFi credentials.
// Set password to "" for open networks.
char ssid[] = "DESKTOP";  //Wifi name
char pass[] = "asdfghjkl"; //Wifi Password
void setup() {
Serial.begin (9600);
Blynk.begin(auth, ssid, pass);
pinMode(TRIGGER, OUTPUT);
pinMode(ECHO, INPUT);
pinMode(BUILTIN_LED, OUTPUT);
}
void loop() {
long duration, distance;
digitalWrite(TRIGGER, LOW);
delayMicroseconds(2);
digitalWrite(TRIGGER, HIGH);
delayMicroseconds(10);
digitalWrite(TRIGGER, LOW);
duration = pulseIn(ECHO, HIGH);
distance = (duration/2) / 29.1;
if (distance <=200) {
Blynk.virtualWrite(V0, 255);
}
else {
Blynk.virtualWrite(V0, 0);
}
if (distance <= 35) {
Blynk.virtualWrite(V1, 255);
}
else {
Blynk.virtualWrite(V1, 0);
}
if (distance <= 30) {
Blynk.virtualWrite(V2, 255);
}
else {
Blynk.virtualWrite(V2, 0);
}
if (distance <= 25) {
Blynk.virtualWrite(V3, 255);
}
else {
Blynk.virtualWrite(V3, 0);
}
if (distance <= 20) {
Blynk.virtualWrite(V4, 255);
}
else {
Blynk.virtualWrite(V4, 0);
}
Serial.print(distance);
Serial.println("Centimeter:");
Blynk.virtualWrite(V5, distance);
delay(200);
Blynk.run();
Serial.print(distance);
Serial.println("Centimeter:");
Blynk.virtualWrite(V6, distance);
delay(100);
Blynk.run();
}Step 1
Download the Blynk app from the app store.
Step 2
open the Blynk app & click on the new project.
Step 3
Select nodeMCU from the appeared menu.
Step 4
Token will be sent to your Gmail id. copy that token from the Gmail id and paste it into the code which is given above.
Step 5
add the gauge widgets as shown below.
Step 6
Set led with the name of safe 1 to safe 5.
Step 7
Set gauge value from 0 to 100, 255.
You are all set.
Thanks for reading.


_3u05Tpwasz.png?auto=compress%2Cformat&w=40&h=40&fit=fillmax&bg=fff&dpr=2)


Comments
Please log in or sign up to comment.