


Hardware components | ||||||
| × | 1 | ||||
 |
| × | 1 | |||
Software apps and online services | ||||||
 |
| |||||
Hand tools and fabrication machines | ||||||
 |
| |||||
In a previous project, we built a wireless sump pit water level monitor with an ESP32-C3 and the HC-SR04 ultrasonic distance sensor. For this project we'll be using the same hardware, however it is implemented without any coding! Using the Home Assistant - ESPHome addon we can program the ESP32 through USB for the initial programming and then update the board wirelessly after that.
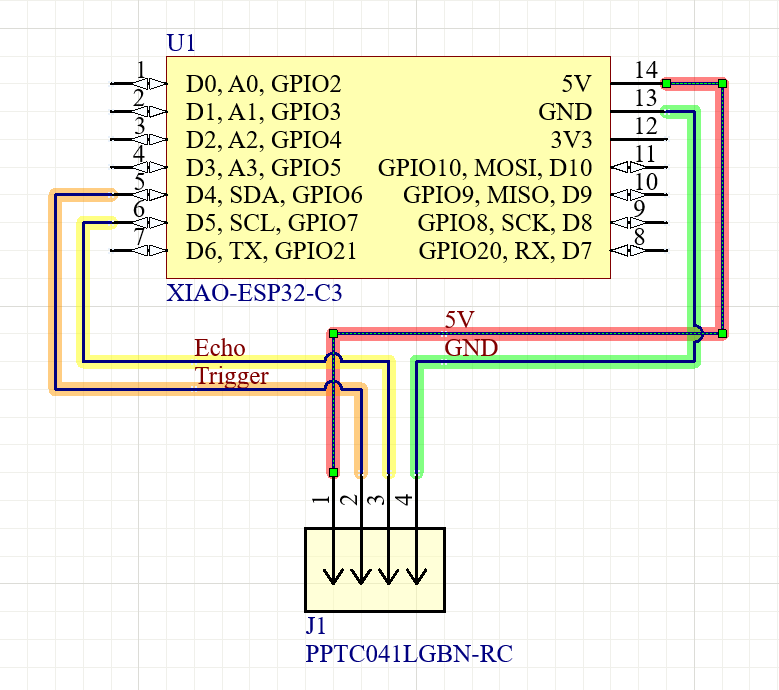
HardwareUsing the same hardware from the last project, we can wire up the ESP32 per the schematic diagram.
The UltraBdv1, pictured below, makes the connections in the PCB for us.
Programming the ESP32 is made easy by using the ESPHome addon in home assistant. Start by opening home assistant in your web browser from a client device. Go to settings --> Devices and Services. Select '+add integration' and search for ESPHome. Enter any necessary information. The ESPHome documentation has proven very useful.
After ESP home is installed, make sure to start the service and add the page to your sidebar.
Before programming the device, add the SMTP integration by modifying /root/config/configuration.yaml This will allow ESPHome to send emails when we make a service call in the ESP32 config file. Documentation on SMTP service can be found at: https://www.home-assistant.io/integrations/smtp/
notify:
    - name: "gmail_notifier"
    platform: smtp
    server: "smtp.gmail.com"
    port: 587
    timeout: 15
    sender: "<sender_email>@gmail.com"
    encryption: starttls
    username: "<sender username>@gmail.com"
    password: "<your 16 digit gmail app password>"
    recipient:
        -<"target email address1">
        -<"target email address2">
    sender_name: "SALT_Tank"
Setup 2-factor authentication on the gmail account.
Create a 16-digit app password for home assistant to use by visiting https://myaccount.google.com/apppasswords. Use this password in the password field above.
Reload the yaml configuration by restarting home assistant. Test the SMTP service by opening Developer Tools from the home assistant side-bar and going to the services tab. Search for 'notify.gmail_notifier' and send a test message with the call service button.
If the service call fails, there is either a problem with the SMTP configuration or the gmail account was not setup properly. You can skip all of the SMTP setup and configurations if you only want to read sensor values on your dashboard without SMTP notifications.
ProgrammingConnect the ESP32 module to the machine hosting your Home Assistant instance. Verify the ESP32 is recognized by opening a terminal session in home assistant.
Use 'ls' to search the directory '/dev' and use grep to filter the results by only returning items matching ttyUSB.
Open the ESPHome addon and click '+ New Device'. On the first time programming a device, enter the necessary Wifi network information which will be used on all subsequent devices. This information is stored in the directory /root/config/esphome and can be edited any time with the visual studio code server addon. When it comes time to edit the device configuration, add the below:
esphome:
    name: esp32salt
    friendly_name: ESP32Salt

esp32:
    board: esp32-c3-devkitm-1
    framework:
type: arduino

# Enable logging
logger:

# Enable Home Assistant API
api:
    encryption:
        key: "<YOUR KEY>"

ota:
    password: "<YOUR OTA PASSWORD>"

wifi:
    ssid: !secret wifi_ssid
    password: !secret wifi_password

manual_ip:
    static_ip: <ESP32 WIFI ADDRESS_IP>
    gateway: <NETWORK_GATEWAY_IP>
    subnet: <NETWORK_SUBNET_MASK_IP>
    dns1: <DNS_SERVER_IP>

# Enable fallback hotspot (captive portal) in case wifi connection fails
ap:
    ssid: "Esp32Salt Fallback Hotspot"
    password: "<SET_AD-HOC_WIFI_PASSWORD>"

captive_portal:

# Example configuration entry
sensor:
    - platform: ultrasonic
    trigger_pin: GPIO6
    echo_pin: GPIO7
    name: "Salt"
    update_interval: 1s
    unit_of_measurement: cm
    pulse_time: 20us
    accuracy_decimals: 4
    filters:
        - multiply: 100
        - exponential_moving_average:
            alpha: 0.001
            send_every: 1
        - clamp:
            min_value: 20
            max_value: 100
    on_value_range:
        above: 200
        then:
            - homeassistant.service:
                service: notify.gmail_notifier
                data:
                    target:
                        -"<target_eMAIL_ADDRESS1>"
                        -"<target_eMAIL_ADDRESS2>"
                    title: "Add Salt"
                    message: "Add Salt to the Water Softener Tank"
switch:
- platform: restart
name: esp32-Salt Restart
Be sure to update your yaml file with the necessary information. Yaml files are also sensitive to indentation so carefully inspect after a copy and paste of the config.
The config we went with utilizes Exponential Moving Averages. Adjust alpha to change the sensitivity levels. You can also update the minimum and maximum values to interpret from the sensor. This helps filter out noise from measurements above and below the realistic level. If you setup the SMTP notifier service earlier, you can use the on_value_range to trigger sending an email notification of when to buy more salt for the softener. Update the target email addresses to receive notifications as necessary.
Save and exit the config file. Validate the script and handle any errors. Click install after there are no more errors to handle.
The first time a device is programmed, it must be done through USB, after that you can program wirelessly. Once the device is programmed, you can view the logs through USB or wirelessly by selecting the logs button
Go to Home Assistant settings --> Devices and Services. You should see an option to configure your new ESPHome device. Once configured, you can add the entity to your home assistant dashboard of choice.
To install the HC-SR04 onto the water softener brine tank, remove the lid so the drill shavings don't go into the tank. Use a 5/8" spade-bit and drill from both sides for a clean hole through the lid. Install the sensor into the holes and replace the lid.


Comments
Please log in or sign up to comment.