


Hardware components | ||||||
 |
| × | 1 | |||
Software apps and online services | ||||||
 |
| |||||
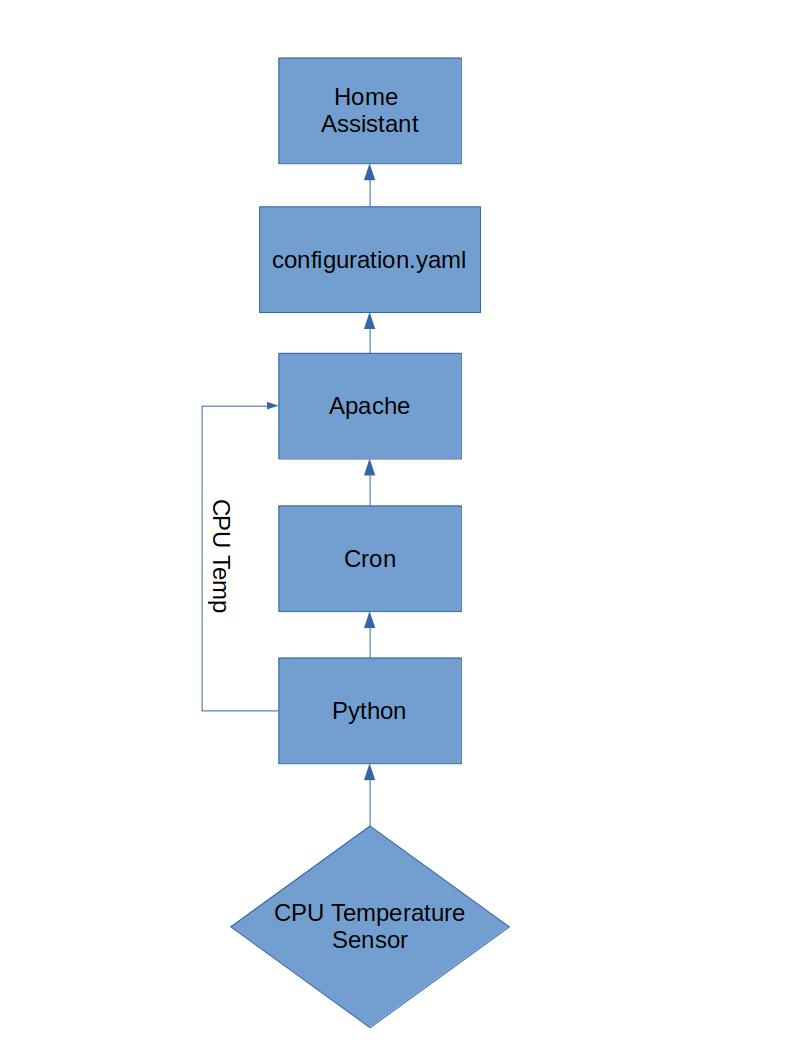
In this project, we'll investigate what it takes to connect a sensor to the Raspberry Pi and have this data published automatically to the Home Assistant Dashboard. To accomplish this, we'll have Home Assistant scrape a web-page hosted on our Pi and then write the data to the dashboard. This same workflow can apply to any i2c, spi, or GPIO connected device with the raspberry pi.
Apache ServerThe Pi will need to read data from a sensor and then update the Apache 2 server with the value we read. First lets install Apache 2 on the pi with:
sudo apt install apache2 -yNext test that the server is functional by visiting the Apache server from your web browser. This can be done from the Pi or from another host machine.
From the Raspberry Pi, or from a host on the same network use:
http://<192.168.0.101>
Replace <192.168.0.101> with the actual IP address of the Pi (Do not include < > symbols)
Once the Apache server is verified to be running, we will also need to create a directory on the apache server where we want our data to be written to. In this application, create a directory called cpu_data in the /var/www/html/ folder and make a file called temperature.txt in this new directory. This directory will show up on the Pi at http://192.168.0.101/cpu_data/ and the empty file we generate can be found at temperature.txt
sudo mkdir /var/www/html/cpu_data
touch /var/www/html/cpu_data/temperature.txtNext we will need to configure user permissions on the Pi. This is for writing data to the Apache server's directories when called by a python or shell script. Thanks to Thomas Ward on askubuntu.com for the excellent instructions on setting these permissions for the Apache Server. Replace <USER> with your username.
sudo chgrp -R www-data /var/www/html
sudo find /var/www/html -type d -exec chmod g+rx {} +
sudo find /var/www/html -type f -exec chmod g+r {} +
sudo chown -R <USER> /var/www/html/
sudo find /var/www/html -type d -exec chmod u+rwx {} +
sudo find /var/www/html -type f -exec chmod u+rw {} +
sudo find /var/www/html -type d -exec chmod g+s {} +Now that the Apache Server is writable, it is time to connect a sensor to the Raspberry Pi. In this application, we'll use the Raspberry Pi's built in CPU temperature monitor located at /sys/class/hwmon/hwmon0/temp1_input.
sudo cat /sys/class/hwmon/hwmon0/temp1_inputThe temperature is recorded in milli °C. Next we'll write a python script which reads the CPU temperature sensor and writes the value to a file which is located in one of the Apache server's directories.
nano read_cpu_temp.pyExit nano and save changes with:
ctrl+x
y
"enter"
Give the script execute permissions, run the script, and check the output file on the Apache Server:
sudo chmod +x read_cpu_temp.py
./read_cpu_temp.py
cat /var/www/html/cpu_data/temperature.txtTo automate the process of writing the CPU temperature to the Apache server, we will setup Cron to periodically execute the python script:
crontab -eAdd the configuration to the crontab with error logging supoort:
* * * * * /usr/bin/python3 /home/<USER>/Documents/read_cpu_temp.py >> /home/<USER>/Documents/read_cpu_cron_logfile.log 2>&1Exit nano and save the configuration. This Cron job will run the python script once per minute, thereby updating the Apache server with our new value every minute.
The final step in this workflow is to integrate this information with our Home Assistant server. Add the Studio Code Server or Terminal Addon in Home assistant to modify the configuration.yaml file located at /root/config/configuration.yaml
The following should be added to the file:
sensor:
# The rest line specifies that you're configuring a RESTful sensor.
# It means that the sensor's data will be retrieved from a RESTful API endpoint.
- platform: rest
#Name the sensor
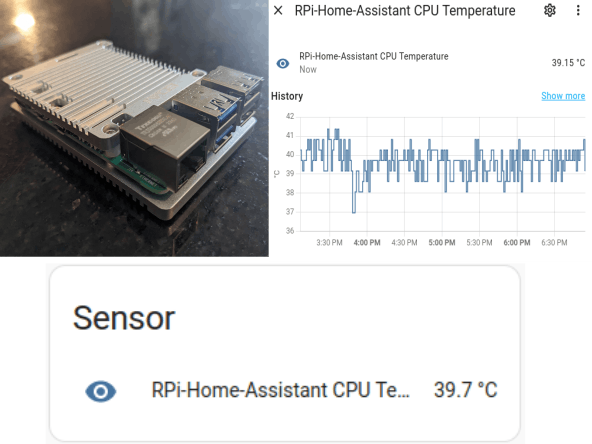
name: "RPi-Home-Assistant CPU Temperature"
#Where the data needs to be scraped from
resource: http://192.168.0.101/cpu_data/temperature.txt
#Convert the data from the website from string to float
value_template: "{{ value | float }}"
#Set the unit of measure fore the dashboard
unit_of_measurement: "°C"
#Set how often the site is scraped
scan_interval: 60Restart your Home Assistant server hardware and the Sensor called RPi-Home-Assistant CPU Temperature will report on your dashboard.


Comments
Please log in or sign up to comment.