FOR EDUCATIONAL PURPOSES ONLY!!!!!
DO SUBSCRIBE
A way to use ESP8266 to remotely light up a firecracker or a gas bomb.
Hello guys, we are back again with another tutorial on how to build a small circuit that can remotely switch on or activate a firecracker or a gas bomb.
The theory behind this circuit is simple we want to create an electric arc powerful enough to light a fuse attached to a gas bomb or any particular firework. The esp8266 will host a web server that we will use to remotely cause the high voltage generator to activate and light the fuse up.
Remote Detonator ESP8266(DO SUBSCRIBE)
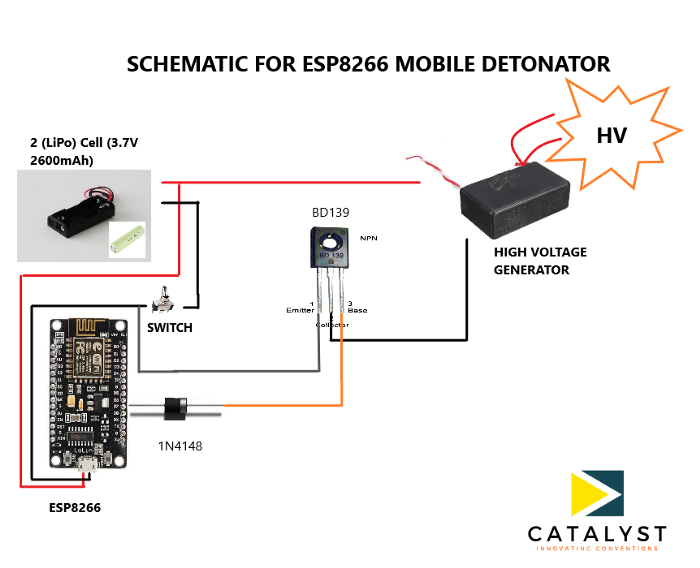
Components requiredHigh voltage generatorESP8266BD139 transistorSwitch(toggle or push) depends on you2 Lipo cellsDiode 1N4148Gas bomb/firework
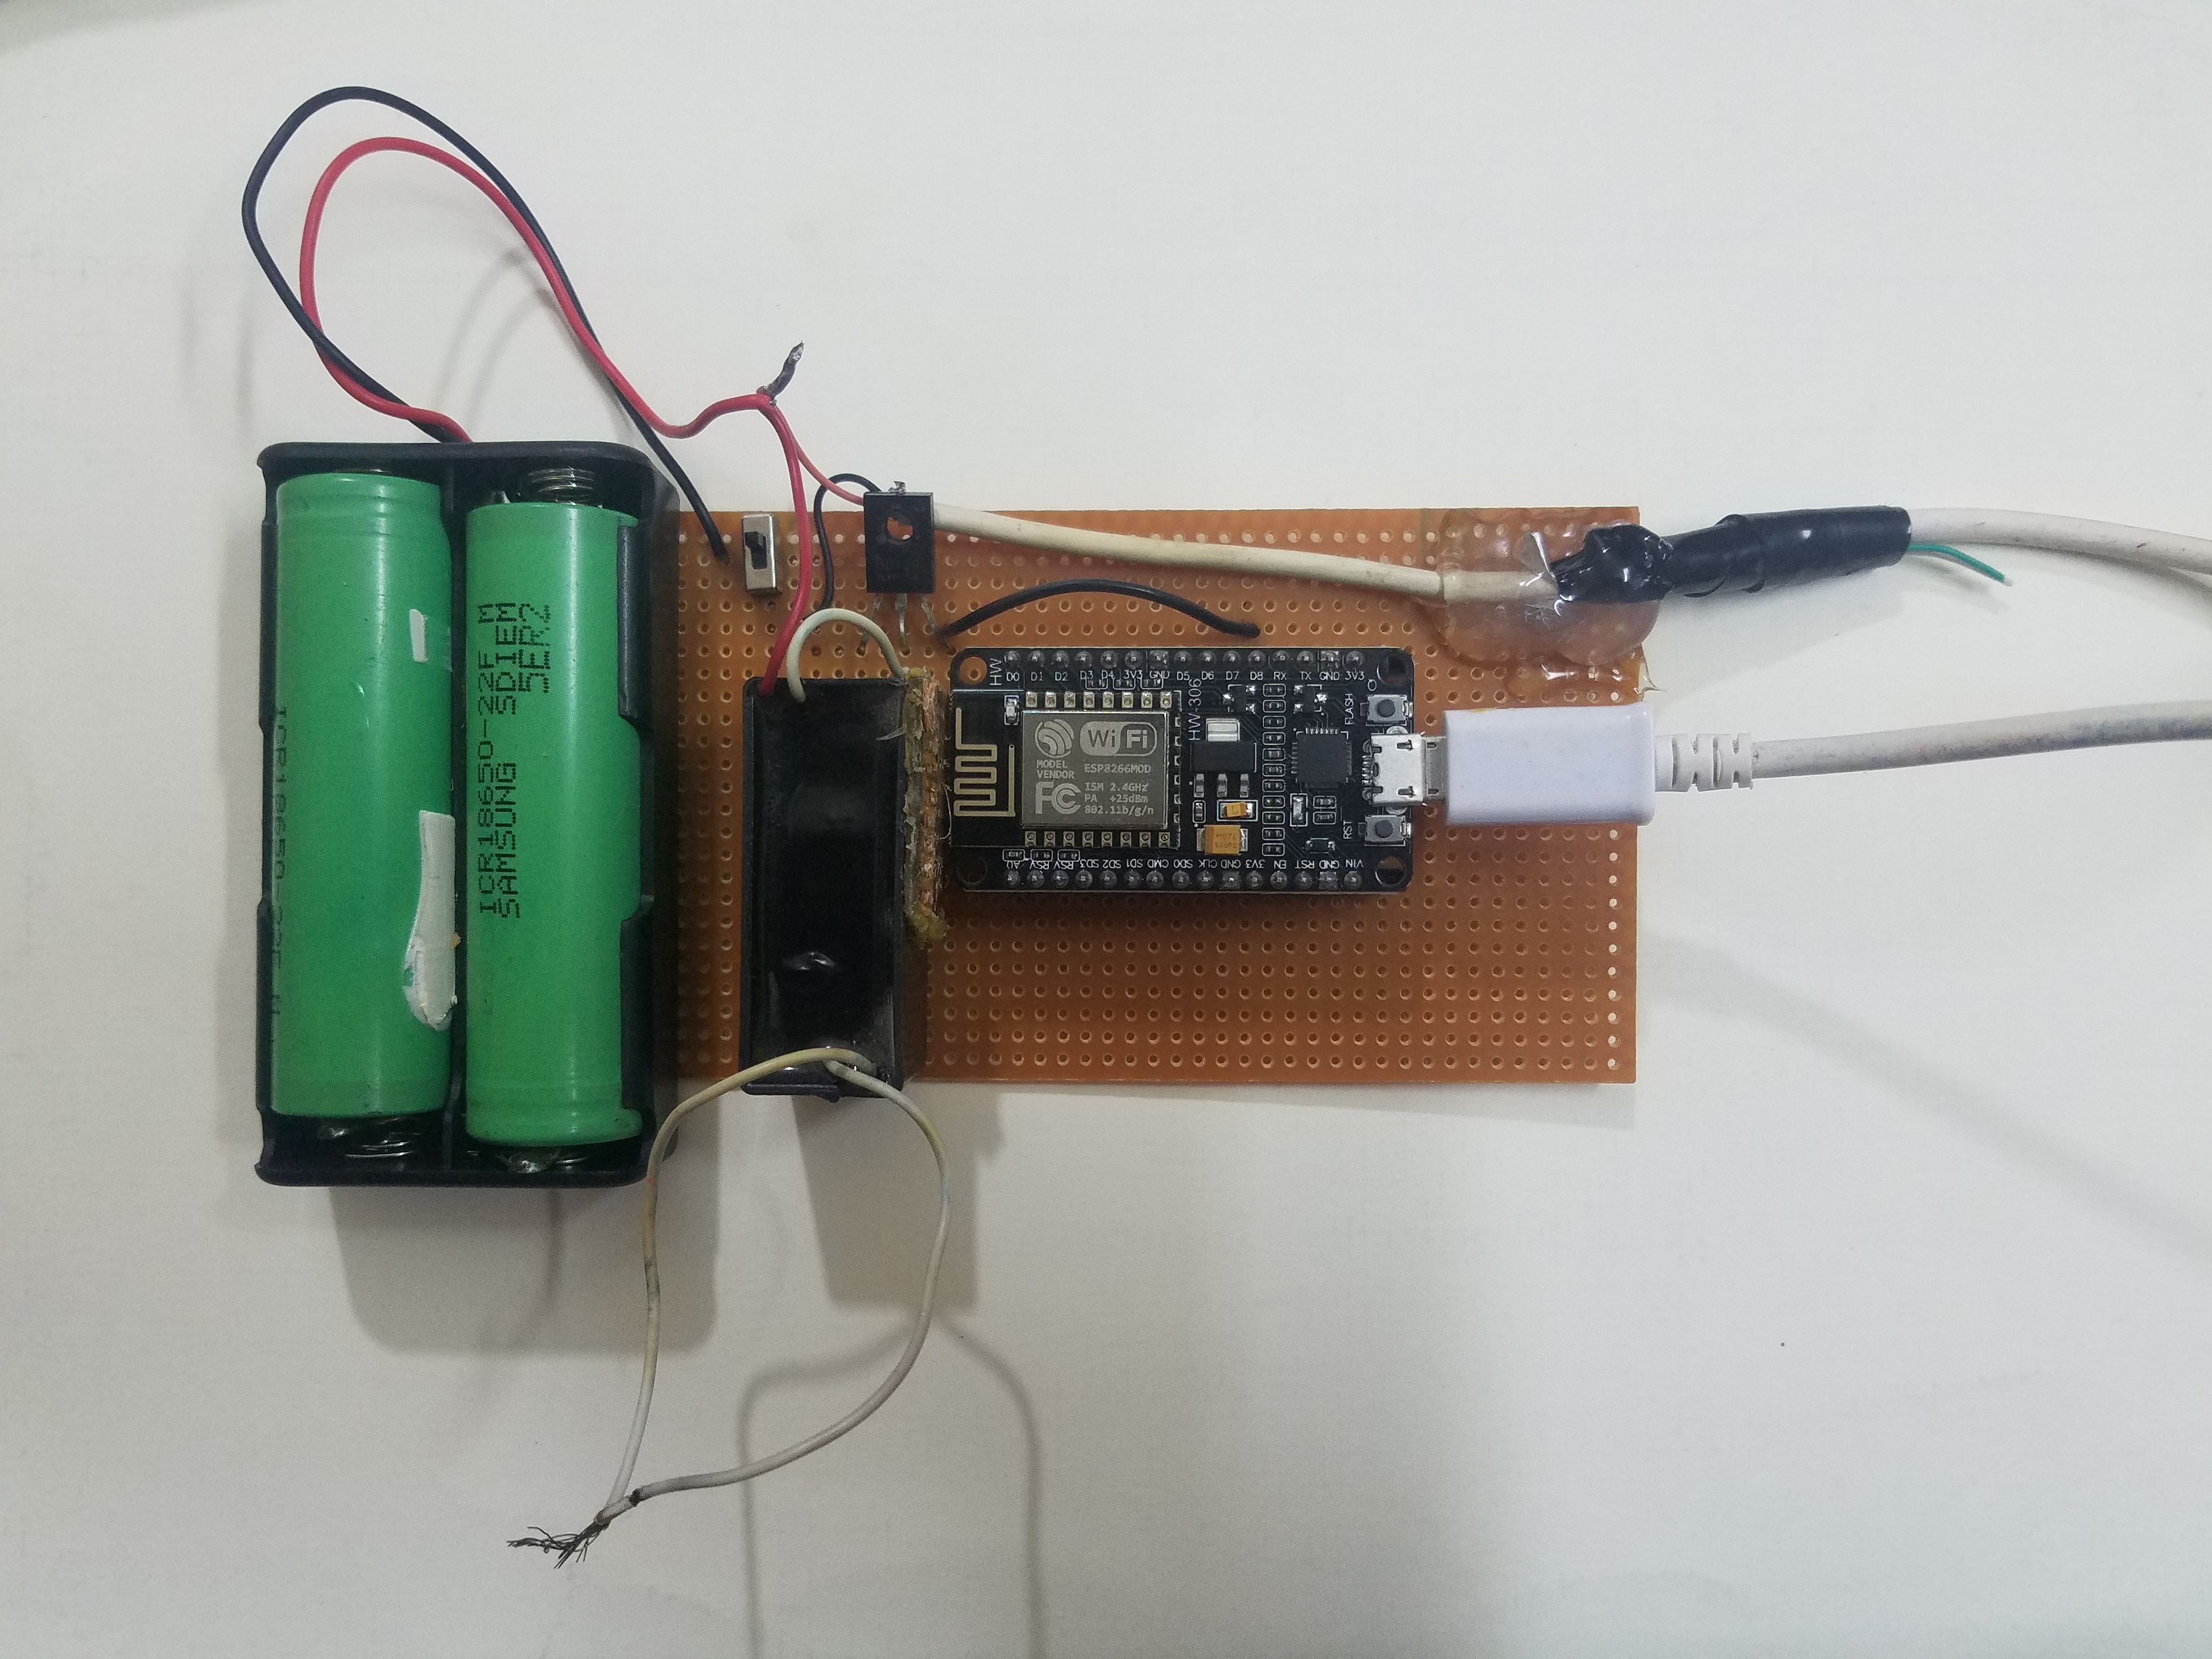
Assemble the circuit as shown above and program the esp8266 with the Arduino IDE.
We are using pin number GPIO13 or D7 in the program, which is connected with a 1N4148 diode. You don't need to attach a diode, but I attached it in case I accidentally connect the wrong wires.
But before programming understand this important thing first that, esp8266 works in either ST or AP mode or in both. In AP mode the esp8266 doesn't need to connect itself with a router or internet it hosts the webserver itself with your own credentials. Secondly, if you want to use the esp8266 in ST mode then the program changes a little and you can use that program to first connect the esp8266 with the home router and then you can connect it to the hosted web server for which you will be able to get the IP from the serial monitor. But a person should use the AP mode to light up the fireworks otherwise every time you have to program the esp with the router's credentials of your internet.
Also, make sure that you have installed the esp8266 library in the Arduino IDE, before doing all this.
I used the esp in the AP(access point) mode for this task and also in the ST(station) mode to give a better idea of how things work.
Program to use ESP8266 in AP Mode#include <ESP8266WiFi.h>
#include <ESP8266WebServer.h>/* Put your SSID & Password */
const char* ssid = "ZAIN"; // Enter SSID here
const char* password = "12345678"; //Enter Password here/* Put IP Address details */
IPAddress local_ip(192,168,4,2);
IPAddress gateway(192,168,4,1);
IPAddress subnet(255,255,255,0);ESP8266WebServer server(80);uint8_t LED1pin = D7;
bool LED1status = LOW;uint8_t LED2pin = D2;/*If you want to control another set of firework, use it for a testing led*/
bool LED2status = LOW;void setup() {
Serial.begin(115200);
pinMode(LED1pin, OUTPUT);
pinMode(LED2pin, OUTPUT);WiFi.softAP(ssid, password);
WiFi.softAPConfig(local_ip, gateway, subnet);
delay(100);
server.on("/", handle_OnConnect);
server.on("/led1on", handle_led1on);
server.on("/led1off", handle_led1off);
server.on("/led2on", handle_led2on);
server.on("/led2off", handle_led2off);
server.onNotFound(handle_NotFound);
server.begin();
Serial.println("HTTP server started");
}
void loop() {
server.handleClient();
if(LED1status)
{digitalWrite(LED1pin, HIGH);}
else
{digitalWrite(LED1pin, LOW);}
if(LED2status)
{digitalWrite(LED2pin, HIGH);}
else
{digitalWrite(LED2pin, LOW);}
}void handle_OnConnect() {
LED1status = LOW;
LED2status = LOW;
Serial.println("GPIO7 Status: OFF | GPIO6 Status: OFF");
server.send(200, "text/html", SendHTML(LED1status,LED2status));
}void handle_led1on() {
LED1status = HIGH;
Serial.println("GPIO7 Status: ON");
server.send(200, "text/html", SendHTML(true,LED2status));
}void handle_led1off() {
LED1status = LOW;
Serial.println("GPIO7 Status: OFF");
server.send(200, "text/html", SendHTML(false,LED2status));
}void handle_led2on() {
LED2status = HIGH;
Serial.println("GPIO6 Status: ON");
server.send(200, "text/html", SendHTML(LED1status,true));
}void handle_led2off() {
LED2status = LOW;
Serial.println("GPIO6 Status: OFF");
server.send(200, "text/html", SendHTML(LED1status,false));
}void handle_NotFound(){
server.send(404, "text/plain", "Not found");
}String SendHTML(uint8_t led1stat,uint8_t led2stat){
String ptr = "<!DOCTYPE html> <html>\n";
ptr +="<head><meta name=\"viewport\" content=\"width=device-width, initial-scale=1.0, user-scalable=no\">\n";
ptr +="<title>LED Control</title>\n";
ptr +="<style>html { font-family: Helvetica; display: inline-block; margin: 0px auto; text-align: center;}\n";
ptr +="body{margin-top: 50px;} h1 {color: #444444;margin: 50px auto 30px;} h3 {color: #444444;margin-bottom: 50px;}\n";
ptr +=".button {display: block;width: 80px;background-color: #1abc9c;border: none;color: white;padding: 13px 30px;text-decoration: none;font-size: 25px;margin: 0px auto 35px;cursor: pointer;border-radius: 4px;}\n";
ptr +=".button-on {background-color: #1abc9c;}\n";
ptr +=".button-on:active {background-color: #16a085;}\n";
ptr +=".button-off {background-color: #34495e;}\n";
ptr +=".button-off:active {background-color: #2c3e50;}\n";
ptr +="p {font-size: 14px;color: #888;margin-bottom: 10px;}\n";
ptr +="</style>\n";
ptr +="</head>\n";
ptr +="<body>\n";
ptr +="<h1>BOOM BOOM!!!!</h1>\n";
ptr +="<h3>USING AP MODE</h3>\n";
if(led1stat)
{ptr +="<p>LED1 Status: ON</p><a class=\"button button-off\" href=\"/led1off\">OFF</a>\n";}
else
{ptr +="<p>LED1 Status: OFF</p><a class=\"button button-on\" href=\"/led1on\">ON</a>\n";}if(led2stat)
{ptr +="<p>LED2 Status: ON</p><a class=\"button button-off\" href=\"/led2off\">OFF</a>\n";}
else
{ptr +="<p>LED2 Status: OFF</p><a class=\"button button-on\" href=\"/led2on\">ON</a>\n";}ptr +="</body>\n";
ptr +="</html>\n";
return ptr;
}#include <ESP8266WiFi.h>
const char* ssid = "YourWIFInameSSID";
const char* password = "yourWIFIpassword";int ledPin = 13; // GPIO13---D7 of NodeMCU
WiFiServer server(80);
void setup() {
Serial.begin(115200);
delay(10);
pinMode(ledPin, OUTPUT);
digitalWrite(ledPin, LOW);
// Connect to WiFi network
Serial.println();
Serial.println();
Serial.print("Connecting to ");
Serial.println(ssid);
WiFi.begin(ssid, password);
while (WiFi.status() != WL_CONNECTED) {
delay(500);
Serial.print(".");
}
Serial.println("");
Serial.println("WiFi connected");
// Start the server
server.begin();
Serial.println("Server started");
// Print the IP address
Serial.print("Use this URL to connect: ");
Serial.print("http://");
Serial.print(WiFi.localIP());
Serial.println("/");
}
void loop() {
// Check if a client has connected
WiFiClient client = server.available();
if (!client) {
return;
}
// Wait until the client sends some data
Serial.println("new client");
while(!client.available()){
delay(1);
}
// Read the first line of the request
String request = client.readStringUntil('\r');
Serial.println(request);
client.flush();
// Match the request
int value = LOW;
if (request.indexOf("/LED=ON") != -1) {
digitalWrite(ledPin, HIGH);
value = HIGH;
}
if (request.indexOf("/LED=OFF") != -1) {
digitalWrite(ledPin, LOW);
value = LOW;
}
// Set ledPin according to the request
//digitalWrite(ledPin, value);
// Return the response
client.println("HTTP/1.1 200 OK");
client.println("Content-Type: text/html");
client.println(""); // do not forget this one
client.println("<!DOCTYPE HTML>");
client.println("<html>");
client.print("LED STATE NOW: ");
client.println("<!DOCTYPE html><html>");
client.println("<!DOCTYPE html><html>");
client.println("<head><meta name=\"viewport\" content=\"width=device-width, initial-scale=1\">");
client.println("<link rel=\"icon\" href=\"data:,\">");
// CSS to style the on/off buttons
// Feel free to change the background-color and font-size attributes to fit your preferences
client.println("<style>html { font-family: Helvetica; display: inline-block; margin: 0px auto; text-align: center;}");
client.println(".button { background-color: #f44336; border: none; color: White; padding: 16px 40px;");
client.println("text-decoration: none; font-size: 30px; margin: 2px; cursor: pointer;}");
client.println(".button2 {background-color: #77878A;}</style></head>");
// Web Page Heading
client.println("<body><h1>LETS FIRE EVERYTHING!</h1>");
if(value == HIGH) {
client.print("ON");
} else {
client.print("OFF");
}client.println("<br><br>");
client.println("<a href=\"/LED=ON\"\"><button>On </button></a>");
client.println("<a href=\"/LED=OFF\"\"><button>Off </button></a><br />");
client.println("</html>");
delay(1);
Serial.println("Client disonnected");
Serial.println("");
}In the ST mode after successfully programming the esp8266, power on the esp8266 and check the serial monitor it will give you a message that it has connected with the WIFI of your home. It will also show you the IP which you can input in the cellphone to access the webpage and use the circuit.
Lastly, do not use it to cause harm to someone it's for education purposes only.
Summary of steps:1, Buy the components2, Connect the components as per the schematic3, Program the ESP8266 with the AP/ST mode4, Check the high voltage generator before attaching a firework to it.5, Attach the firework with the High voltage generator wires and FIRE EVERYTHING!!!!
For any queries related to this project, you can contact the author directly.
DO LIKE AND SUBSCRIBE THE VIDEO ALSO VISIT US FOR ANY INFO REGARDING THE TUTORIAL.


Comments
Please log in or sign up to comment.