


Hardware components | ||||||
_ztBMuBhMHo.jpg?auto=compress%2Cformat&w=48&h=48&fit=fill&bg=ffffff) |
| × | 1 | |||
 |
| × | 1 | |||
 |
| × | 1 | |||
 |
| × | 1 | |||
| × | 1 | ||||
 |
| × | 1 | |||
 |
| × | 1 | |||
 |
| × | 1 | |||
Software apps and online services | ||||||
| ||||||
This project demonstrates how to interface Arduino boards with Android based mobile devices/phones using CASP. It also demonstrate the capabilities of CASP to program Android based devices. Users are advised to use their old and unused phone for this project.
Users can interface Arduino board with Android device using following two methods
Method 1. CASP Bridge Application
CASP Bridge application runs on Android mobile devices with WiFi and USB OTG support. It acts as a software bridge by transferring data between Arduino Board connected to the USB port and a client PC connected to the WiFi of the mobile device. This application comes in handy when user wants to access Arduino board wirelessly (using WiFi) from the client PC.
Method 2. Directly creating CASP models that run on Android device
With this method user can create and test CASP models on the host PC and then rebuild the model to run on Android device. Here, CASP creates an APK file for every model build. User has to manually copy and install the generated APK file on the Android device.
This project demonstrates above two methods. Arduino Uno is used as a data acquisition and control board connected to the USB port of the mobile device.
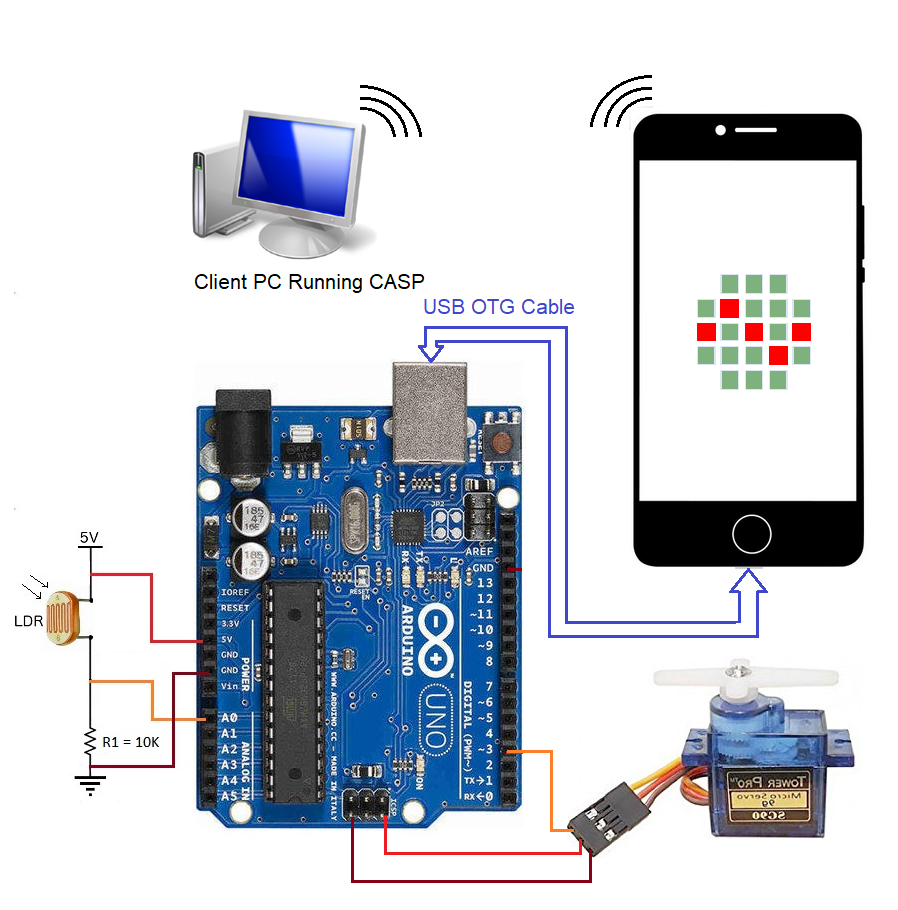
ProcedureStep 1. Connect a light depending resistor (LDR) to pin-A0 and a servo to pin-3 of the Arduino Uno board. Refer schematic section for connection diagram. Build a CASP model to acquire data from pin-A0 and send to the serial port and control the servo based on the angle received from the serial port.
Step 2. Create a native model to plot the LDR data and control the servo through serial communication
Step 3. Demonstration for Method 1 - CASP Bridge Application
Install the CASP Bridge application from CASP/support/android_apk/CASP Bridge/casp_bridge_xxxx.apk file on the Android device (choose suitable APK file based on the processor architecture). Provide required permissions in the Android to install the application from the USB. Connect Arduino Uno board that was programmed in Step-1 to the Android mobile device via USB OTG cable.
Open the CASP Bridge application and select Arduino Uno using vendor and product ID. From the network configuration choose UDP protocol (TCP can also be used) and select WiFi IP address of the mobile device. Click 'Start' to bring the program ready for communication.
On the host PC, we use the same model from Step 2. Configure the Simulation Hardware settings to communicate with the device IP address. Build the model and start the simulation. After the simulation has started it should automatically connect to the Android device and start communicating with the Arduino Uno via the CASP Bridge application running on the Android device. The simulation panel should look similar to the figure shown in Step 2.
Step 4: Demonstration for Method 2 - Directly creating CASP models that run on Android device
For the CASP model from Step 2 on the host PC, change the target to the Android device (choose suitable platform based on the CPU architecture of the Android device). Rebuild the model for the target Android device. After the build process CASP generates an APK file in the build/bin folder of the project directory. Manually copy and install the APK file on the Android device. Enable the required permissions and run the installed application (i.e CASP simulation panel). The CASP simulation panel should now communicate with the Arduino Uno connected to the USB port of the Android device. The resultant plot should look similar to the figure shown in Step 2.
All the above steps are detailed in the below video. Please go through it.
To download and install CASP and required BSPs please visit this page: https://aadhuniklabs.com/?page_id=550.
Please go through this link: https://aadhuniklabs.com/?page_id=554 for video tutorials on CASP.


Comments