


Hardware components | ||||||
 |
| × | 1 | |||
 |
| × | 3 | |||
 |
| × | 1 | |||
Before we begin exploring our internet router further, I would suggest reading Part-1 in this series of projects to get an idea of what we are trying to achieve and the hardware setup.
So, in part-1 of this project series, we opened up a Linksys E1200 internet router and accesses its hardware and firmware (keep in mind that doing this led to the end of manufacturer guarantee). Although we have done a few cool things once we got access to its operating system, our major limitation there was that we were not able to add new files or make any sort of change as it was a read-only file system.
Also, there was only a minor subset of desktop tools available on that file system. These tools were okay to get started, but we need a few more tools to be able to do meaningful stuff. We will be solving all of those issues in this project where we will add custom firmware images to the router.
Most routers these days have an option in their configuration menu where you can upgrade the firmware image. This is a feature provided by the company so that we could upgrade the firmware provided. Although we won't be upgrading any firmware, we will use this feature to add our own firmware which we have full access to. There are a few open-source projects available where we can create firmware images. OpenWRT and DDWRT are two such projects. Each one has its own pros and cons but We shall be using OpenWRT in this project. DDWRT will be covered in a later project to fix one of the OpenWRT issues which we will see.
Firstly, the router needs to be connected to the PC using the ethernet cable. This is done so that we can access the configuration page via a web browser.
Next, we open up a web browser and go to the local address 192.168.1.1. This was in the instructions provided by Linksys. Once we do that, we should reach the Linksys login page. The default username and password are "admin" and "admin".
We type in the credentials and log in. The main page has plenty of configuration options as you can see below. The only option that we are concerned with is the Firmware upgrade option under the administration tab as shown below.
As we can see, there is an option to upload a firmware file and then start upgrading. But firstly, we need to check whether our router is supported by the OpenWRT project. Most routers these days are supported. We visit the supported devices page and type in the model name. In our case, we type E1200 in the search box and hit enter. It shows that the router is supported. The webpage also shows us a 4/32 warning saying that devices having 4Mb Flash and 32Mb RAM don't quite work well with OpenWRT. The router we use here is the E1200 v2. It has 8Mb of Flash and 32Mb of RAM. We can ignore this, for now, and go ahead anyway. But don't worry, we will also be doing a project on upgrading the Flash and RAM.
We now have to go to the firmware selector webpage and type in our model number and click on the download button at the bottom. This will download a binary image file (a file with the ".bin" extension).
Once we have downloaded the image file, we go back to the firmware upgrade page in the router configuration page ( remember the router configuration page is at 192.168.1.1 ) and upload this newly downloaded binary image from OpenWRT. I have uploaded the image and selected the start upgrade option. As you can see below, the firmware upgrade has started and a status bar indicates the progress.
You can also see the upgrade messages on the PC terminal through the UART messages. The flash memory is currently being erased and new firmware is being written. The dot pattern indicates the erase cycle.
Now, sit back and relax for the upgrade to complete. It should take about 5-10 minutes depending on the model. Once that is done, we should reach the login page of OpenWRT as shown in the image below. Note the pound symbol (#) as before. We have root access. As the banner says, we have complete freedom! We type in the "uname" command and see the version information. We can see that we have a much newer version (v5.4) of the Linux kernel (we had v2.6 in the Linksys firmware which is mostly obsolete now). We also try creating a folder and see that we are indeed able to do that. It is no longer a read-only filesystem. Progress!
Let's start exploring our custom operating system. The best part about this OS is that we have the opkg package manager built-in. For the folks familiar with ubuntu, it is like the apt package manager we use to install new packages. We will use opkg to install new packages to our router. We check to see if opkg is installed by typing the following command.
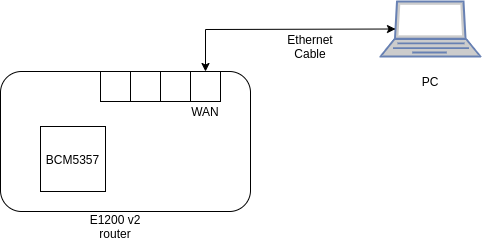
# opkg --versionWe need an internet connection to the router to download packages. For this, I shared my PC's internet connection to the router through the ethernet. You can follow this guide if you don't know how to do that. Keep in mind that we have to connect the ethernet cable to the router's WAN port as shown beloif we want to access the internet. Connections to any other ports won't work.
Why have you not used the router's WiFi? You may ask. One of the disadvantages of using OpenWRT on this router is the radio used on this model is not supported. We then check to see if we have access to the internet by pinging google's servers using the following command. I am indeed able to access the internet.
# ping www.google.comWe then update the package repositories by typing in the following command.
# opkg updateWe start by installing a few useful packages. Since I am used to the nano editor, I install that and then install the openssh-server by using the following command.
# opkg install openssh-server nanoBe careful with what you install though. We have very little flash memory available. As you can see in the images below I have used up 2Mb for these two packages.
The reason we installed openssh-server is to access the router through SSH by using the ethernet cable. This eliminates the messy jumper cables. OpenWRT comes with an SSH server built-in (dropbear) which we can use to login via SSH but it does not support file transfer between systems as the lite version does not provide the FTP server required to transfer files. We would be transferring files later on in this and the next projects.
Now, we need to disable dropbear and start the openssh server. We do this by the following commands.
# /etc/init.d/dropbear stop        // Stops the dropbear server

# /etc/init.d/sshd start           // Starts the openssh-server
OpenWRT uses the init system to manage services. You can start, stop and reload all services running on the system through the init.d folder. You can see all the services provided by the system in the image below. All of these can be managed using the stop, start and restart commands like how we did with the dropbear and openssh-server.
We can remove our jumper cables and log in to the router using SSH from our PC. As you can see in the image below, the jumper cables have been removed and only an ethernet cable is connected. We fire up a terminal and type the following command.
# ssh root@192.168.1.1However, this will not work. We need to set up a few things before we can actually access the router. Firstly, the OpenSSH settings need to be updated. We open the sshd config file and update the following settings by uncommenting the line and modifying them.
# nano /etc/ssh/sshd_config //this is the openssh config fileWe find the "PermitRootLogin" and change it to "yes" after uncommenting it by removing the # symbol. We do this so that we can log in as the root user. We then change the "PermitEmptyPasswords" to "yes". This is done so that we can leave the password field empty while logging in.
We save the file using "Ctrl + x" key combination and then reload the sshd server using the following command.
# /etc/init.d/sshd reload //reload the sshd serverNow, I open a terminal on my PC and make an SSH connection via the following command and as you can see in the image below, I was able to log in successfully.
$ ssh root@192.168.1.1 // connect to the router via SSHThere might be an issue sometimes where the login is not permitted if you have an empty password. This can be resolved by setting up a password through the router's configuration webpage at 192.168.1.1
Phew, that was quite a lot of stuff we covered here. We have built upon the basic router hacking in Part-1 of this series and made a lot of progress. In the next project, we will further build upon this configuration and play around with the GPIO pins and blink the onboard LED. Stay tuned!

Comments
Please log in or sign up to comment.