The Bluetooth-controlled remote control car project explores wireless communication, microcontroller programming, and motor control. The car, controlled via a smartphone app, uses an Arduino microcontroller and Bluetooth module to respond to commands. Challenges such as delays, disconnections, and power supply issues were addressed by optimizing control algorithms, ensuring stable power, and reducing interference. This hands-on project provided valuable lessons in system optimization, problem-solving, and real-time control, with future improvements planned for the app and additional features.
Process:
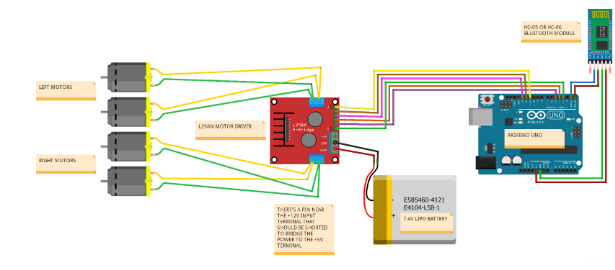
Step 1&2: Same with Line Follower CarStep 3: Set Up the Bluetooth ModuleConnect the Bluetooth module (HC-05 or HC-06) to the Arduino Uno:
- Connect TX on the Bluetooth module to RX on the Arduino (Pin 0).
- Connect RX on the Bluetooth module to TX on the Arduino (Pin 1).
- Connect the VCC and GND pins of the Bluetooth module to the 5V and GND pins of the Arduino, respectively.
- Connect the Bluetooth module (HC-05 or HC-06) to the Arduino Uno:
Connect TX on the Bluetooth module to RX on the Arduino (Pin 0).
Connect RX on the Bluetooth module to TX on the Arduino (Pin 1).
Connect the VCC and GND pins of the Bluetooth module to the 5V and GND pins of the Arduino, respectively.
Step 4: Power Supply- Connect a battery pack (typically 9V or 12V) to the motor driver to power the motors and the Arduino.
- Ensure the battery pack provides enough power for both the Arduino and the motors.
Step 5: Programming the ArduinoStep 6: Install the Bluetooth Control App- Download and install the Arduino BlueControl app (or another Bluetooth control app) on your smartphone.
- Pair the smartphone with the HC-05/HC-06 Bluetooth module (default password: 1234 or 0000).
Step 7: Testing the Car- Once everything is set up, power the car on and open the Bluetooth control app on your smartphone.
- Connect to the car via Bluetooth and use the app’s interface to send commands (e.g., Forward, Backward, Left, Right, Stop).
- The car should respond to the commands by moving accordingly.
Step 8: Troubleshooting and Adjustments- If the car is not responding well, check the wiring, Bluetooth connections, and ensure the motor driver is properly connected.
- Adjust the speed and responsiveness in the Arduino code if necessary.


_ztBMuBhMHo.jpg?auto=compress%2Cformat&w=48&h=48&fit=fill&bg=ffffff)


Comments