This is my first project on Hackster and it's about relieving the fuss of copying some text from one device which has to be pasted in another device. I would sometimes mail or text myself what I wanted to paste and then open my mail or Facebook to copy that text. Although Google now offers a service where you can paste onto your desktop if you have Chrome and a Google account, I wanted to create an overall solution which would work across any device ( And mostly because I like to tinker with Arduino and wanted to create a simple yet useful project for all). This project is fairly easy and can be made by anyone, even if you haven't used an Arduino before. So if you feel you've faced this problem, feel free to indulge and try this project for yourself. I have explained each and everything that is needed to understand this project.
Step One: Parts RequiredFor this project, I'll be using Arduino Micro but you can use any Arduino compatible board with ATmega32u4 as the main processor, since it is capable of acting as a Human Interface Device(HID); in this case, a keyboard. I haven't tested this project on other processors like Microchip's SAMD21 and SAMD51.
You'll also need breadboard and some jumper wires, HC-05 bluetooth module and a micro USB type B cable to program your Arduino board.
Other than these parts, you'll obviously need a laptop and a smartphone to test your project.
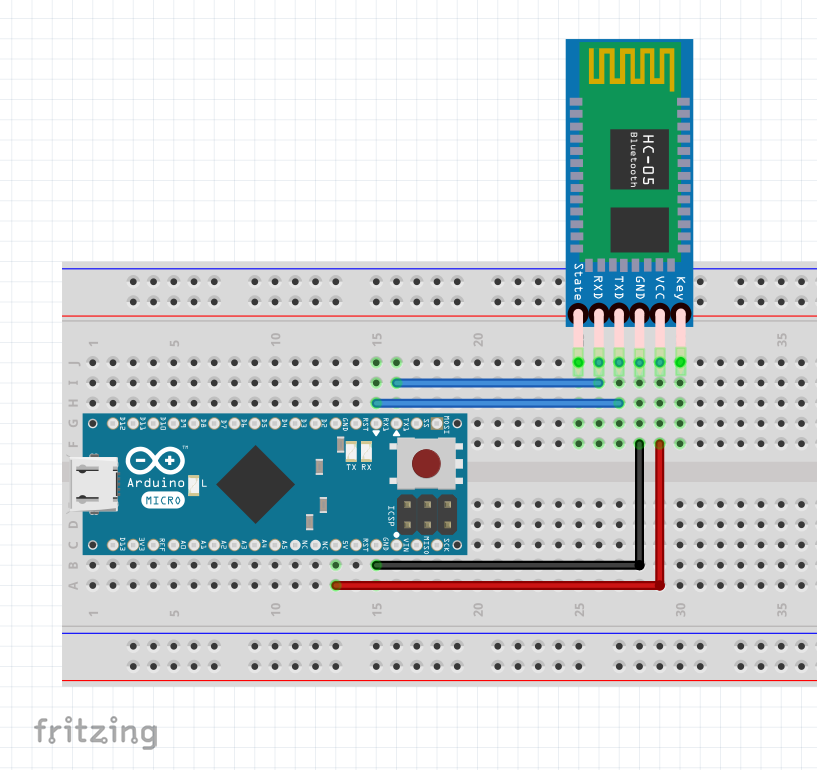
Step Two: Circuit DiagramWe will be using Serial Communication to connect Arduino Micro to HC-05 module. There are two communication ports available on the Arduino; Serial interface is reserved for communication between your computer (Serial Monitor), so, we'll use Serial1 interface to communicate between Arduino and HC-05 module. The connections are pretty simple:
- RX of HC-05 goes to TX of Arduino Micro
- TX of HC-05 goes to RX of Arduino Micro
- GND of HC-05 goes to GND of Arduino Micro
- VCC of HC-05 goes to +5V of Arduino Micro
We won't be using Key and State pins of the HC-05.
It's recommended to disconnect the RX and TX pins of the HC-05 bluetooth module to prevent any interference during code compilation and upload.
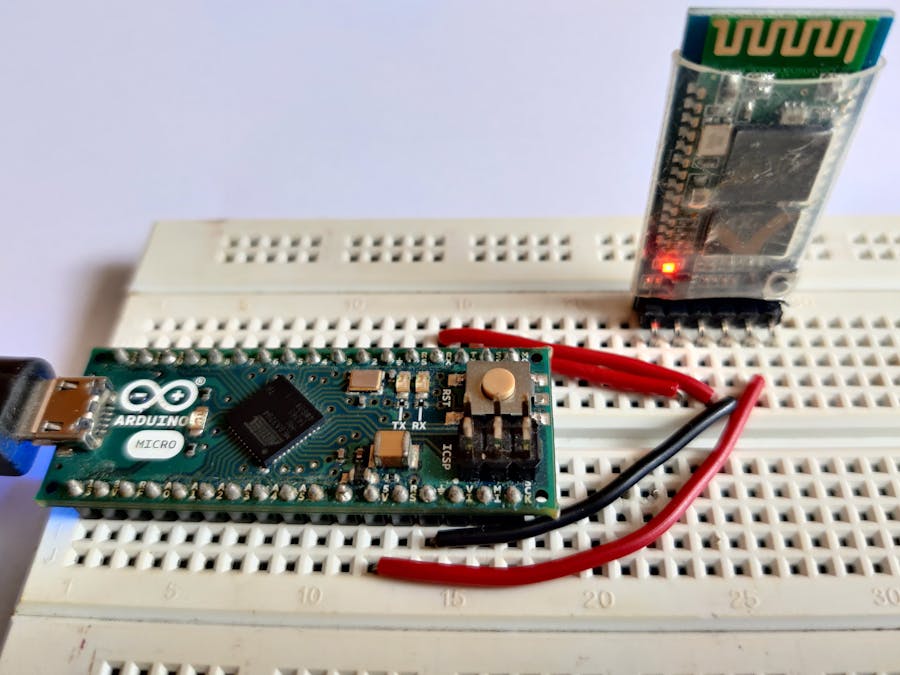
After the connections, your build should look something like this :
/* Project Name : Text Teleporter
 * Receives some text in String format via bluetooth from one device and types (pastes) it into another device.
 * For : Arduino Micro/Leonardo/Due/Pro Micro (ATMega 32U4)
 * Author : Advik Singhania
 * Created On : 11th October, 2020; 11:23 AM IST
 */

//Keyboard header file for Arduino to take
//control of the keyboard and paste the string
#include "Keyboard.h"

void setup() {
  // Open the serial port for bluetooth:
  Serial1.begin(9600);
  // Initialize control for the keyboard:
  Keyboard.begin();
}

void loop() {
  // Check for incoming serial data:
  if (Serial1.available() > 0) {
    // Read incoming serial data:
    String a = Serial1.readString();
    // Type the text:
    Keyboard.print(a);
  }
  delay(10); // Delay of 10 milliseconds
}
At first, we need to tell the compiler that we'll be using a Keyboard.h header file from the library to use the HID functions available for the Arduino Micro. The compiler links this header file with our program and uploads it onto the board.
In the default setup() function, we begin the process to open a serial port for connecting to the module. 9600 is the default baud rate; the speed of data transmission used by the HC-05 bluetooth module. Then initialize the Keyboard to be used. Pretty much self explanatory. This block will execute only once and can be re-executed by pressing the reset button on the Arduino.
The loop() function will keep on repeating the code inside it and therefore we can send any amount of text we want to paste any number of times. If the Arduino detects that there is a connection and data is ready to be sent through the Serial1 interface, we declare a variable a of data type String to store the text which is sent to Serial1 (bluetooth) as a string and use the Keyboard.print() function to take control over the keyboard and type out the String a (copied text). if conditions can work without the need of else block and we don't need anything to write if the condition fails so that's that and no harm done.
This code is also available on my GitHub repo here, so you're welcome to make any ammendments if any. After writing the code, make sure you've selected the right Board and Port from the tools menu then click on upload (Remove the RX and TX wires of HC-05 before uploading).
Step Four: Configuring It AllAfter uploading the code, connect the RX and TX wires again. Head over to the bluetooth settings of your smartphone and check if the scan list shows HC-05. Tapping on it will ask for a password, which is 1234 by default.
After successful connection, you'll need to install this app or any other bluetooth client that can provide a terminal mode:
Arduino Bluetooth Controller by Giumi Apps
The app will ask you to turn on bluetooth if not on before, tap on Yes/Allow. Then it will show 2 lists: Connect to a device and Available devices. Your HC-05 should be listed under the first list. Tap on it and under the Connect in options, click on Terminal mode. If succesful, you should see a type in command box, where you can paste the copied text.
You can also use the Bluetooth Serial Controller app by NEXT PROTOTYPES. Here, you'll need to click on the CONNECT button at the top right and find HC-05. The default interface is in landscape with many buttons and a small terminal box to enter your text. Note that you'll need to tap on the x button in bottom left after sending your text if you want to type in something new.
Be sure to open a notepad or move your cursor where you want to paste your text before hitting enter. The text should be typed out on the screen. It's important to note here that the Arduino takes control over your keyboard and won't let you type anything else while it's doing its work.
Step Five: Done. What's Next ?If you've made this project and would like to make it permanent, you can solder it on to a PCB with the bluetooth module and keep it as a self-made device for situations where it can come handy. Although, it also has some malicious uses like typing in some commands in CMD which can be dangerous. Therefore, exercise caution. If you have an OTG cable you can connect the usb cable of Arduino to your phone and it should work the same. Thank you for taking your time and making this project. Feel free to comment below your feedback and ask your doubts if any. I will try and answer as much as possible.


_PnKPri8a6q.jpg?auto=compress%2Cformat&w=48&h=48&fit=fill&bg=ffffff)


Comments
Please log in or sign up to comment.