Hey, what's up, Guys! Akarsh here from CETech.
This is the second part of Arduino based drone series. In this part, we are going to make a Transmitter and Receiver pair of our own which is based on Arduino as well. In the first part of the series, we made the Flight Controller of our Drone which you can check out from here. In this tutorial, we are going to make two different circuits. The first one is for the Transmitter which will act as the Remote Controller of the Drone. We will send the controlling commands to our drone using this Transmitter. The second one is the Receiver Circuit which will be placed on our Quadcopter and will be connected to the Flight Controller. The Receiver circuit will continuously receive the signals that will be sent by our Transmitter and it will pass that signal to the Flight Controller which according to that signal will control the motors ultimately controlling the drone.
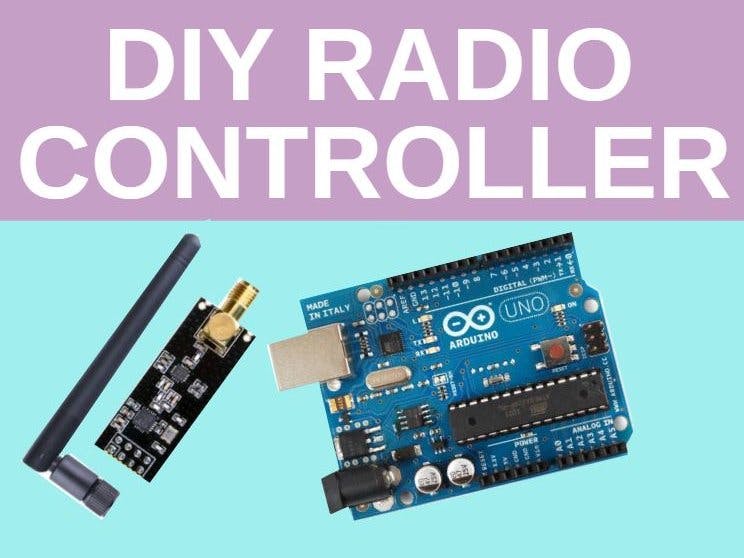
Both the circuits will be Arduino-based we will be using Arduino UNOs for the Transmitter and Receiver Circuit but other than that we will use NRF24L01 Radio Transceiver modules for the transfer of data between Transmitter and Receiver. Other than these we will use Joystick modules to give the commands.
So let's get to work straight away.
Get PCBs for Your Projects ManufacturedYou must check out PCBWAY for ordering PCBs online for cheap!
You get 10 good-quality PCBs manufactured and shipped to your doorstep for cheap. You will also get a discount on shipping on your first order. Upload your Gerber files onto PCBWAY to get them manufactured with good quality and quick turnaround time. Check out their online Gerber viewer function. PCBWAY takes care of its customers a lot that's why they offer reward points with every purchase that you make from them these reward points can be redeemed for various useful items from their gift shop.
About NRF24L01 Transceiver ModuleThe nRF24L01 is a wireless transceiver module, meaning each module can both send as well as receive data. They operate at the frequency of 2.4GHz, which falls under the ISM band, and hence it is legal to use in almost all countries for engineering applications. The modules when operated efficiently can cover a distance of 100 meters (200 feet) which makes it a great choice for all wireless remote-controlled projects. The module operates at 3.3V hence can be easily used with 3.2V systems or 5V systems. Each module has an address range of 125 and each module can communicate with 6 other modules hence it is possible to have multiple wireless units communicating with each other in a particular area. Hence mesh networks or other types of networks are possible using this module. So if you are looking for a wireless module with the above properties then this module would be an ideal choice for you. The NRF24L01 module works with the help of SPI communications. These modules can either be used with a 3.3V microcontroller or a 5V microcontroller but they should have an SPI port.
The advantages of using the NRF24L01 Transceiver module are:-
- Low cost: The NRF24L01 is one of the cheapest wireless transceiver modules in the market.
- Ease of Pairing with Microcontroller/Arduino Board:The nRF24L01 can be easily paired with a variety of microcontroller systems; MCU/ARM/PIC/AVR/STM32 by using the SPI protocol or an RF24 library when pairing with Arduino.
- 2.4Ghz for wireless communication flexibility: 2.4GHz operating frequency allows for higher bit rate usages rather than other lower operating frequencies. It uses GFSK modulation for data transmission as well, meaning the data transfer rate can either be 250kbps, 1Mbps, or 2Mbps.
- High transmission range – The nRF24L01, when used with the right setup, can transmit wavelengths over several kilometers.
- Endless Applications – Ranging from Wireless PC Peripherals to controllers and toys, the nRF24L01 is applicable to be used for many scenarios.
Though there are a lot of advantages that give this module an edge over other modules, there are some drawbacks of using this module as well which can be easily dodged but we need to keep them in check while using these modules. Some of those drawbacks are:-
- It is a highly sensitive module that's why sometimes it catches noise from the power supply or other sources and amplifies that as well ultimately disrupting the original message. To keep that in check we need to make sure that we do not use very long connections. We can also connect a capacitor of somewhere around 10uF across the power terminals to control the noise.
- It uses SPI communication that's why comparatively more pins are required to connect and use this module which is confusing sometimes.
- It operates on a 3.3V power supply that's why it cannot be directly connected to some Microcontrollers that offer only 5V. In this type of case, we need to connect this module through 5V to 3.3V voltage regulator in order to save it from any damage.
But even after these drawbacks, this module is a great choice for applications like ours. To get some more knowledge about this module, you can have a look at its datasheet from here.
Setting Up the Drone TransmitterIn this step, we will complete the Transmitter setup. We will do the circuit part first and after that, we will upload the code to the Arduino UNO to wrap up the setup. The materials required for this step are the NRF24L01 Transceiver module, Arduino UNO, 10 uF Capacitor, Jumper wires, Breadboard/Zero PCB, and Joystick modules. The steps that we need to follow are as follows:-
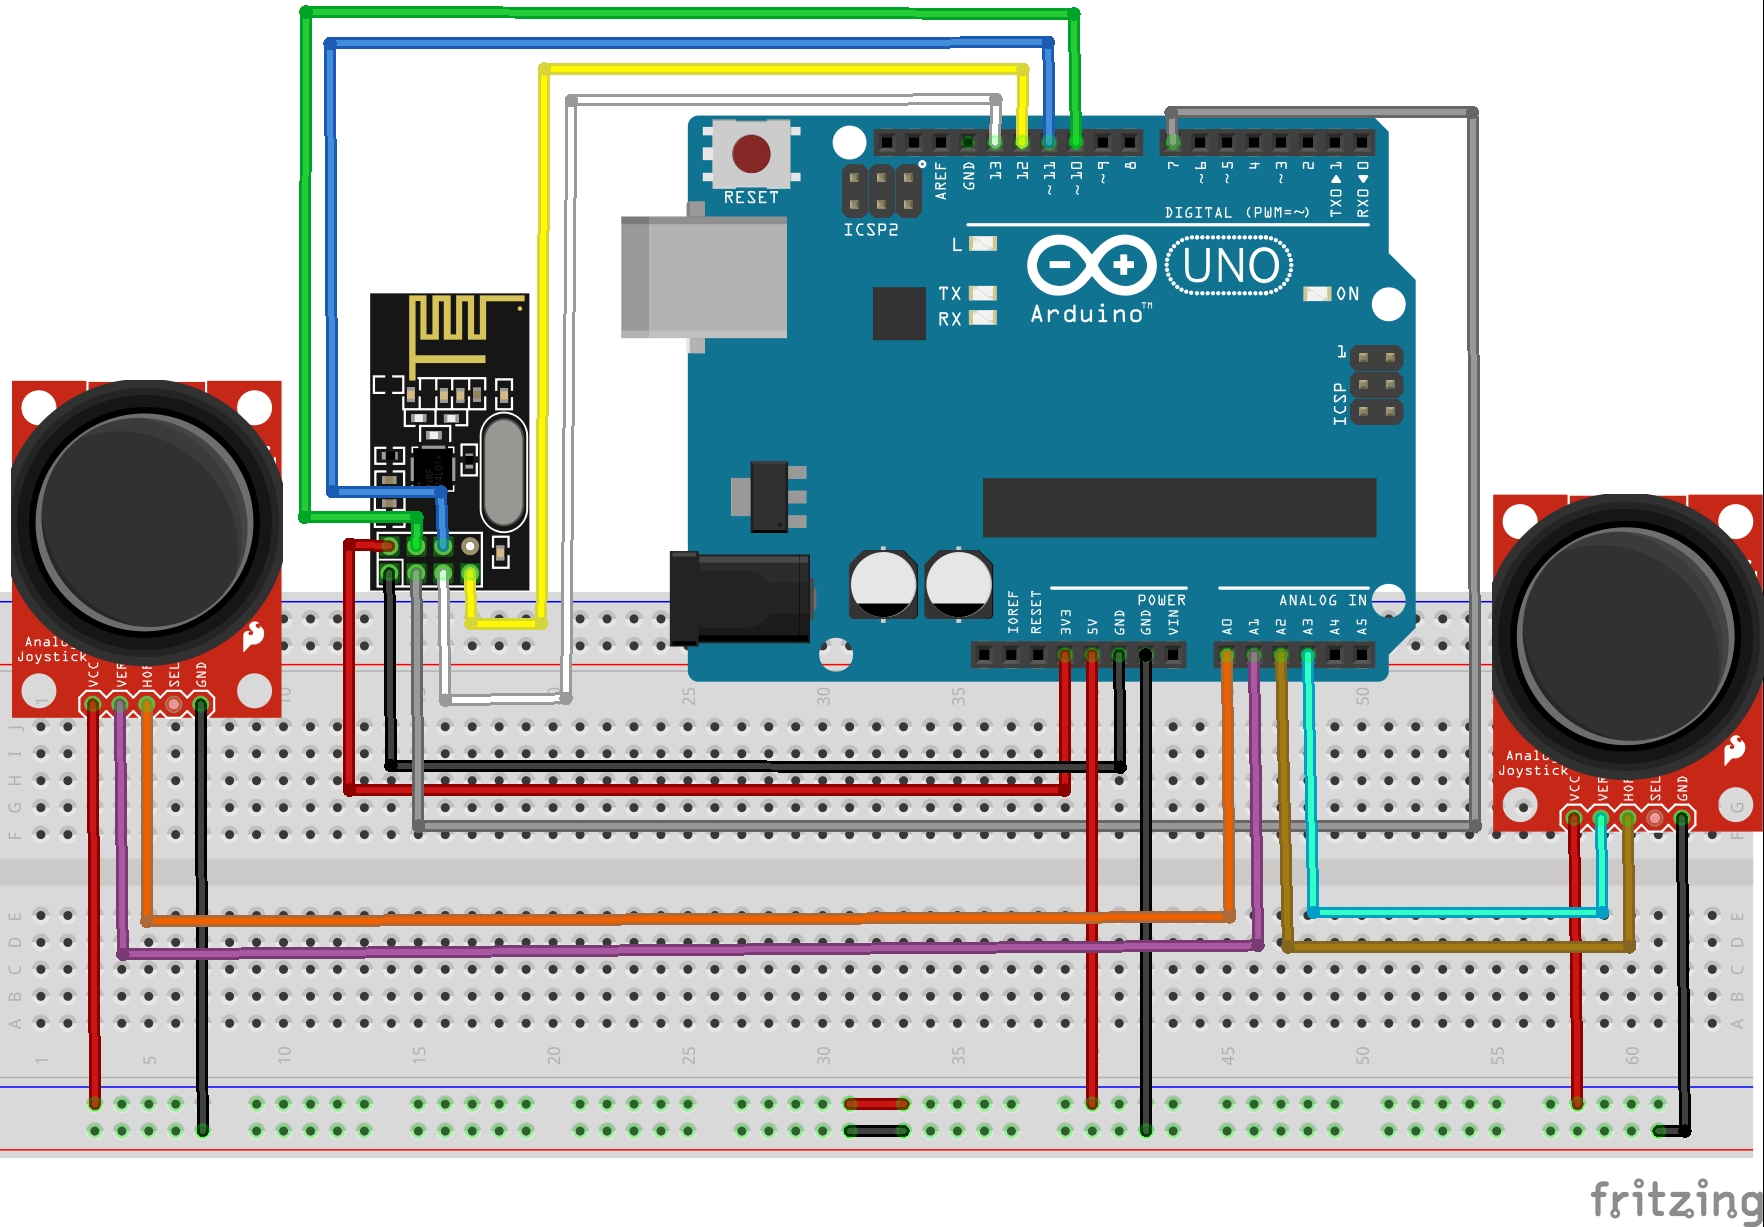
First of all, we need to connect a 10 uF Capacitor to the Vcc and GND terminals of the NRF24L01 module to make the input noise-free. After that, we need to connect the Arduino UNO, and the NRF24L01 Transceiver module as shown in the circuit diagram above and as stated below:-
- Connect GND pin of NRF module to GND pin of Arduino.
- Connect Vcc pin of NRF module to 3.3 V pin of the Arduino UNO.
- Connect CE pin of the NRF i.e Pin No. 3 to Digital Pin 9 of Arduino UNO.
- Connect CSN pin of the NRF i.e Pin No. 4 to Digital Pin 8 of Arduino UNO.
- Connect SCK pin of the NRF i.e Pin No. 5 to Digital Pin 13 of Arduino UNO.
- Connect MOSI pin of the NRF i.e. Pin No. 6 to Digital Pin 11 of Arduino UNO.
- Connect MISO pin of the NRF i.e. Pin No. 7 to Digital Pin 12 of Arduino UNO.
After the connection between the NRF and Arduino UNO is done. We now need to connect our Joystick modules to the Arduino UNO as well. The Joysticks are to be connected as stated below:-
- Connect 5V pin of the Joystick module to 5V pin of the Arduino UNO.
- Connect the GND pin of the Joystick module to the GND pin of the Arduino UNO.
- Connect the VRx of the Left Joystick module to the A0 pin of the Arduino and the VRy pin of the Left Joystick module to the A1 pin of the Arduino.
- Connect the VRx pin of the Right Joystick to the A2 pin of the Arduino and the VRy pin of the Right Joystick to the A3 pin of the Arduino.
- This will complete the Hardware part of the Setup. Now we need to upload the code on our Arduino UNO but before that, we need to make sure that our Arduino IDE has all the libraries required for the NRF module. You can download the NRF24 library from the project's Github repository, which you can open from here. There you will see a file named "RF24 Master". Download the file, then head over to the Arduino IDE. In the IDE open the Sketch tab, there you need to click on Include library, and after that click on Add.ZIP library. Select the file you downloaded and click on open. This will install the library but before using restart the IDE once.
- Now we need to upload the code in the Arduino UNO for that, we need to head back to the Github repository of the project. In the Github repository, you will see a folder named "Drone_Transmitter". In that folder, the code file for the Transmitter is present open that file in your Arduino IDE. Select the correct board and COM Port and hit the Upload button.
This will complete the Setup for our Drone Transmitter. Some precautions that should be kept in mind are, The connections should be as small and tight as possible. The capacitor should be connected between the Vcc and GND terminals of the NRF24L01 module and don't forget to connect the Antenna of the NRF module. You can turn this Transmitter ON by connecting the Arduino to a Power bank or by connecting it to a 9V power supply. In the next step, we will have a look at the Receiver Section setup.
Setting Up the Drone ReceiverIn the previous step, we completed the Drone Transmitter setup. In this step, we are going to do the complete setup of our drone Receiver. The materials that we require for this step are the NRF24L01 module, Arduino UNO, wires, and Breadboard/Zero PCB. The setup is simple and is similar to the one that we did in the previous step. We need to follow the steps given below:-
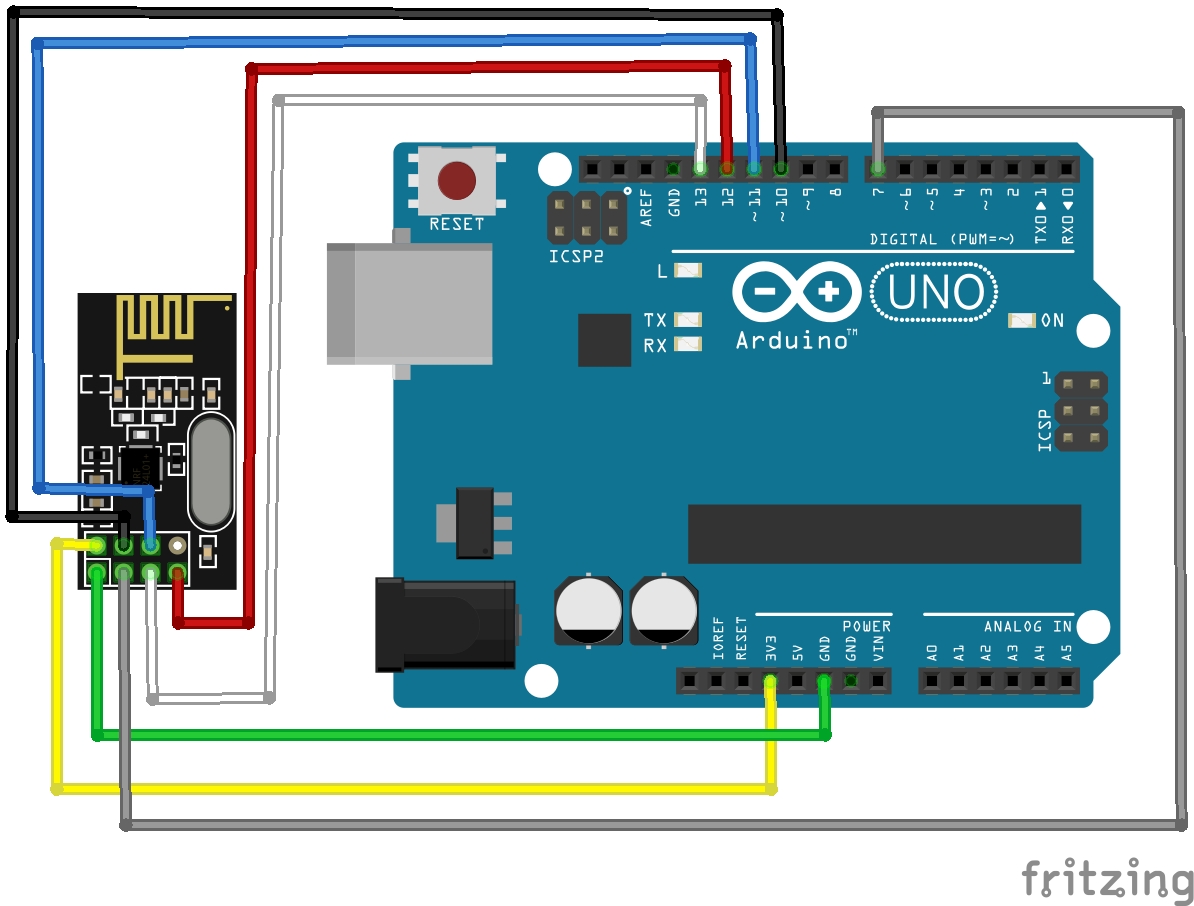
First of all, we need to connect a 10 uF Capacitor to the Vcc and GND terminals of the NRF24L01 module to make the input noise-free. After that, we need to connect the Arduino UNO, and the NRF24L01 Transceiver module as shown in the circuit diagram above and as stated below:-
- Connect GND pin of NRF module to GND pin of Arduino.
- Connect Vcc pin of NRF module to 3.3 V pin of the Arduino UNO.
- Connect CE pin of the NRF i.e Pin No. 3 to Digital Pin 9 of Arduino UNO.
- Connect CSN pin of the NRF i.e Pin No. 4 to Digital Pin 8 of Arduino UNO.
- Connect SCK pin of the NRF i.e Pin No. 5 to Digital Pin 13 of Arduino UNO.
- Connect MOSI pin of the NRF i.e. Pin No. 6 to Digital Pin 11 of Arduino UNO.
- Connect MISO pin of the NRF i.e. Pin No. 7 to Digital Pin 12 of Arduino UNO.
This will complete the Hardware setup of our Drone Receiver. Now we just need to upload the code and we are done with the setup. But we will not directly upload the final code to our Arduino UNO. Before uploading the final code, we will upload a test code on the Arduino UNO. What the Test code will do is that it will display the values received by the Receiver on the Serial Monitor of the Arduino IDE after that we will upload the final code to our Arduino UNO. All these things will be done in the next step.
Testing Completing the Transmitter Receiver PairSo as we are done with the Complete Setup of the Transmitter and the Hardware Setup of our Drone Receiver. Now we need to test the pair so for that we will follow the steps given below:-
- Head over to the Github repository of the project from here. In the repository, there is a file named "Receiver_test". This file is the test file for the performance of our Transmitter Receiver pair.
- We need to open the code in our Arduino IDE after that we need to connect the Receiver Circuit to our PC and then after selecting the correct Board and COM port, we need to hit the upload button.
- Once we are done with the Upload, we need to keep the Receiver connected to the PC and turn on our Transmitter. Now we need to open the Serial Monitor of our Arduino IDE and there we need to set the Baud Rate to 250000. After selecting the Baud rate, you will see 4 values: Throttle, Yaw, Pitch, and Roll. If you move the Joysticks of the Transmitter to different directions, you will observe that the Serial Monitor values also change according to that. This will confirm that our Transmitter and Receiver pair are working fine.
- Now as it is confirmed, that our Transmitter and Receiver pair are working fine. We can now upload the final code to the Receiver's Arduino UNO. The code is available on the Github repository with the name "Drone_Receiver". Open that file in Arduino IDE. Select the correct COM Port and Board and then hit the upload button.
So in this way, we have built our own Arduino-based Transmitter and Receiver Pair for our Arduino-based Quadcopter. In the next part of the Series, we will assemble our drone's body and after that, we will load it with the Flight Controller and the Receiver that we have made to Complete our drone's assembly.


_baVEVgguW1.jpg?auto=compress%2Cformat&w=48&h=48&fit=fill&bg=ffffff)


Comments
Please log in or sign up to comment.