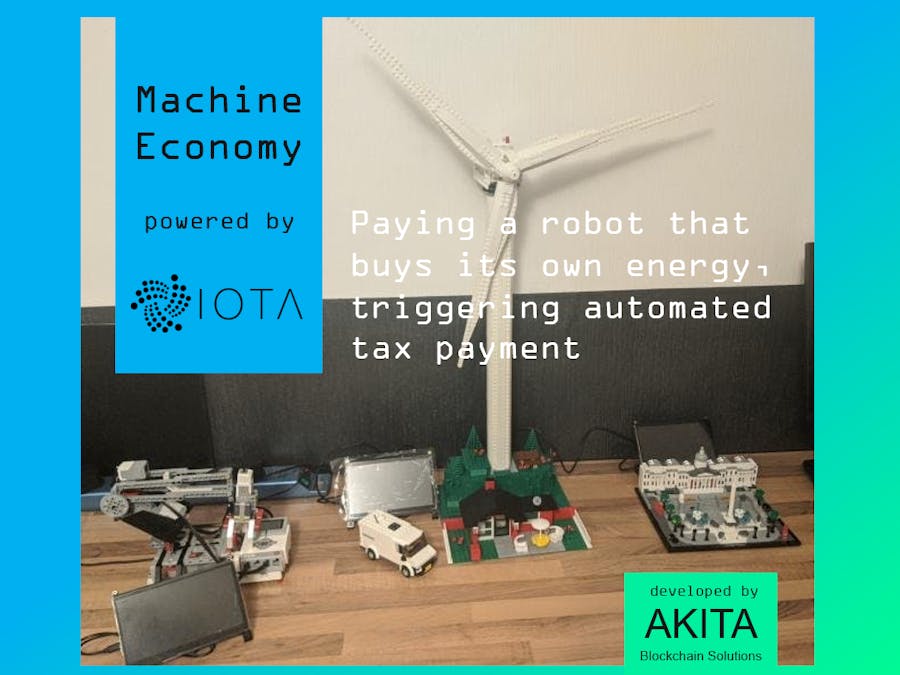
Paying a robot to work, who pays a windmill to produce and deliver energy, then triggering an automated tax payment to the government - sounds futuristic? We have already built it based on the next-generation Distributed Ledger Technology (DLT) IOTA Tangle. With this step by step instruction and our powerful open source "IOTA Payment Module" you can easily re-build this prototype even with a Beginner/Intermediate level. Feel free to modify and extend it for higher-skilled people and innovative businesses.
*H2M = human-to-machine // M2M = machine-to-machine
Machine Economy 2020The big hype about "blockchain" is over. The positive effect now is growing interest from serious people and large companies who still do not understand Distributed Ledger Technologies (DLTs). That's why we are building tangible prototypes that demonstrate live how this new technology is going to impact business processes, transaction costs and speed, and even process automation.
In the year 2020 machines can pay each other and automate interactions. In this simple portable prototype, a robot starts working as soon as he receives payment to its own dedicated machine "bank" account, it requires energy to do the work, that's why it pays the wind energy supplier, triggering an automated % tax payment to the government.
The portable prototype that we have developed is supposed to demystify DLT and educate by just experiencing it live. You, universities and companies can easily rebuild and modify it since we have published the instructions, required hardware, and code open source.
Build the hardware setup and install the required softwareThe goal here is to assemble all hardware and software to have a fully automated prototype to build by yourself and present to your audience (friends, university, company, etc.). We will guide you step by step through each required phase exactly how we build the latest version after countless iterations of trial and error.
Let's get to work:
A) Start by putting the hardware components together. You have 3 machine devices: a Robot Arm (from Education EV3 set, manual: tiny.cc/36y4hz ), an energy windmill and a government tax building. Detailed instruction manuals come with the packages, linked above or can be found online.
B) Install the Raspberry Pis with our 10 step sub guide and connect them to the touchscreens (repeat this process three times, for each machine): https://machineeconomy.github.io/cookbook/docs/00_setup_raspberry_pi
C) Install the IOTA Payment Module on each Machine/ Pi. This a simple and quick installation, where have made 3 customized payment modules for each machine:
- Robot: https://github.com/machineeconomy/akita-robot
- Energy: https://github.com/machineeconomy/akita-energy
- Government: https://github.com/machineeconomy/akita-government
Follow the instructions described in the "Usage" section on each repository. And find the full instruction for the first machine (robot) also below:
1. Clone repository
Clone git repository from machineeconomy/akita-robot
git clone https://github.com/machineeconomy/akita-robot.git2. create.env
Create a.env file with your settings in the root directory.
Always start with a new unused seed!
MAX_PAYMENT_TIME is the time until created paymentes aren't checked anymore in minutes (4320 = 3 days to pay, transactions after that are ignored)
If you want to send payouts, without receiving iotas via payments first, send the iotas to the first address of the seed (index 0)
SEED='REPLACEWITHEIGHTYONETRYTESEED'
IOTANODE='https://nodes.thetangle.org:443'
FALLBACKNODE='https://node01.iotatoken.nl'
MAX_PAYMENT_TIME=4320
PROVIDER_URL='http://localhost:5001/iotapay/api'
NAME="Robot"
VALUE=3
3. Generate new seed
Create a seed and insert it to your.env file.
Linux
Enter this line into your terminal to generate a new random seed with 81 letters from the allowed capital alphabet and the number 9:
cat /dev/urandom |tr -dc A-Z9|head -c${1:-81}Mac
For Apple Users, enter this line in your terminal:
cat /dev/urandom |LC_ALL=C tr -dc 'A-Z9' | fold -w 81 | head -n 1Windows
For Windows, the best way is to use KeePass, or use one of the two online generators above.
You will want to use the password generator with the following settings:
- Length of generated password: 81
- Check Upper-case (A, B, C,...)
- Make sure all other boxes are unchecked
- Also include the following characters: 9
4. Setup the robot
- Insert your provider URL from machineeconomy/akita-energy
- Insert your name (example: "Robot")
- Insert an IOTA Value. (example: 3)
5. Build the front end
Enter these lines in your terminal to install the front end displayed on your Pi Screen:
cd frontend
npm install
npm run build
cd ..
6. Run robot
To start the robot payment module enter these lines in your terminal.
npm install
npm start
Your machines are all set up and ready for the demonstration.
IOTA Payment ModuleOnce a payment module is installed you already have all required functions and connections to the IOTA Tangle up and running and do NOT need to install them separately.
✅ generated address to receive payment (plain text and QR code)
✅ connected to the IOTA Tangle via our AKITA Machine Nodes
✅ show front end with attributes machine type, wallet balance, current action, last tx.
*The standard payment module does not include a front end currently
Go to console > payments > payment > address to see your machine address in plain text.
D) If you do not have an IOTA Wallet installed on your phone or computer already, please install the official Trinity Wallet IOTA App and fund it with a small amount (1 MIOTA currently equals 0, 20 EUR and we are only using 3 IOTA = 0, 000003 MIOTA per demo run). https://trinity.iota.org
Run the live demonstrationClick the Order button on the Robot Pi screen to show the QR code, scan the QR code to load the transaction details into your Trinity, including address, amount (3 IOTA) and you can add optional Message text. Then Confirm sending the transaction.
*Tangle transaction hash values can be read in console and verified on the public Tangle Explorer https://thetangle.org
Only the first action of this process flow is manual from you Trinity to the robot human-to-machine (H2M), while the following process steps machine-to-machine (M2M) are completely automated, without any human/ manual interaction required.
Our custom builds are programmed to transfer the following amounts:
a) Human/Trinity sends to Robot = 3 IOTA
b) Robot has now a new balance of 3 IOTA and sends to Energy = 2 IOTA
c) Energy has now a new balance of 2 IOTA and sends to Tax = 1 IOTA
All transactions are listed below to be verified on the public IOTA Tangle Explorer:
a) Human to Robot
b) Robot to Energy
c) Energy to Tax
We hope you enjoyed this custom IOTA Payment Module tutorial and this helps to push real world adoption of IOTA technology to individuals, companies and even governments to improve.
If you are working on another IOTA Use case that involves any kind of hardware you do not have to start from scratch, but can use this tutorial or our general Payment Module to boost your project.
We want to give a special Thank You to the IOTA community and Thoralf https://github.com/Thoralf-M
Also check out our previous development of this Use Case in a virtual web environment: https://m2m.akitablock.io
2019 was a great roller coaster ride again. We wish everyone an awesome start into 2020, good health and mass adoption of IOTA (naturally increasing its value again^^).
All the best,
AKITA Blockchain Solutions, Team and all supporters
Follow for news and updates: https://twitter.com/AkitaBlock


Comments
Please log in or sign up to comment.