Social distancing is the one of the effective method for fight against Covid-19. I saw lot of the projects for social distancing. Social distancing badge, Social distancing helmet, etc... But the mechanism of all the devices are same. Today we discuss about the working of these type of devices. For making this, we need a microcontroller (here I use Arduino Nano), distance sensor (HC-SR 04), Battery backup, piezo buzzer.
How it works?Here I use ultrasonic sensor to measure the distance and Arduino will continuously analyse that distance. When the distance is measured less then 1 meter then the Arduino will turn on the buzzer.
Before starting we need to understand some components used in this circuit.
1. Arduino Nano
Arduino Nano is the one of small development board in Arduino family. And breadboard-friendly board based on the ATmega328 (Arduino Nano 3.x). It has more or less the same functionality of the Arduino Duemilanove, but in a different package. It lacks only a DC power jack, and works with a Mini-B USB cable instead of a standard one. You can read more from Arduino CC.
2. HC-SR 04
It is an ultrasonic sound based distance sensor. It has an transmitter and a receiver. I already mentioned this component in detail in one of my previous article. Please read the that article here for better understanding the HC-SR 04.
3. Piezo Buzzer
Piezo buzzer is an output device which can produce sound in some frequencies. It is mainly made up of piezo electric materiel. It has only two terminals. And it is available in different operating voltages. Here I use the 5V model. For more read "Interface Buzzer With Arduino Uno".
4. 9V Rechargeable Battery
Here we design this "Social distancing reminder" as a portable device. So the battery backup is an essential thing. We can use a 9V rechargeable battery. This is a USB rechargeable battery. Alternatively you can use a generic 9v battery. But I strongly recommend the rechargeable battery. Because I'm not just a developer. Also an conservationist.
Let's Start!!!!
Step - 1
First I'am going to create an Arduino Sketch. Open Arduino IDE.
Define the echoPin at pin number 4 and trigPin at 3. Then declare two variables. First is duration and second variable is distance.
#define echoPin 4
#define trigPin 3

long int duration;
int distance;
Step - 2
Next code the setup part. Set the trigPin as "OUTPUT" and echoPin as "INPUT". Here I attach the buzzer to pin 13 so we need to set the pin 13 as "OUTPUT".
void setup{
pinMode(trigPin,OUTPUT);
pinMode(echoPin,INPUT);
pinMode(13,OUTPUT);
}
Setup part is completed.
Step - 3
Next program the loop part.We can divide loop part into two. First is part 1. And second is part 2.
Part - 1
This part is used for get the distance between sensor and the object or person.
First set the trigPin as "LOW" for 2 microseconds. Then set it as "HIGH" for 10 microseconds. Again set the trigPin as LOW. Next store the total travel time of ultrasonic sound wave to the variable duration using the function "pulseIn()". Then multiply the duration with 0.034 and divide it by 2. Next store the resultant value to variable "distance". Now we have the actual distance between the sensor and object in the variable "distance".
digitalWrite(trigPin,LOW);
delayMicroseconds(2);
digitalWrite(trigPin,HIGH);
delayMicroseconds(10);
digitalWrite(trigPin,LOW);

duration=pulseIn(echoPin,HIGH);
distance=(duration*0.034/2);
Part - 2
This part is used for turn on the buzzer when the distance is less than 1 meter or 100 centimetres.
If the distance is less than 100 Cementers then set the pin 13 (Buzzer pin) "HIGH" for 500 milliseconds and then set it "LOW" for 500 milliseconds.
Else keep the pin 13 as "LOW".
if(distance<100){
   digitalWrite(13,HIGH);
   delay(500);
   digitalWrite(13,LOW);
   delay(500);
  }
The coding is completed. Upload the complete code to Arduino Nano.
The complete code is given in the code section of this Article.
Step - 4
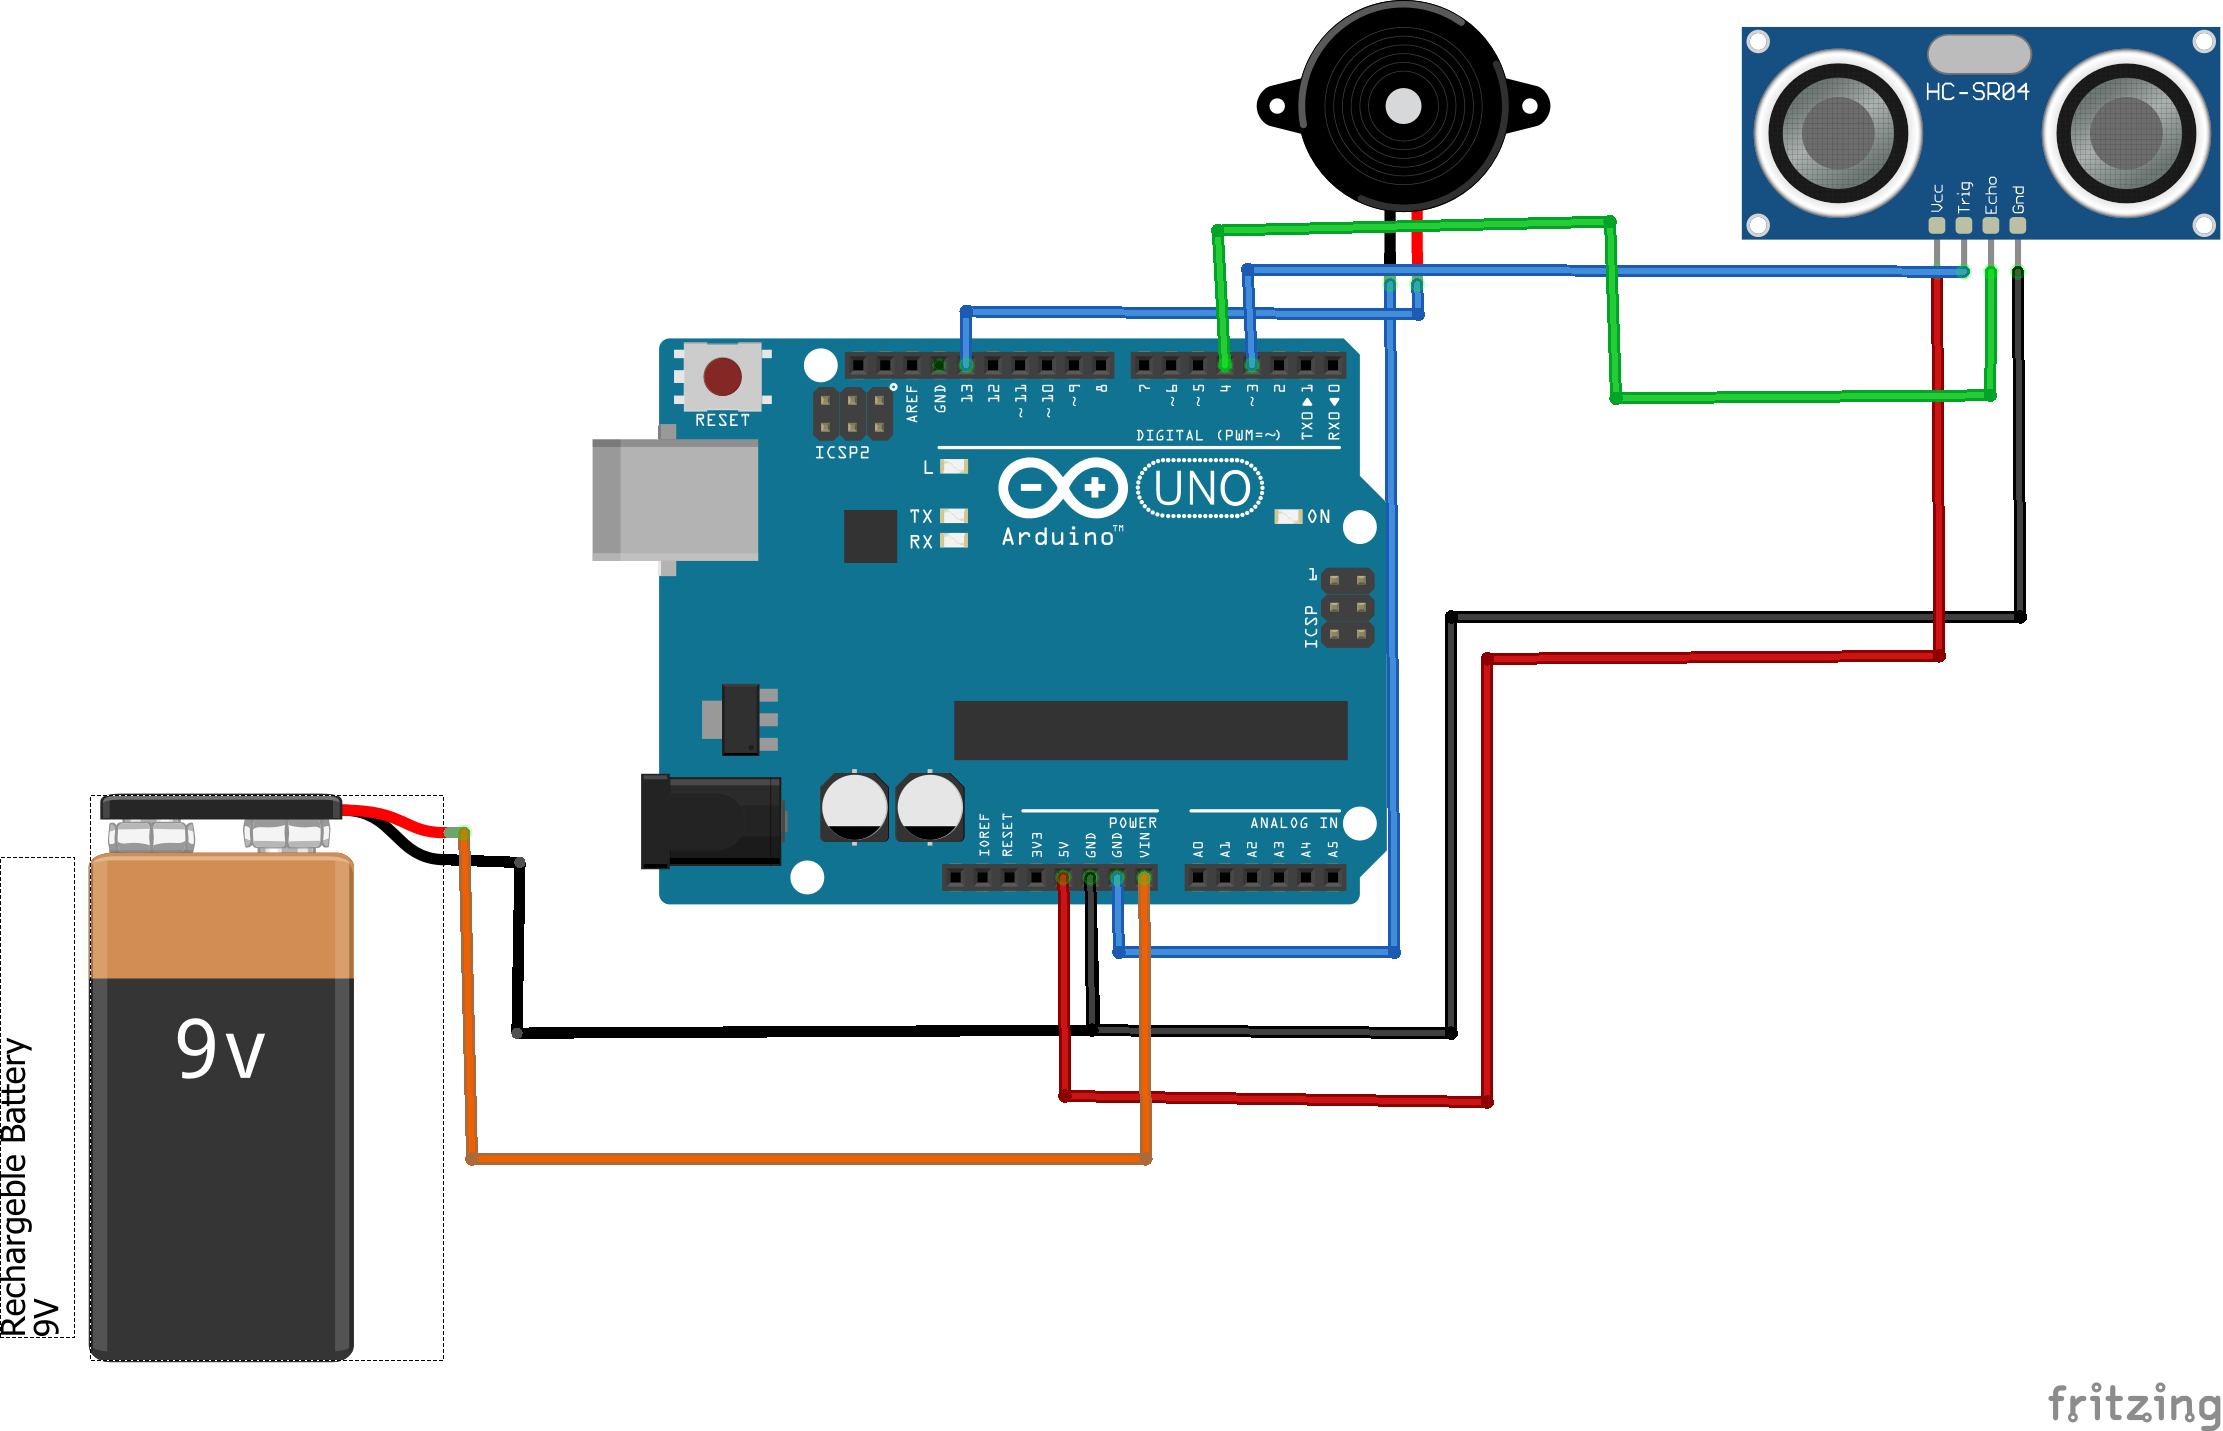
ConnectionArduino Nano D4 - HC-SR 04 Echo
Arduino Nano D3 - HC-SR 04 Trig
Arduino Nano GND - HC-SR 04 GND
Arduino Nano 5V - HC-SR 04 Vcc
Arduino Nano GND - Buzzer Negative (-)
Arduino Nano D13 - Buzzer Positive (+)
Arduino Nano GND - 9V Rechargeable battery Negative (-)
Arduino Nano Vin - 9V Rechargeable battery Positive (+)
The circuit diagram is given in the diagram section.
You can set the Arduino, battery and buzzer in a small flat box. Create some small openings for insert USB to charge the 9V battery. And finally it is used as a "Social Distancing reminder Badge". Alternatively you can set the whole components with a helmet.
⚠️⚠️⚠️ This device has a lot of problems. The main goal of this article is introduce the technical side of this device. The practical use of this device is not recommended. ⚠️⚠️⚠️
Please don't copy paste my code. Understand each line of code and create your own sketch.
Follow me on,
Instagram : five_volt_player
Contact : akshayjoseph666@gmail.com
Read my previous articles here.
Share your experience and suggestions on the comment box.


Comments
Please log in or sign up to comment.