

Hardware components | ||||||
_baVEVgguW1.jpg?auto=compress%2Cformat&w=48&h=48&fit=fill&bg=ffffff) |
| × | 1 | |||
 |
| × | 1 | |||
 |
| × | 1 | |||
 |
| × | 1 | |||
 |
| × | 1 | |||
 |
| × | 1 | |||
 |
| × | 1 | |||
Software apps and online services | ||||||
 |
| |||||
The idea arises because I want to realize an IoT system and I want to communicate the Arduino 101 board with internet but this board lacks internet connection. The solution I found was that I can connect my Arduino to a Raspberry Pi Zero W using the Bluetooth connection, in this example I name it as the "Hello world!" of IoT. For the communication I use a program of Node.js in the Raspberry Pi Zero W and here I leave the link so that they read about this package.
https://github.com/sandeepmistry/noble
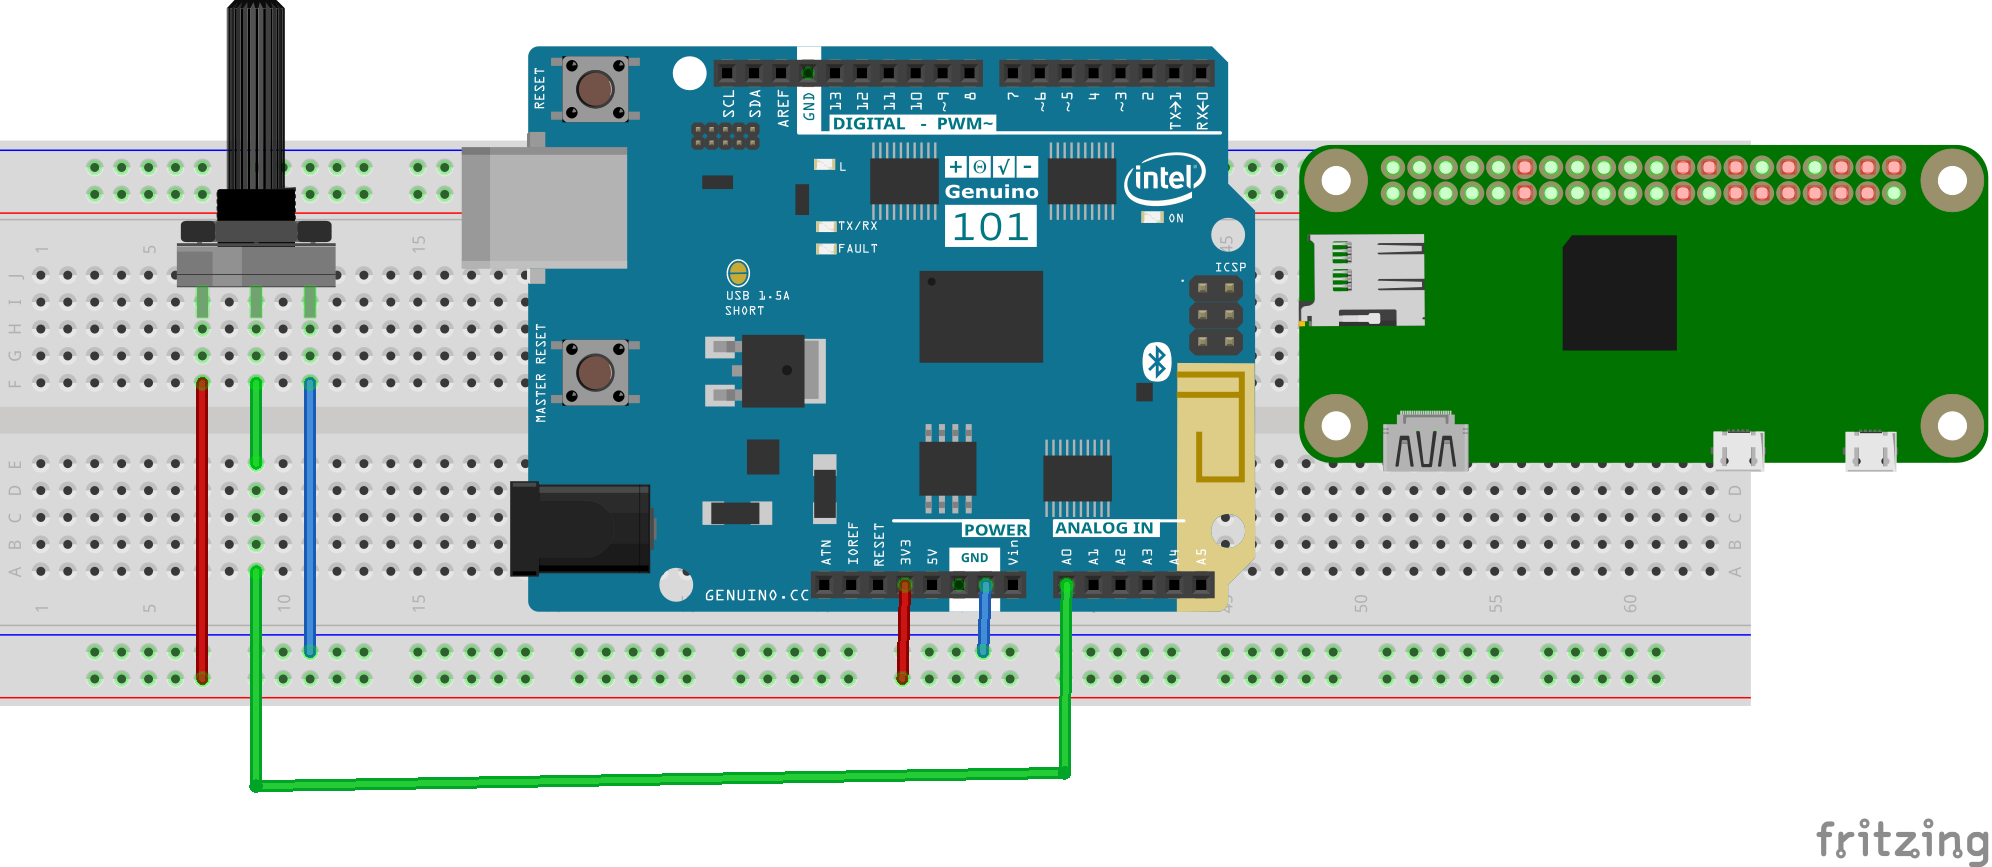
StepsMaterials
- Arduino 101
- Raspberry Pi Zero W with Micro SD card and Raspian OS
- A breadboard
- Potentiometer
- Wires battery case with plug to connect to Arduino
- 4 batteries
- USB to Micro USB cable.
Arduino
To use the low energy Bluetooth communication protocol, it is necessary to define the peripheral to use (board), the service and the characteristic and all this is done through the library CurieBLE.h.
#include <CurieBLE.h>
BLEPeripheral blePeripheral;  // BLE Peripheral Device (the board you're programming)
BLEService ledService("19b10000-e8f2-537e4f6c-d104768a1214"); // BLE LED Service
// BLE LED Switch Characteristic - custom 128-bit UUID, read and writable by central
BLEUnsignedCharCharacteristic switchCharacteristic("19b10001-e8f2-537e4f6c-d104768a1214",  // standard 16-bit characteristic UUID
   BLERead | BLENotify);
The rest of the code makes the connection with the controller device and has a function to send the value of the potentiometer that is connected to the analog input A1 and then map the signal since I want the values to send oscillate between 0 and 255 to then send The value for Bluetooth.
const int ledPin = 13; // pin to use for the LED
int oldValue = 0;  // last battery level reading from analog input
long previousMillis = 0;  // last time the battery level was checked, in ms
void setup() {
 Serial.begin(9600);
 // set LED pin to output mode
 pinMode(ledPin, OUTPUT);
 // set advertised local name and service UUID:
 blePeripheral.setLocalName("LED");
 blePeripheral.setAdvertisedServiceUuid(ledService.uuid());
 // add service and characteristic:
 blePeripheral.addAttribute(ledService);
 blePeripheral.addAttribute(switchCharacteristic);
 // set the initial value for the characeristic:
 switchCharacteristic.setValue(0);
 // begin advertising BLE service:
 blePeripheral.begin();
 Serial.println("BLE LED Peripheral");
}
void loop() {
 // listen for BLE peripherals to connect:
 BLECentral central = blePeripheral.central();
 // if a central is connected to peripheral:
 if (central) {
   Serial.print("Connected to central: ");
   // print the central's MAC address:
   Serial.println(central.address());
   // while the central is still connected to peripheral:
   while (central.connected()) {
        long currentMillis = millis();
     // if 200ms have passed, check the battery level:
     if (currentMillis - previousMillis >= 1000) {
       previousMillis = currentMillis;
       updateSensor();
     }
     }
   // when the central disconnects, print it out:
   Serial.print(F("Disconnected from central: "));
   Serial.println(central.address());
 }
}
void updateSensor(){
 int sensorValue = analogRead(A0);
 int sensorLevel = map(sensorValue, 0, 1023, 0, 255);
 switchCharacteristic.setValue(sensorLevel);
 }
Raspberry Pi Zero W
You should have the Raspbian Jessie Lite operating system, if you do not have it, here is a tutorial.
Then you must have in your PC: Putty software and Winscp software, you can download them here:
The next thing is to open a session of Putty and put the IP of Raspberry and put the port number to 22 and open.
Then you can log with user: pi and password: raspberry.
Then, since you logged in, you must login as root with the following command:
sudo su
To install Node JS, I leave a tutorial that personally served me a lot.
Noble on Raspbiansudo ln -s /usr/bin/nodejs /usr/bin/node
sudo apt-get install bluetooth bluez libbluetooth-dev libudev-dev
Then you open winscp and choose the SCP communication protocol and add the IP address of the Raspberry Pi and the password and the port as 22.
You create a new document called send.js and then a screen to write code appears.
Then copy and paste the test code:
var noble = require('noble');
// Search only for the Service UUID of the device (remove dashes)
var serviceUuids = ['19b10000e8f2537e4f6cd104768a1214'];
// Search only for the led charateristic
var characteristicUuids = ['19b10001e8f2537e4f6cd104768a1214'];
// start scanning when bluetooth is powered on
noble.on('stateChange', function(state) {
 if (state === 'poweredOn') {
   noble.startScanning(serviceUuids);
 } else {
   noble.stopScanning();
 }
});
// Search for BLE peripherals
noble.on('discover', function(peripheral) {
 peripheral.connect(function(error) {
   console.log('connected to peripheral: ' + peripheral.uuid);
   // Only discover the service we specified above
   peripheral.discoverServices(serviceUuids, function(error, services) {
     var service = services[0];
     console.log('discovered service');
     service.discoverCharacteristics(characteristicUuids, function(error, characteristics) {
       console.log('discovered characteristics');
       // Assign Characteristic
       var ledCharacteristic = characteristics[0];
       setInterval(function() {
           ledCharacteristic.read(function(error, data) {
           // data is a buffer
           console.log('sensor value is: ' + data.readUInt8(0));
               });
       }, 1000);
     });
   });
 });
});
Then go to the command prompt in PuTTY and execute the code with:
node send.js
And you will see how each second appears on the console screen the value of the potentiometer every second. And now you can move the potentiometer and you will see that it changes.


Comments