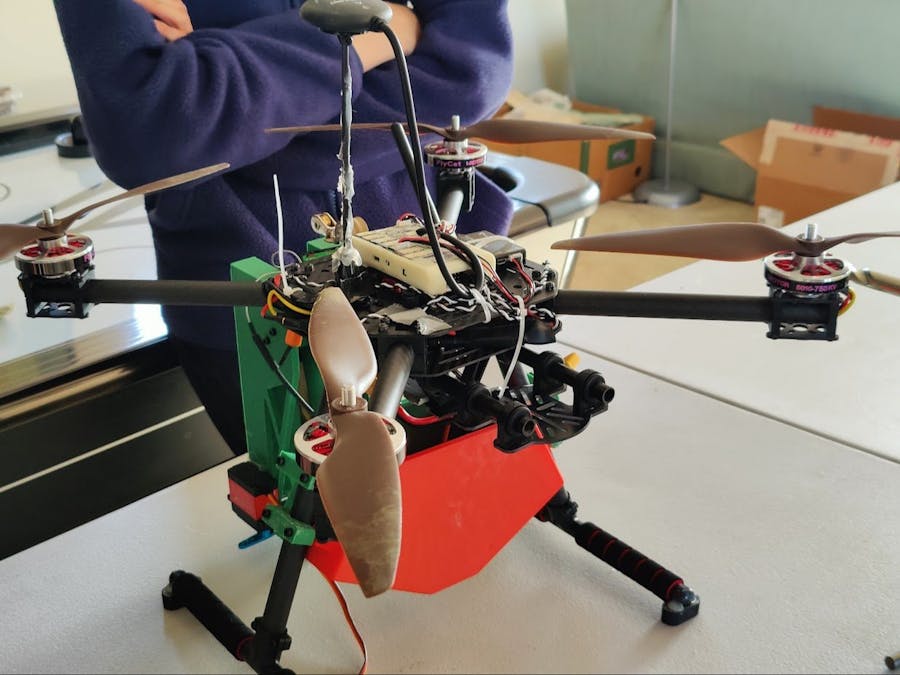
This project is the Amador Valley High School Hovergames Team's submission for the 2023 competition. We are using a KIT-HGDRONEK66 drone provided by NXP Hovergames to analyze soil samples and distribute fertilizer to improve arability in places that need it. This is a large issue in modern agriculture, as many lands are underfertilized and uncultivated, and this could allow for more usable farmlands across the globe. In order to solve world hunger issues, it is crucial for more food to be grown and exported, and the best way to do this is to make land more efficient for growing crops and fix underutilization of arable land.
ProcessIn order to make this project happen, we spent hours, modeling, printing, reprinting, debugging, reading documentation, and building and repairing various parts of our drone. Our concept is made possible through the use of servos and 3D printed parts to collect dirt samples - achieved with a core sampler that is attached to the drone, as well as a fertilization container that can drop fertilizer if needed.
HardwareWhen designing our custom parts, we went through multiple iterations until finally landing on designs that we were happy with. Our first task was just figuring out how we were going to drop the core sampler. Initially, we were planning on utilizing a singular servo with a plate directly attached onto it, that would rest under the core sampler and rotate down and out of the way to drop it. The problem with this design we found right away was all of the strain that was being placed on the servo from it constantly being run to keep the plate closed. It quickly stripped the gears and no longer worked.
From there, it was back to the drawing board, in which we added some major improvements, the first of which being a different place to mount the servo. This time, we mounted it in such a way so that the constant weight from the core sampler wouldn't be trying to turn it, and it would act like a lock mechanism more so than a rotating hinge. In addition, we also added a notch in the bottom of the plate for the tip of the core sampler to slot into to keep it from moving. The final aspect of this iteration was the use of hinges to add more stiffness to the plate.
This design worked great until we realized that when the core sampler would be pulled back up, there was no way to reclose the plate. To fix this, we combined our intial design with our new updated one, having two servos, one as a lock, and the other to reclose the plate. We would have gotten these three motors working together, but there weren't enough channels on the receiver or controller for them, but we got each individually working including the DC motor designed to pull the core sampler back up.
In practice, you would ideally have some sort of ratchet mechanism mounted to the shaft of the motor to enable a free fall of the core sampler to attain max velocity; however, none of the ratchets we could find functioned in the right direction or interfaced with the motor. This would be something attainable with the greater infrastructure or manufacturing abilities available to companies.
Our core sampler also went through many iterations, starting off as a simple PVC pipe cut diagonally across the tip, with fins at the back for stabilization.
Upon seeing that this design didn't work because of the way the center of mass was distributed, we created a similar design in which the tip would be made out of copper and the body made longer, so that we could place the fins farther away from the center of mass and give it more stabilization. This worked much better and fell straight, but had two major problems: it was too large to be mounted to the drone, and the center of the hole was too large to secure looser consistencies of soil.
Next, we selected a design that was much shorter and heavier to let it penetrate the soil better, with a narrower tip radius and tapered head joint to prevent it from lodging itself too deep in the ground. The problem with this was that the shaft was steel and heavy enough that the center of mass was at the back of the core sampler which made it very unstable in the air and always fall on its side, To try to fix this we found a lighter shaft that weighed 46 grams as opposed to 189 grams so it made a very big difference. This new design worked a few of the times when we tested dropping it from the drone, but it was very unreliable in its ability to land tip first. We continued to drop shaft weight and find a section of thin walled PVC that weighed 26 grams, and that was light enough that the center of mass became positioned close enough to the tip that it would land tip in the ground every time.
Finally, the fertilizer reservoir. Our initial concept for this was going to be that it would spray liquid fertilizer that would seep deep into the soil and enrich it. This would be accomplished via a thick walled hopper sort of design, which would funnel all the liquid to a hole in the center, where a solenoid valve would be mounted. Later, we realized that this would be very inefficient, because in creating liquid fertilizer, you must dilute it by adding water to an existing fertilizer, so in a way we would be weakening our fertilizer, while at the same time increasing the load out drone would have to fly with.
At this point, we switched our plan from liquid fertilizer to fertilizer pellets that would slowly break down over time, avoiding the potential problem of oversaturation of nutrients and soil poisoning. We repurposed the reservoir that we designed for the liquid, and made the hole large enough to fit cocoa puffs, our placeholder for the fertilizer pellets. To seal the hole, a servo was placed with a small wood plate to cover the hole, and when actuated rotates out of the way to let the cocoa puffs or fertilizer pellets fall out.
For a more in-depth look at software, please see our GitHub repository.Our first step, to get the drone flying, was to flash the PX4 Pro Autopilot firmware onto the FMUK flight controller using a debugger. This allowed us to connect to the drone in QGroundConrol via a USB connection, or via telemetry radio.
Next, we calibrated the drone's sensors and GPS in QGroundControl, which involved rotating it around a bunch of times and setting up each flight mode on our controller for manual control.
Once the drone was set up in QGroundControl, we were able to arm and fly it via a telemetry radio connection from a laptop.
Our next task was to set up the onboard computer for development. We have a NavQPlus onboard computer and a Adafruit Bosch BME688 gas sensor.
Our first task was to prepare and enable the NavQ to connect to a stable internet connection. This would allow us to push/pull code to our GitHub repository, download packages from the internet, and remotely connect through the SSH protocol.
~ $ nmcli radio wifi on
~ $ nmcli dev wifi list
~ $ sudo nmcli dev wifi connect [network name] password "[network password]"
We first enabled Wi-Fi connection, then scanned for the available networks and their respective SSID names, and then connected to the internet using that information. We mostly used the internet connection to manage packages and push commits to GitHub. Instead of using SSH, we mostly connected with the NavQ through USB with the following commands below (Mac):
~ $ ls /dev/tty.usb*
/dev/tty.usbserial-A10MVWJ3
~ $ screen /dev/tty.usbserial-A10MVWJ3 112500
~ $ login: user
    password: user
To get readings of temperature, gas, pressure, etc. we used the Adafruit Blinka library to convert from Python to CircuitPython, which the sensor uses. With this library we can use code such as the snippet below to communicate with the gas sensor from the NavQPlus.
import time
import board
import adafruit_bme680

# Create sensor object, communicating over the board's default I2C bus
i2c = board.I2C()
bme680 = adafruit_bme680.Adafruit_BME680_I2C(i2c, debug=False)

bme680.sea_level_pressure = 1013.25 # can adjust to be whatever
temperature_offset = -5

while True:
    print("\nTemperature: %0.1f C" % (bme680.temperature + temperature_offset))
    print("Gas: %d ohm" % bme680.gas)
    print("Humidity: %0.1f %%" % bme680.relative_humidity)
    print("Pressure: %0.3f hPa" % bme680.pressure)
    print("Altitude = %0.2f meters" % bme680.altitude)

    time.sleep(1)
Initially, the Adafruit sensor was unable to properly detect the board and chip IDs of the NavQ. By forking the Adafruit Blinka library, we were able to add our own constants and get the board detected by the gas sensor properly.
Adding our own support for the NavQPlus board through Adafruit Blinka allows us to properly get sensor readings from the BME688, which we can use to assess soil samples collected via the core sampler mechanism. We can set a baseline of soil arability for samples collected by the core sampler mechanism, and use collected gas, pressure, and humidity information to judge whether or not to release fertilizer.
TeamOur team leader is Christopher Hazell. Our mechanical team is made up of Brady Lucas, Jerry Peng, Daniel Choi, and Aryan Das. Our software team is made up of Ryan Zheng, Dhanvanth Rajesh, and Hanzhen Yu.
MediaSee our team photo album here!


Comments
Please log in or sign up to comment.