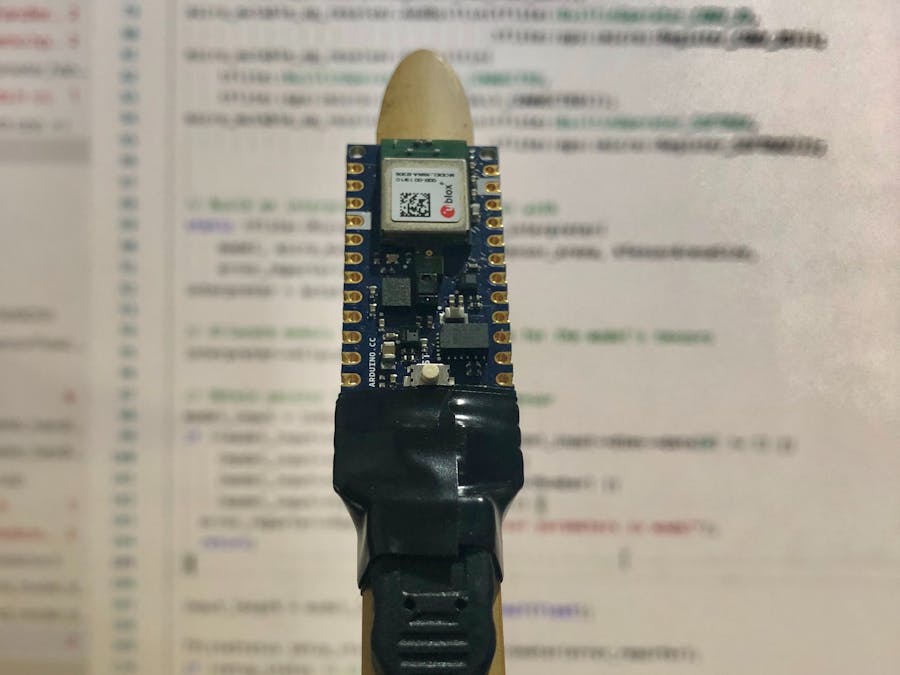
Let the magic fills this year's Christmas and upcoming new year. For that, I built a magic wand :) And I use it to properly greet the holidays in a geeky possibly way.
What "magical" about this wand is that it uses Machine Learning (ML) to learn and recognise the wand gestures, only from the data collected from accelerometer sensor (that measures acceleration force). By using ML, the wand movement doesn’t have to be precise, it can be still recognised as gesture.
Arduino Nano 33 BLE Sense board as the main hardware with ARM Cortex M4 Microcontroller (MCU), is attached on a stick, that functions to collect acceleration data from on-board accelerometer sensor, then process and infer the prediction (hence, inference) of performed gesture, right on the Microcontroller (MCU) itself. ML software framework powered by TensorFlow Lite is needed to perform such inference, and optimised to run on low power MCU that only runs at 64 MHz and 256KB of RAM.
No magic included, only pure code :)
However, ability to run TensorFlow for ML inference on low power MCU, is kinda magical.
Notes:
If you search "Magic Wand" in hackster.io projects collection, you'll find some similar projects, but so far none of them that:
- Allows "correct" or convenient board orientation to do the gestures.
- Leverages PlatformIO. I'll explain why it's important. Keep on reading.
- Removes you from some hassles, explained below.
My project offers better experience - both for the wand users, and for developers or makers like yourself.
Original WorkSome says, there's nothing new under the sun, and this project is not exception. It is based on the original Magic Wand sample code from TensorFlow Lite for Microcontroller. The TensorFlow authors were kind enough to provide a simple yet complete and fun example on how to infer physical movement from accelerometer, all runs on MCU with no OS, not Android, not Linux. Something that I've been searching for quite some time.
The original Magic Wand example can be run on Arduino Nano 33 BLE (or the more expensive one, Nano 33 BLE Sense) and SparkFun Edge board. It all works but I found it quite hassle to setup and run for the first time, especially for early learners. It involves to clone the whole TensorFlow repo and some "make" stuffs to sort things up and build the code. Using Arduino IDE is easier and only works for Arduino Nano 33 BLE board out of the box. However, as I intent to do heavier and further programming ahead with TensorFlow on MCU, Arduino IDE doesn't really fit my need. That's just me, though, I don't feel the need to explain why.
Another thing that I found quite disturbing is the board's orientation so it can infer the gestures correctly. You have to hold like this (Figure 1) when you perform the gesture. I find it hard to attach the board to a stick. I think it's a easy fix.
My project code is published to this repo. Some improvements I made over the original example are as following.
1. "Correct" board's orientation
Correct or not, depends on your need. But since the Arduino Nano 33 BLE board is elongated form-factor and I need to attach it on a stick, I think this orientation (Figure 2) is correct.
I managed to fix it by very simple code change to the original accelerometer_handler.cpp file at these lines, that previously:
save_data[begin_index++] = y * 1000;
save_data[begin_index++] = x * 1000;
save_data[begin_index++] = z * 1000;
to:
save_data[begin_index++] = -x * 1000;
save_data[begin_index++] = y * 1000;
save_data[begin_index++] = z * 1000;
Remember: that fix is only specific to Arduino Nano 33 BLE.
2. Leveraging PlatformIO
As above-mentioned, as I intent to do heavier and further programming ahead with TensorFlow on MCU, Arduino IDE doesn't really fit my need. As the board of choice exercises nRF52840, the native choice is going with nRF5 SDK, or with higher level SDK based on Arm mbed OS (don't confuse it with full-pledge OS, like Linux). Although I'm quite familiar with mbed OS and have been writing some production code with it, it requires some setup. I want to quickly get started, with easy to use tooling, but not as simple as using Arduino IDE. Again, that's just my choice.
The obvious candidate is PlatformIO, either Core or IDE. I prefer to use Visual Studio Code with PlatformIO IDE extension. But PlatformIO is only development environment, I still need to choose the framework or SDK that my code is based upon. It may sound ironic, as I don't want to use Arduino IDE, but Arduino framework is easier choice. Arduino IDE and Arduino framework are different, if you're still not aware by now.
Luckily, there's Arduino framework targeted for nRF52840 on top of PlatformIO, called Nordic nRF52 Platform for PlatformIO. Unfortunately, at time of writing the stable version (master branch) has not support Arduino Nano 33 BLE board yet. Apparently, it's not as easy as just adding new board json file for the platform, as Arduino Core for Nano 33 BLE is written based on mbed OS. But the timing is about right, as some great people are already working on that support, that's now live in "develop" branch. So for now, we need to refer the repo URL (https://github.com/platformio/platform-nordicnrf52.git) in platformio.ini, instead of just as simple as: "nordicnrf52".
Searching around hackster.io projects for "Magic Wand" and you'll find some similar projects, but so far I found no projects that use PlatformIO.
3. Bundling TensorFlow Lite for Microcontroller library
If you read the TensorFlow Lite guide to prepare the library for Arduino framework so it's based on the latest code, it requires you to clone TensorFlow repo and execute provided script, which eventually requires you to install some stuffs.
I took the liberty to bundle the TensorFlow Lite for Microcontroller library and all required code for you, as found in my repo. The library lives in lib folder that's compatible with PlatformIO. You can use it for another projects as well.
This is exactly one of the reasons why I use PlatformIO, as you can bundle your own libraries, without depending on global libraries like if you use Arduino IDE. So, if later you use other version of TensorFlow Lite library that's suitable for another projects, current project won't be affected.
4. Bundling modified version of Arduino LSM9DS1 library
LSM9DS1 is the Inertial Measurement Unit (IMU) sensor which includes accelerometer that is essential in this project to collect acceleration data. To easily access it, you need software library instead of communication with it over I2C by reading registers value. Apparently, for this project to work correctly - due to the nature of acceleration data that need to fed into ML model - the LSM9DS1 has to work in FIFO manner.
There's already Arduino_LSM9DS1 you can use. By default, it doesn't enable FIFO buffer that is required by the project, so we need to make some modifications to the library's source code.
But don't you worry, I already include the modified library into this project repository. Again, that's the beauty of PlatformIO, that you can bundle whatever libraries you want to use into a self-contained project.
Demo VideoI made a demo video to show how it works.
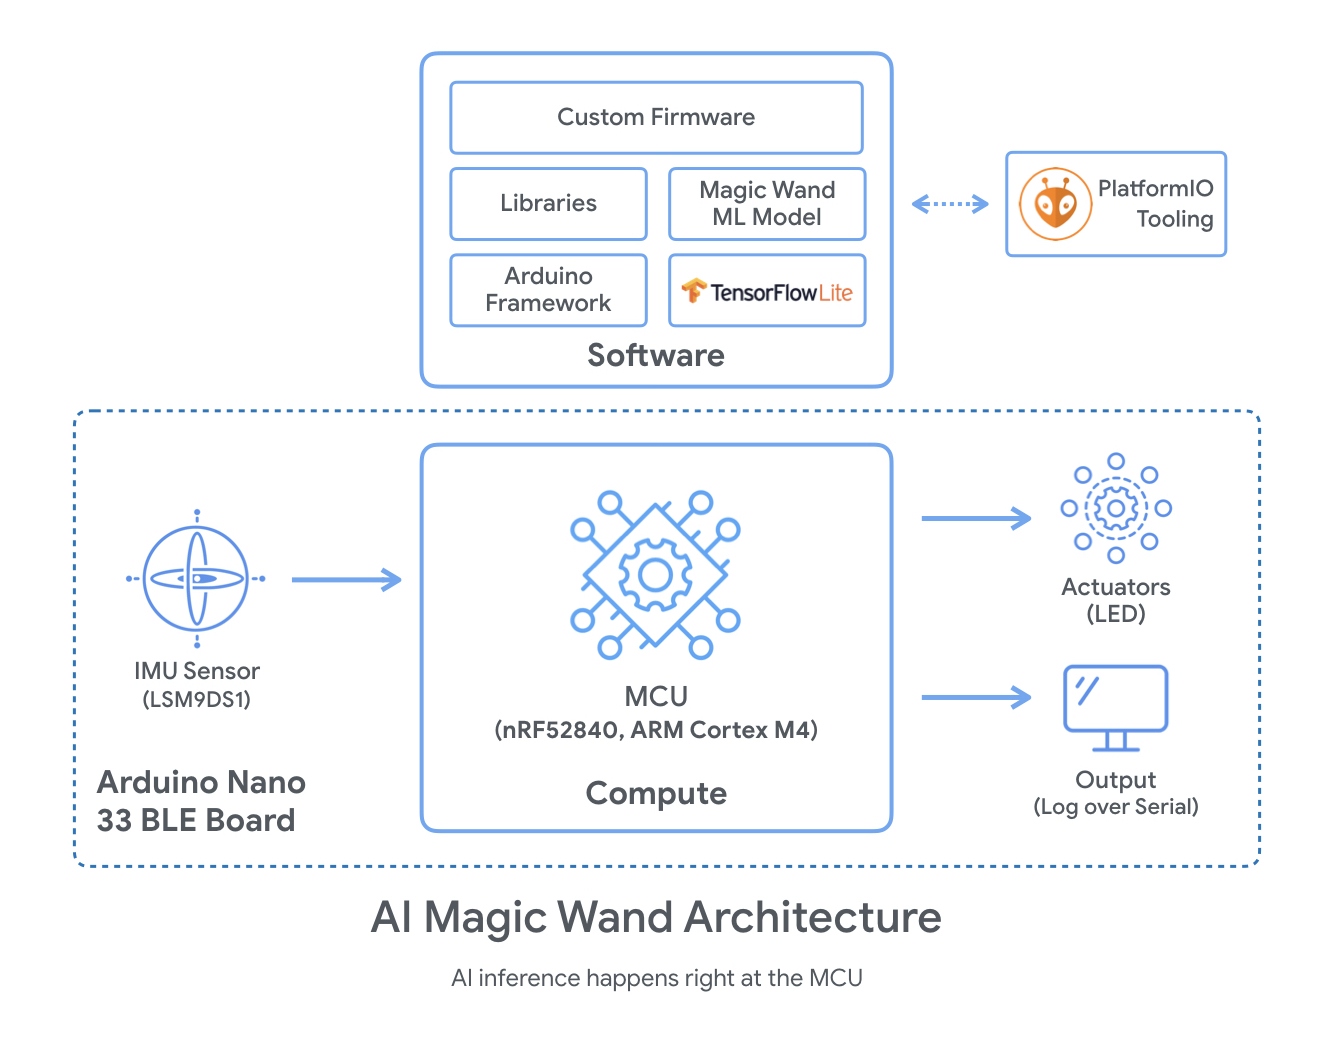
System ArchitectureHigh level architecture depicting the hardware and software involved in the system is as following.
By now, you should be aware of what you need to prepare to run the project code.
- PlatformIO, either Core or IDE. If you're like me, I'm using Visual Studio Code with PlatformIO IDE extension.
- platform-nordicnrf52. Should be installed automatically, as it's specified in platformio.ini. Please note that I'm using
developversion/branch, that already supports Arduino Nano 33 BLE board.
The full working source code can be found on attached repository. If you want to replicate this project by yourself, I think it's easier just to watch the step by step video. Hey, I made one for you.
Pro Tip
When using PlatformIO with VS Code, after uploading the firmware is finished, most likely you immediately open Serial Monitor to see the log messages that are spit out by MCU over Serial. If you reupload the firmware (e.g. after some code modification) without closing/terminating Serial Monitor, it'll be automatically reopened almost immediately, and it should. But at this point, you may experience that the board's serial port is not found, like this:
Don't worry. What you can do is either you close Serial Monitor by clicking "x" button or pressing "ctrl+c", or the better way is you delay the reopening of Serial Monitor. To add delay, you can go to: Preferences -> Settings, then find PlatformIO IDE Configuration, and change the value (pointed by red arrow) of Reopen Serial Monitor Delay, as depicted below.
I use 2000, means 2000 ms = 2 seconds. You can try another value.
To recognise more or different gestures, we need to train the ML model with new data. This page explains in not-so-detail on how to do the training, and it's targeted for SparkFun Edge development board, not Arduino Nano 33 BLE.
It's not a promise, but I'll find the time to write a post on how to do the training on Arduino Nano 33 BLE board. Stay tune.
ClosingThis simple project shows us that Machine Learning inference on low power Microcontroller is now possible.
It may seem like a child play, but the same principle can be used to solve more serious or critical problems, such as for predictive maintenance which possible machinery failures need to be predicted as early as possible, by analyzing machine’s vibration data.
My company DycodeX uses similar approach in our product SMARTernak - an AIoT-power cattle-farm assistance platform - to predict cow’s activities in order to deliver better insight of cow’s behaviour.
If you need your own use case to be solved with AI at the Edge or on-device AI, you know who to contact.
--
That's it for now. Enjoy.
Happy New Year 2020!


Comments
Please log in or sign up to comment.