Ever wanted to know the temperature and humidity around you? If yes, this project will be very helpful for you. If no, it'll be cool anyway. What I mean is, you can use this in anything from home automations to smart watches.
What is humidity?Humidity is the water vapor around you mixed with air. It is measured in per cents. So, if the humidity is 60 per cent(which is the average humidity), then 60 per cent of the air around you is water vapor. If it is 100%, then it means either the sensor is not correct, the sensor is broken/damaged, the Arduino crashed, the Arduino can't receive any signal, there's an error in the code or you're underwater*. If it's 0%, it means all the reasons above except the last one, you're in space or you're in the middle of a desert**.
* Correction: it means the air cannot hold any more water.
** The air in a desert does contain some water but it is a very little amount compared to a normal place. The Sahara Desert has a mean humidity of 25%.
The world's lowest recorded relative humidity value occurred at Coober Pedy in the South Australia desert when the temperature was 93 degrees and the dew point was minus 21 degrees producing a relative humidity of 1 percent. (source: 'www.chicagotribune.com')Is your sensor different?
My sensor is like this:
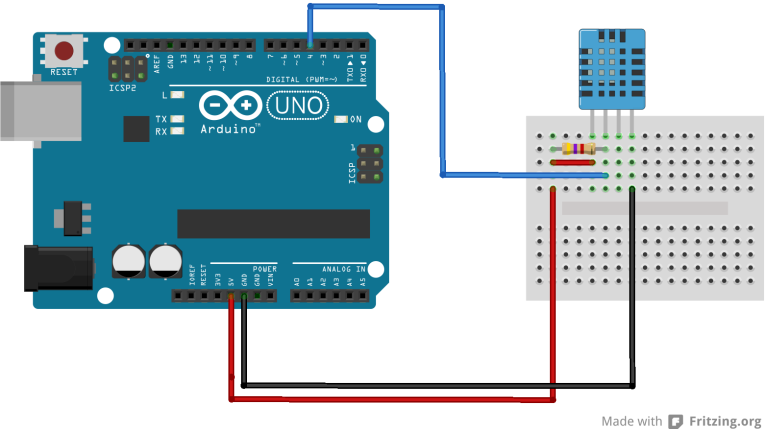
My sensor has 3 pins and it's on a PCB. If yours has 4 pins, then you need to modify the circuit as such (the resistor is 4K7):
If it is same as mine, then omit the resistor as it is built into the PCB.
Then, build the circuit!
Details about the codeYou need to follow these instructions to make it work:
1. You need to add the library to the Arduino IDE.
2. Upload the code.
3. When the code is uploaded, open the Serial Monitor and set the baud rate to 9600.
4. You will see the humidity and temperature.


_ztBMuBhMHo.jpg?auto=compress%2Cformat&w=48&h=48&fit=fill&bg=ffffff)


Comments
Please log in or sign up to comment.