Premium Female/Male 'Extension' Jumper Wires, 40 x 3" (75mm)
Story
The idea behind this project was to build an enclosure to grow microgreens or small plants indoors and make it automated. So the Arduino was a proper fit but I wanted to view the enclosure even if I was outside my home. So here comes the Bolt IoT Module to rescue. I hooked it up to the Arduino Nano using the UART connection and attached the relay and sensors to Arduino.
The Setup:
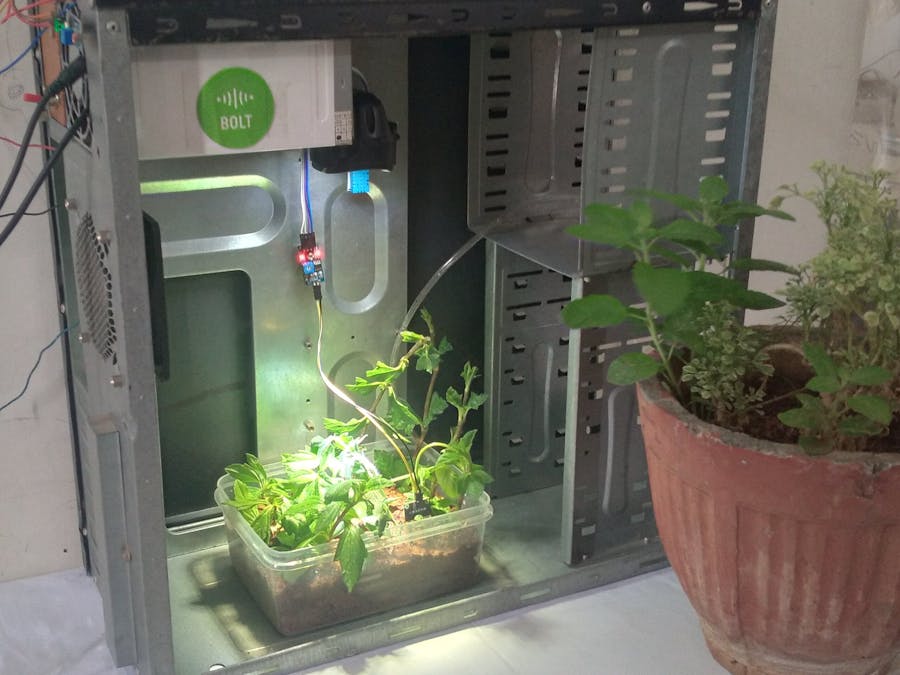
For the setup I used a full ITX size CPU case. As I was having one lying around and it was quite aesthetic to the décor, it was a great fit. The Power Supply unit was damaged so I removed the power internals and hooked up the Arduino Nano, The bolt module, relays and power distribution inside the Power supply unit. The enclosure was great way to hide all the wonky and dangling wires reducing the risk of short circuit or Electrostatic discharge damaging any component. Inside the SATA Drive bay, I fixed a Water bottle connected to a 5V water pump and placed the saplings in the area where the motherboard would be.
Farm Unit inside the Power Supply enclosure
Using the standoff for the Motherboard, I screwed in the sensors and attached the modules to it making a tight fit and did proper cable management to make it look good and clean.
Working:
Well there are five things which happen during the loop function of the Arduino
Getting Humidity and Temperature: The Arduino collects the temperature and humidity value from DHT11. Then it checks if the humidity is more than 80% or Temperature is more than 37 C. If true, it powers a relay which powers an exhaust fan that removes humid air from the enclosure. This creates negative pressure inside sucking in fresh air reducing indoor humidity and temperature.
Getting ambient brightness: Then Arduino collects the Ambient light levels. Here I have used an LDR Module instead of directly using LDR alone. This module directly gives a digital output in form of HIGH or LOW instead of analog value. Based on the input received (HIGH stating Darkness / LOW stating Bright), a relay is powered which in turn powers an auxiliary LED lamp. This LED lamp acts as an alternate source of light and accelerated the growth cycle of the microgreens.
Getting soil moisture: Thereafter Arduino uses soil moisture to detect amount of moisture available in soil. If it is less than 70% (as microgreens use lot of water), the relay is triggered which triggers the pump to send more water to the plants.
Uploading to Bolt Cloud: Well after 5 minute interval, the bolt sends a serial message to Arduino to send data. As Arduino gets this message it sends this all the four values (temperature, humidity, ambient brightness, soil moisture) to the Bolt as CSV format (values in string separated by commas).
Bolt Cloud: The javascript file on the bolt device converts the input string to separate values and makes four different graphs allowing to view the trends.
Bolt IoT Cloud Page for Indoor Farm monitoring
Building:
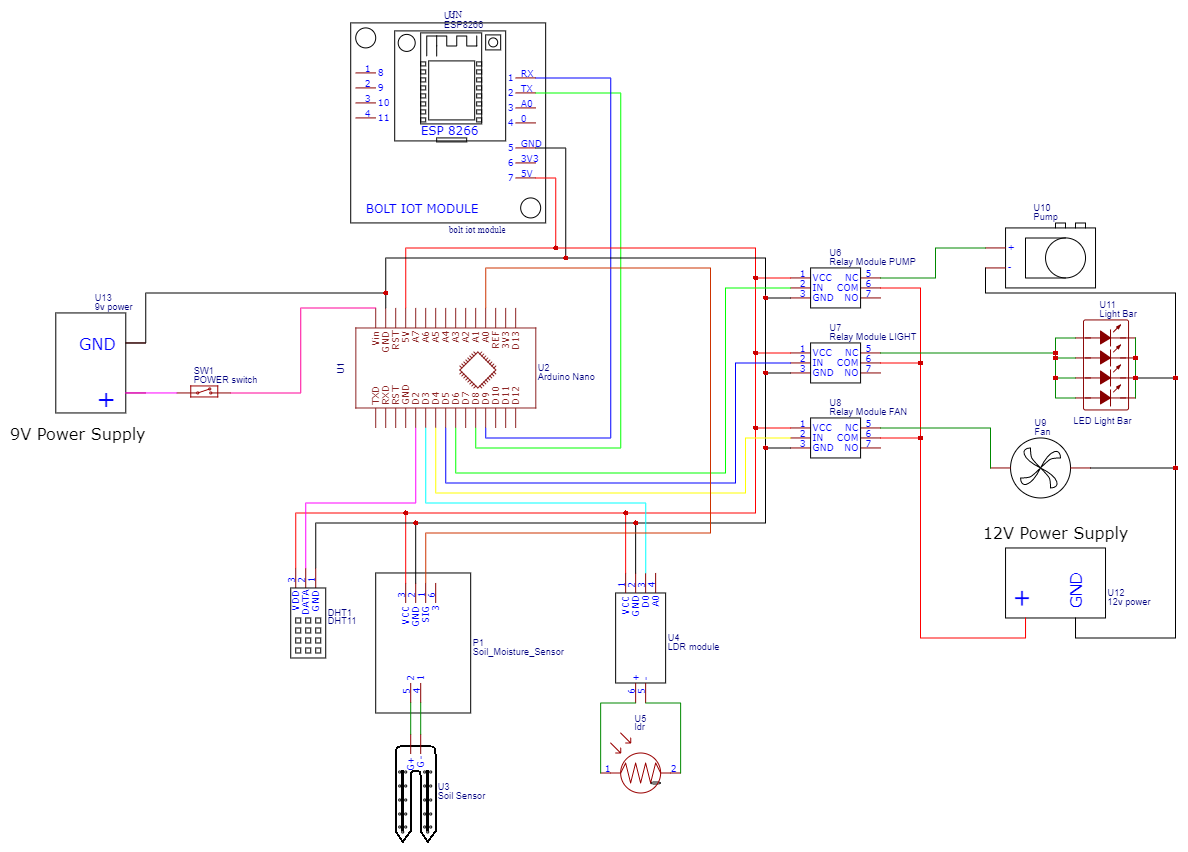
Connect all the sensors to the Arduino Nano as per the schematics
Later connect the relay module to the Arduino Nano as per the schematics
Then connect the Bolt IoT Device to Arduino Nano as per the schematics.
Schematics of the system
Run your 12v wires from the relay to the place where the devices (fan, LED light, and water pump) will be mounted in the enclosure. Hide the cables and use zipties for clean cable management.
Upload the code to the Arduino Nano using Arduino IDE. After success uploading of the code, use the Serial Monitor to check if all the sensors and relays are working properly. (PS The Arduino IDE.ino file is in the attachments section).
Arduino IDE
Open Bolt Cloud, Login and go to Products section and click on Add Product. Later give a product name, choose Input Devices and UART. After you are done click on Done.
Next click on Configure This Product, and Choose CSV values as 4, and by default the upload rate is 5 minutes. Click on Save icon to save changes.
Click on Code and enter the javascript code (also given in the attachments section. you're welcome! & don't forget to choose filetype as.js). Click on Save icon and click on close.
Now go to Device's page and choose the device, click on Link product and choose the Indoor_farm product. Click on Deploy configuration and then click on view this device. Voila! you have you own indoor farm monitoring in real time on your smart phone.
Why this and why not that:
This system is for my personal use and I wanted it to be simple and functional as it should not fail or breakdown often. Adding more sensors and variables would make it difficult to operate as well consume lot of power (not much compared to other device but you get the point...). Also I wanted to remote monitor it without my phone being connected to the same network or connecting it via Bluetooth. That is why I refrained from using MIT App Inventor to make a custom App because the Bolt IoT app offered a lot more and there was no point in "reinventing the wheel again". Also this had to be redundant system and would be used regularly, so a purely tried and tested method was only going to make a cut.
Hope you liked this project. Please watch the below video to get an overview of the build.
/*
* Project BOLT IOT FARM
* Dated 22 April 2021 *
* = Source code for INDOOR FARM MONITORING SYSTEM, using DHT11, soil moisture sensor and LDR
* to monitor and upload values on Bolt IoT Cloud.
*
* Edits: #1 Added DHT11 * #2 Added LDR * #3 Added Relays * #4 Added Moisture Sensor * #5 Added Serial Connection to Bolt *
*
*/
#include <SoftwareSerial.h>#include <DHT.h>SoftwareSerial mySerial(8,9);//(Rx of Bolt, Tx of Bolt)//Constants
#define DHTPIN 2 // DHT connected to Pin 2#define DHTTYPE DHT11 // DHT 22 (AM2302)DHT dht(DHTPIN, DHTTYPE); //// Initialize DHT sensor for normal 16mhz Arduino
int ldr=3; //LDR connected to pin 3int fan=4; // Fan relay connected to pin 4int light=5; // Light relay connected to pin 5int pump=6; // pump relay connected to pin 6void setup(){ // put your setup code here, to run once:
Serial.begin(9600); mySerial.begin(9600); dht.begin(); pinMode(DHTPIN,INPUT); pinMode(ldr,INPUT); pinMode(fan,OUTPUT); pinMode(light,OUTPUT); pinMode(pump,OUTPUT);}void loop(){ // put your main code here, to run repeatedly:
String data; int ldr_out; int hum= dht.readHumidity(); int temp= dht.readTemperature(); //temp = temp * 1.8 + 32;if(digitalRead(ldr)==LOW){ldr_out=10; digitalWrite(light,HIGH);}else{ldr_out=0; digitalWrite(light,LOW);}if(hum>80){ digitalWrite(fan,LOW);}else{ digitalWrite(fan,HIGH);} int moist= analogRead(0);if(moist>500){ digitalWrite(pump,LOW);}else{ digitalWrite(pump,HIGH);}data="Hum: "+ String(hum)+"% Temp: "+String(temp)+" C Ambience: "+ldr_out+" Moisture:"+String(moist); Serial.println(data); delay(1000);if(mySerial.available() > 0){ delay(50); String readData=""; Serial.print("Command from Bolt: ");while(mySerial.available() > 0){readData= readData + (char)mySerial.read();} Serial.println(readData);if(readData.indexOf("RD") != -1){ String upload= String(temp)+","+String(hum)+","+ldr_out+","+String(moist); mySerial.print(upload); Serial.print("Data sent to Bolt: "); Serial.println(data);}}}
Bolt Iot Cloud Code
JavaScript
This code is in Javascript to be written in Bolt IoT Cloud page in a Projects Tab
setChartTitle('Indoor Farm Monitor')var lineGraph1= new boltGraph();lineGraph1.setChartType("lineGraph");lineGraph1.setAxisName('Time','Temp C');lineGraph1.plotChart('time_stamp','temp');var lineGraph2= new boltGraph();lineGraph2.setChartType("lineGraph");lineGraph2.setAxisName('Time','Humidity %');lineGraph2.plotChart('time_stamp','hum');var lineGraph3= new boltGraph();lineGraph3.setChartType("lineGraph");lineGraph3.setAxisName('Time','Sunlight (0/1)');lineGraph3.plotChart('time_stamp','ambi');var lineGraph4= new boltGraph();lineGraph4.setChartType("lineGraph");lineGraph4.setAxisName('Time','Soil Mositure %');lineGraph4.plotChart('time_stamp','moist');


Comments