Design Objective:
Mechanical 'Stadiometers' are used for measuring human height. You would find them in almost every hospital or clinics and are for routine medical examination. It usually consists of a ruler rod and a moving flat headpiece as shown below. These mechanical height gauges require clinician's support to setup on the patient & are prone to manual data entry log errors.
The main objective of this project is to create a smart digital patient height scale that can:
- measure patients' height without requiring any manual clinician's intervention. (I have used ultrasonic sensor for contactless height measurement)
- automatically log & upload the data to the cloud via WiFi against the patient's health record (say Fitbit profile).
- can be easily installed -'plug n play'(just needs wall mounting as shown below).
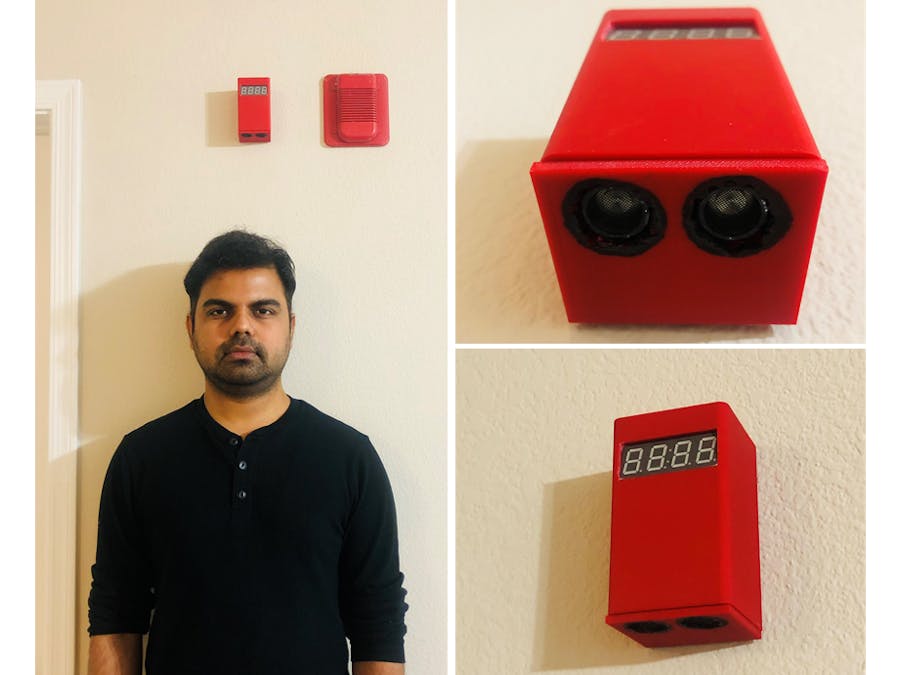
Here is a quick peek of the device! The device is battery operated and can be rechargeable. The device is compact - (in this picture below it is mounted next to a fire alarm for you to see the relative size of the module).
Demo video:
Before diving into the design details, here is the full concept demonstration.
Design Implementation (Hardware):
Important components of the design are:
- PIC-IoT-WG development board from Microchip
- Ultrasonic sensor
- 4-digit 7 segment display
- passive buzzer
- battery.
PIC-IoT WG:
The PIC-IoT WG Development Board combines a powerful PIC24FJ128GA705 MCU, an ATECC608A Crypto Authentication™ secure element IC and a fully-certified ATWINC1510 Wi-Fi® network controller - which provides the most simple and effective way to connect the embedded application to the Google Cloud IoT Core. The board also includes an on-board debugger.
Height measurement:
The concept of height measurement involves the use of an ultrasonic sensor like HC-SR04. This ultrasonic ranging sensor is good with a ranging accuracy of about 3 mm over a range of 2 cm to 400 cm.
The basic principle of ranging involves the device sending a short sonic burst upon a 10 us trigger pulse & raising its echo pulse. The device then measures the time taken to receive an echo reflected from an object (please see timing diagram below & datasheet for more information). The time duration to receive an echo is proportional to the distance of the object.
If the device is mounted at a known height of 200 cm,
Height of patient = 200 - ((Time duration to receive an echo in us) / 58) cmIn the code implementation, several measurements are taken and averaged to get more accurate readings.
The 4-digit 0.56" 7 segment display indicates the height in cm.
A buzzer is added to provide unique audio cues to user:
- when measurement is taken.
- when information is sent to cloud.
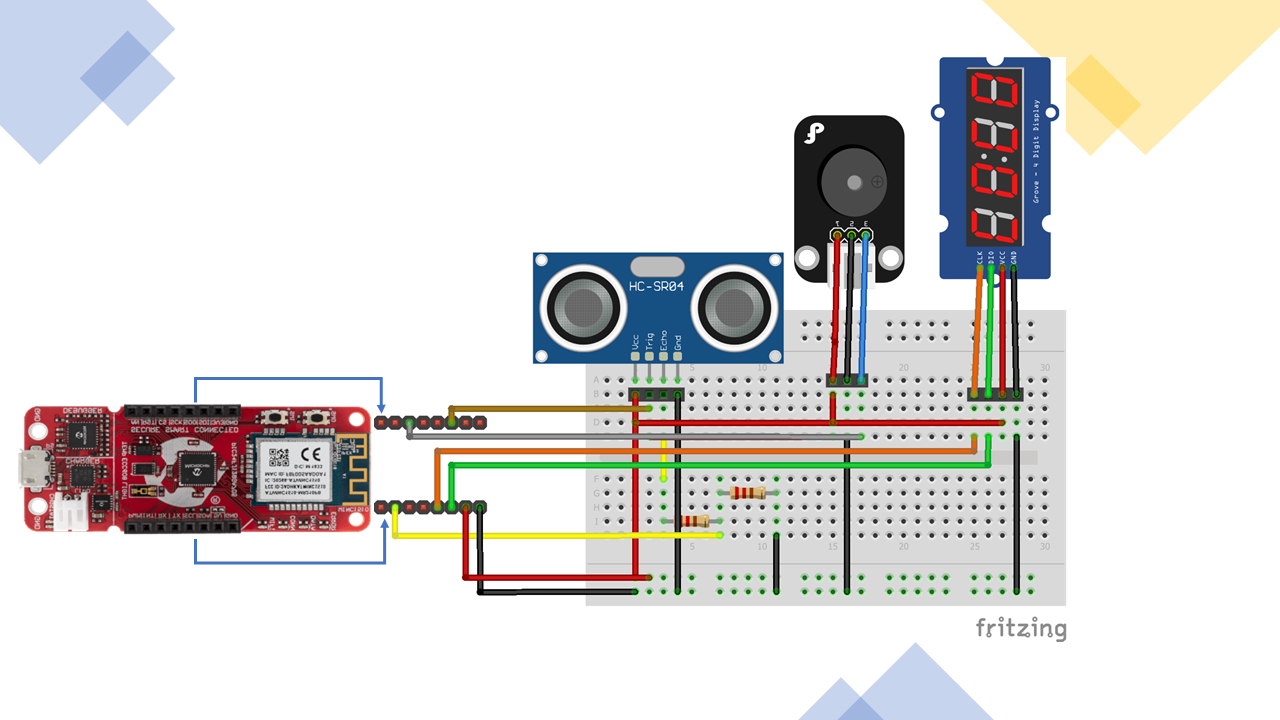
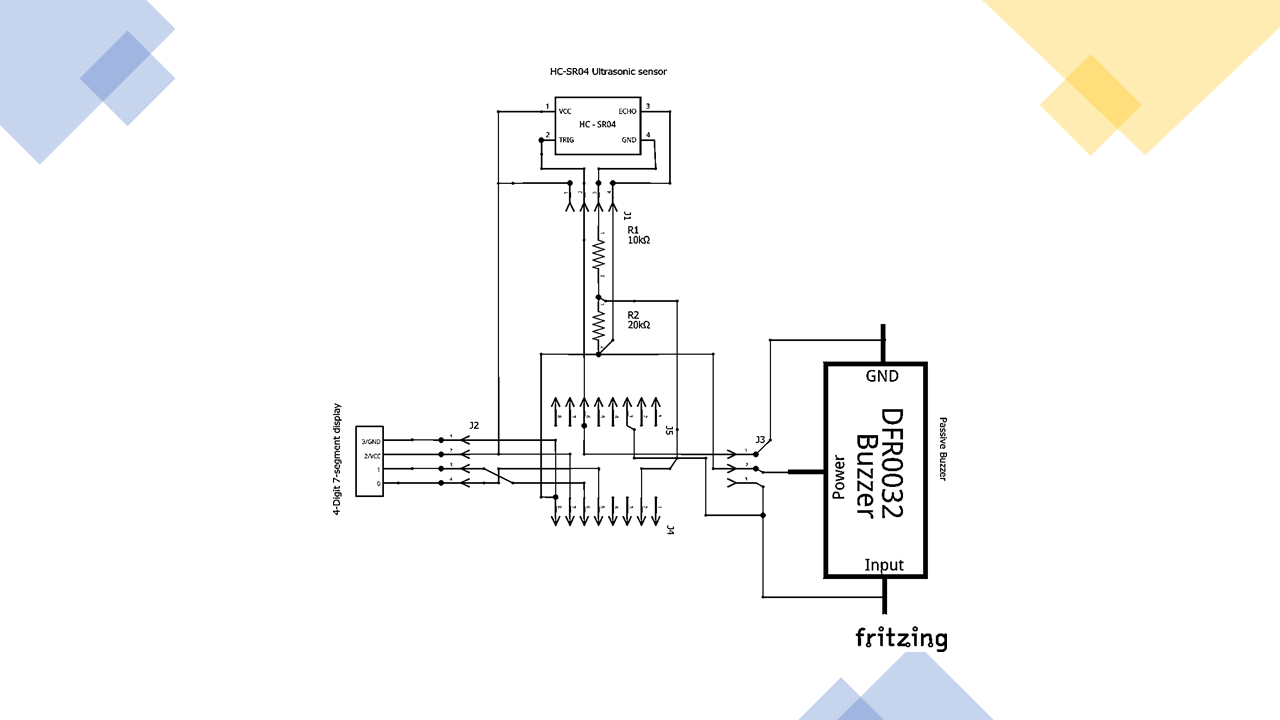
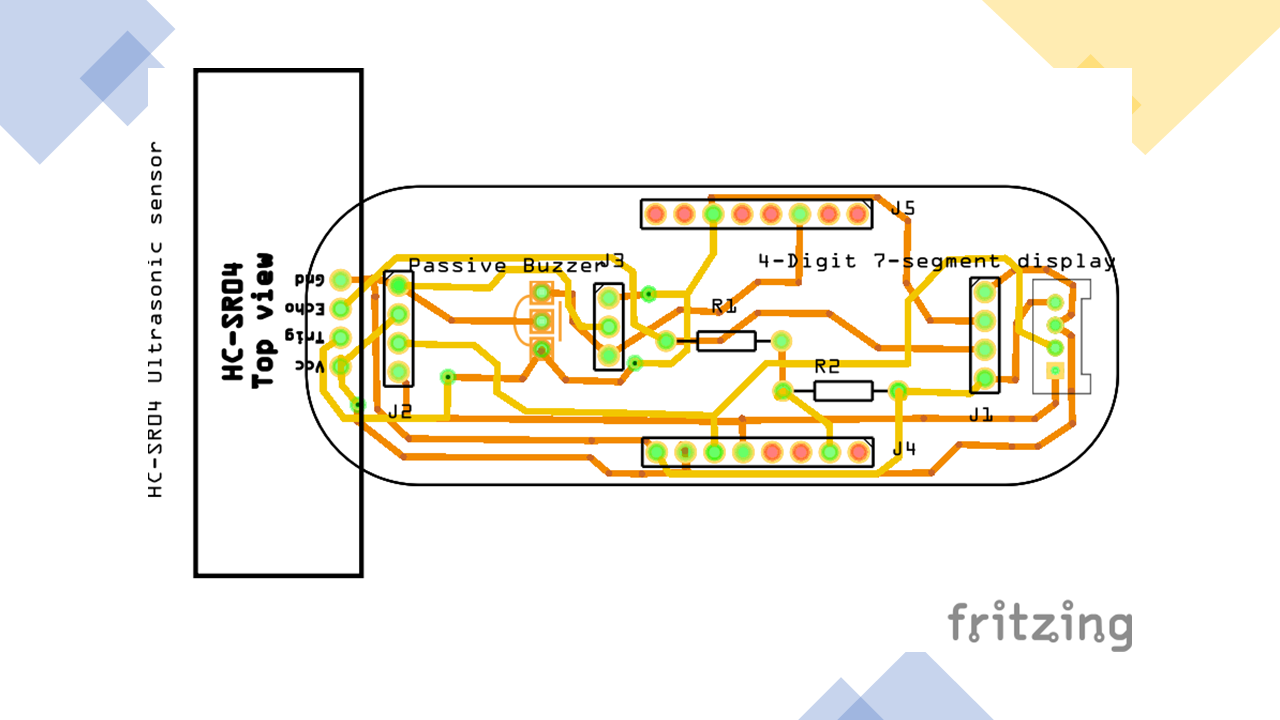
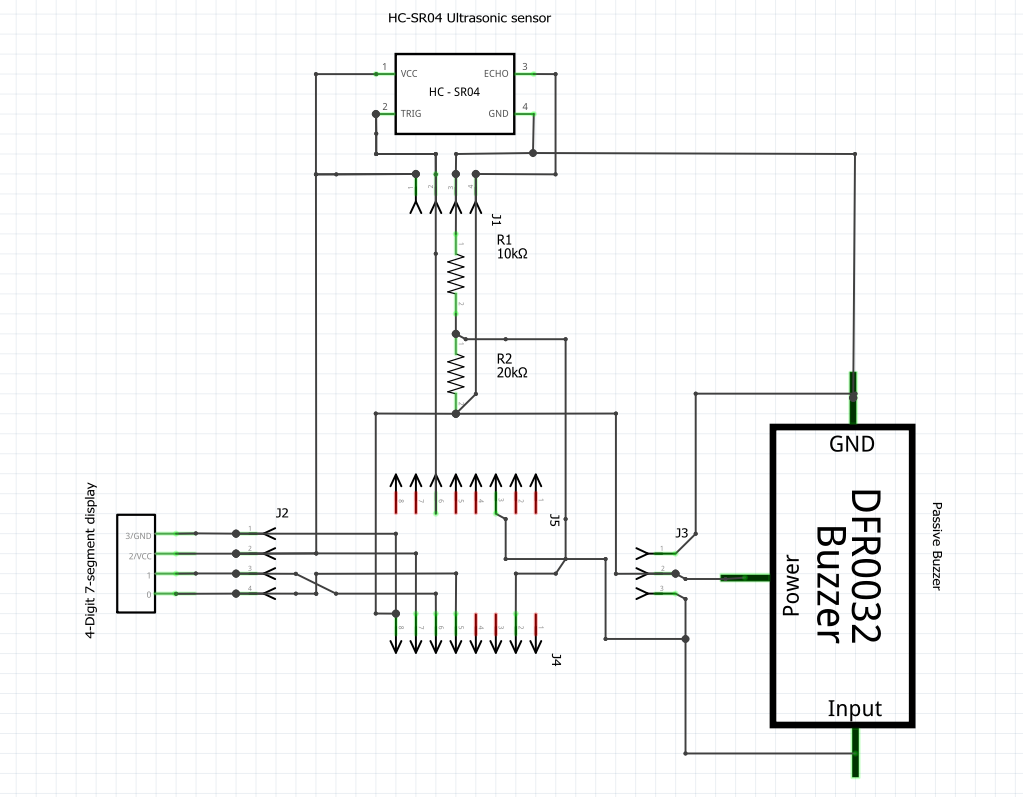
Please refer to the schematics for component wiring information. A custom PCB is designed. The enclosure is designed and 3D printed (please see attachments for top and bottom piece). Couple of holes are drilled in bottom piece of enclosure to allow room for ultrasound sensor heads. Here is a complete setup:
Hardware Design:
Internal view:
Design Implementation (Software):
End to End process flow:
Firmware design:
Before we begin with firmware development, you can watch this video from Microchip to get MPLAB X IDE and MPLAB Code Configurator installed.
I have used PIC-IoT-WD Sensor Node example as a starting point of development for this project (available in MPLAB Code Configurator page)
I have configured the following pins in the Pin Manager:
- RB9 (SDA) and RB8 (SCL) as I2C1 component for communicating with display.
- RB7 as the external interrupt input from Echo pin of the ultrasonic sensor (voltage divided using resistors to suit 3.3V operation).
- RB1 for ultrasonic sensor trigger input.
- RA0 for buzzer input.
- Power: 3.3V for Buzzer VCC and display VCC; 5V for Ultrasonic sensor VCC
Please look through 'main.c' in code attachment for application level implementation of the design.
Program PIC-IoT Board to Connect to Your Google Cloud Project
Open the project and go to MPLAB Microchip Configurator page (MCC).
1. Enter Google Cloud Information
Select Cloud Services Google and enter your Project ID (obtained from 'Create a project and enable billing' section above ), Registry ID (as 'PIC-IOT') - you can modify this, but make sure both project and the cloud entry details match.
2. Enter Wi-Fi Credentials
Select WINC and enter your Wi-Fi credentials against SSID and Password.
Click Generate. After code generation, select Projects tab.
Right click the project. Select Clean and Build and click Run to download the program.
Fitbit provides a Fitbit Web-API for accessing data from Fitbit activity trackers and & also to update manually entered logs. As part of the Web-API, we are focused on the 'User profile' section of the API. The Update Profile endpoint updates a user's profile. Here we are going to use 'height' as the POST parameter in the following POST URL. (More details in later section). We will make this POST request from Google Cloud Function once height is obtained from the smart meter.
POST https://api.fitbit.com/1/user/[user-id]/profile.json

*[user-id] is available in the user's profile page in fitbit.com. https://www.fitbit.com/user/[user-id]Firstly, to use the API, you need to create & register an application to get API client credentials (needs a Fitbit account). Enter details as shown below. See this page to understand the OAuth 2.0 Authorization Flow .
Once application is registered follow the link on 'OAuth 2.0 tutorial page' (marked in image below). Follow the steps to generate OAuth2.0 access token under 'Implicit Grant Flow' type authorization code flow.
In the process, you will be asked to authorize the app. You can specify the duration and the service (here I have authorized the app to access profile service for a week)
Once you have obtained the OAuth 2.0 Access Token, keep it safe, you will need in later steps.
Register Your Device on Google Cloud
1. Create a project and enable billing
Go to the Cloud Resource Center to create a new project
When you create a project, note down your Project ID. You'll need the Project ID later, when you program the hardware to connect to the cloud.
You must enable billing - Read the instructions for enabling billing.
2. Navigate to IoT Core
In the Google Cloud console, Select IoT Core on the side bar in the BIG DATA section.
3. Create a registry called "PIC-IOT"
Set the Registry ID as PIC-IOT. Region should be modified as needed.
Under Cloud Pub/Sub topics create a topic called sensor
Choose none for Cloud Logging
Hit Create.
4. Register your device
In your registry, click Create Device.
Navigate back to your CURIOSITY drive and click on the CLICK-ME.htm again.
You can find your unique device UID in the second part of the URL that is generated
Copy this and go back to the create device forum in Google Cloud. Select "Devices" under IoT Core.
Type the letter d in the Device ID section and then paste your device UID
In the CURIOSITY drive, you'll see a file called PUBKEY.TXT
Add your public key by uploading the PUBKEY.TXT file in the ES256 format
Enter your Device ID and select Upload and ES256
When you hit browse, navigate the the CURIOSITY drive and select PUBKEY.TXT
Set up a Google Cloud Function
Navigate to the cloud functions section of Google Cloud.
Click Create Function
In the menu, select Cloud Pub/Sub as the trigger
Select PIC-IOT as the topic, select Python 3.7 as Runtime script & enter the following code (replace the bearer authentication token with your OAuth 2.0 Access Token obtained from Fitbit app creation section)
POST request to Fitbit Web API (inline python code for google cloud function)
# importing the requests library
import base64
import json
import requests
def hello_pubsub(event, context):
    """Triggered from a message on a Cloud Pub/Sub topic.
    Args:
         event (dict): Event payload.
         context (google.cloud.functions.Context): Metadata for the event.
    """
    pubsub_message = base64.b64decode(event['data']).decode('utf-8')
    print(pubsub_message, type(pubsub_message))
    message = json.loads(pubsub_message)
    print(message['Height']);

    URL = 'https://api.fitbit.com/1/user/-/profile.json'
    headers = {'Authorization': 'Bearer <enter your OAuth 2.0 access token>'}
    r = requests.post(url = URL, headers= headers, data = {'height':message['Height']})
Click Create
Select the function you created and select view logs
You will now be able to see a live stream of the height measurements from your PIC-IOT board to the cloud (use Google Logs Explorer) and a POST request is made to Fitbit Web API to update user section with the height information.




Comments
Please log in or sign up to comment.