

Hardware components | ||||||
| × | 1 | ||||
 |
| × | 1 | |||
 |
| × | 1 | |||
 |
| × | 1 | |||
| × | 1 | ||||
 |
| × | 1 | |||
| × | 7 | ||||
Software apps and online services | ||||||
| ||||||
| ||||||
 |
| |||||
| ||||||
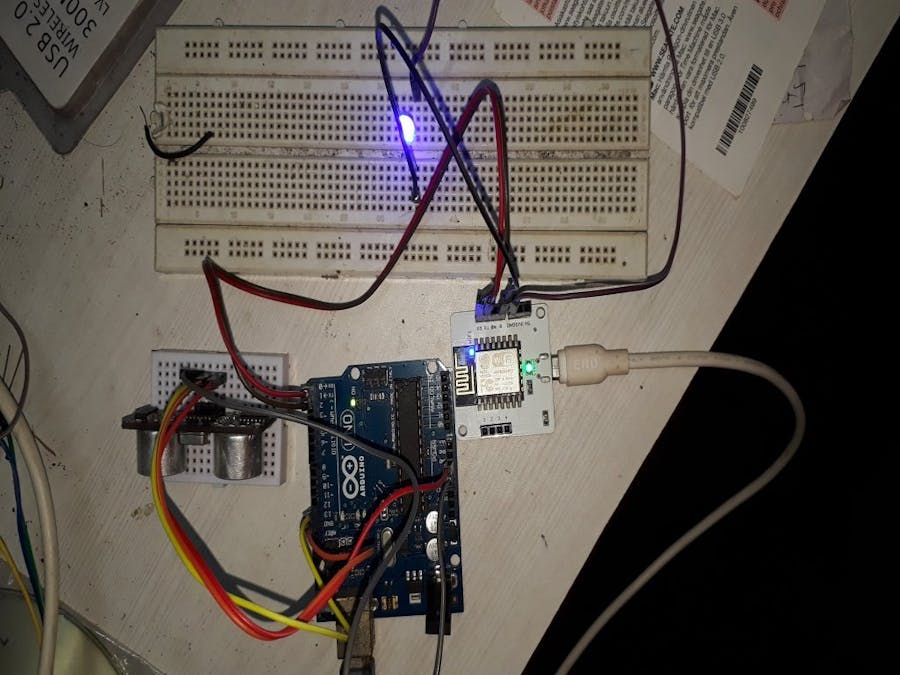
In this project, I focus on certain things i.e receiving data from the ultrasonic sensor and calculate the actual distance from the device to the person and this data will pass through the Tx pin on Arduino to Rx pin of BOLT IOT device. When the data will receive from Arduino, one python script will run some logic i.e if the distance is lower than the range then LED will glow (as an indicator) and if the distance is higher than the range then LED will turn off and side by side
LED status (0 or 1) and the statement ”less than 20cm” or “greater than 20 cm” and connected device name will be inserted into the database. Later another python script will be run for retrieving data using shell interface or starting with the telegram. A telegram bot will receive data from the database and control the telegram operation of the sensor with command.
1. In my project, we need to enable the apache2 server from the terminal
The command is—
service apache2 startTo see server status –
service apache2 statusCommand is –
service mysql startTo know the status
Command is –
service mysql statusCommand is –
service mysql stopTo know the status
Command is –
service mysql statusCommand is –
service apache2 stopTo know the status
Command is –
service apache2 statusNext step
Go to Google or Firefox browser and type in the address bar
localhost/phpmyadminand press Enter.
We will see this dashboard of phpmyadmin
Then I create a Database name ” sensor” and table name “analysis”
Number of the columns – 3
Retrieving Data from sensor
For distance calculation, we use the UltraSonic sensor. In this sensor, 4 pins are available(Vcc, TRIG, ECHO, GND). One is a transmitter and another is a receiver.
Receiving a signal from the ultrasonic sensor and some simple calculation converts it on a centimeter scale.
Calculation
Distance(cm)=duration * 0.0340 / 2
In the coding part
#include<BoltIoT-Arduino-Helper.h>
#include <BoltDeviceCredentials.h>
Two header files are used
- I download these two header files and paste it /Arduino/Libraries/boltiot-arduino-helper/ <My header files>.
- · Edit BoltDeviceCredentials.h file and set my correct Bolt API and Device name.
- Link for Boltiothelper.h and boltcredential.h go to src folder
In Arduino coding, we will see this part
boltiot.begin(Serial);(It is used to initialize the Bolt interface over serial UART)
And lastly, we will connect the Tx pin of Bolt is connected to the Rx pin of Arduino Serial Port, and the Rx pin of Bolt is connected to the Tx pin of arArduinoduino Serial Port.
Trig pin of UltraSonic sensor is used to trigger the signal and the Echo pin is used to receiving the echo signal which is sent by Trigg pin.
· In python script we use
mybolt = Bolt(conf.bolt_api_key, conf.device_id)
reponse=mybolt.serialRead(“1”)- In the second line of code “1” is the pin number for the Tx pin of Arduino and then retrieve the value using JSON and rstrip.
- Most important all code for Arduino is connected and python script I use 5 sec of delay for both the code for sync and avoid crossing my API limit for debugging.
- · LED is connected with the BOLT IOT device with pin number 0.
Send data to the database
In python script importing mysql.connector module is a must for any database related task and then we use
mydb=mysql.connector.connect(host="localhost",user="root",passwd="***",database="sensor")- If the distance is less than 20 cm
mySql_insert_query = """INSERT INTO analysis (Distance_at_cm, LED_status, Connected_device) VALUES ('Less than 20 cm','1','BOLT_IOT & ARDUINO') """- If the distance is greater than 20 cm
mySql_insert_query = """INSERT INTO analysis (Distance_at_cm, LED_status, Connected_device) VALUES ('greater than 20 cm','0','BOLT_IOT & ARDUINO') """- Finally commit.
In this project, I use two option
- From terminal
- From telegram
From Terminal, we use these options
For creating a database
For creating a table
For view table data
For drop database
For the show of, list of database
For drop table
From telegram, we use my BOT Token and creating an interface from the following list
For start apache server
For start SQL server
For view my sensor’s table data
For deactivating apache server
For deactivating SQL server
Command receive from Telegram Bot
Following steps for activating Telegram Bot
- Create an account in a telegram from the web or apps from Play Store.
- Search “botfather”.
- Type /newbot and hit enter
- Choose a suitable name for BOT and ending with bot (e.g telebot, johnbot, harry_bot, etc)and hit enter.
This picture shows that how to create a bot using botfather
Copy the secret token number which is used in python code for accessing bot in telegram.
Finally, in python code, there is some command handlers use for function against specific custom commands when the user types those command, the function which is the program for specific task will execute.
For Project video Click
Python code is available in my Github account below


Comments
Please log in or sign up to comment.