There are a lot of heat generating tools such as soldering iron, hot air working station etc. at the work bench that are potential fire hazards if left powered on for long period of time. Utilize the KEMET Pyroelectric Infrared Proximity Sensor and Blynk IoT, this smart socket will detect the human presence near the work bench, and automatically turn the power off if nobody is around for an extended period of time to improve the work bench safety, and save energy. The power and motion sensor can also be controlled, monitored and tracked remotely over the Internet from smartphones using Blynk App.
How it worksThere are many smart plugs are available on the market but few of them features built-in PIR sensors for power management. Meanwhile the PIR sensors are mainly used for light controls and security applications. This project explores a new application to combine the PIR sensor with IoT connected power socket. Let's get started.
For this project, a KEMET Infrared Sensors is used. KEMET's SS-430L-N (Neutral Lens) sensor use the pyroelectric effect of ceramic by absorbing infrared rays emitted from the human body. The sensor detects the natural infrared signature produced by humans without using lenses.
I found that sensor is very sensitive. If used without additional covers, it will be triggered constantly by minute environmental temperature changes. In order to use it as a human body proximity senor, I experimented with different thickness of 3D printed covers and designed a 3D printed spherical sensor mount which helps to make the sensing area more 'directional' with appropriate level of sensitivity. Two layers of red PLA (approximately 0.4-0.5 mm in thickness) provides reasonably good filtering property.
At the core of this device there is a time delay relay. Its off delay timer is controlled by a wifi enabled microprocessor with auto reset. A WeMos Mini D1 R1 board is used. The WeMos Mini is a mini wifi board with 4MB flash based on ESP-8266EX. It has a micro USB connection that makes the flashing the Arduino sketch very easy. The SS-430L-N has an output voltage of 3V DC which is compatible with the ESP-8266's pin input voltage, so they can be connected directly.
The relay controls the power output and can be triggered both locally or remotely. For safety reasons, the power only can be turned on on-demand either by pressing the button on the device, or remotely from the Blynk App. Once the power is turned on, the PIR sensor will keeps monitoring if there's human presence nearby. As soon as motion is detected, the off delay timer will be reset and restart. If there has been no motion detected for a extend period of time, for example 15 minutes, then the time is up and the power will be disconnected automatically. The power can also be shut off manually locally or remotely at any time. The device also functions as a motion sensor and keep monitoring the room constantly. A LED will turn on once the motion is detected with the pyroelectric sensor as visual cue. The buzzer will also emit different sound patterns as the device status changes.
On the Blynk dashboard, virtually there is one power button and two LEDs. One LED shows the power status, another LED is the PIR sensor indicator and will illuminate if there's motioned detected. Additionally, there's also a chart available on the dashboard to display live and historical PIR sensor data. So the user can monitor remotely activities near the workbench.
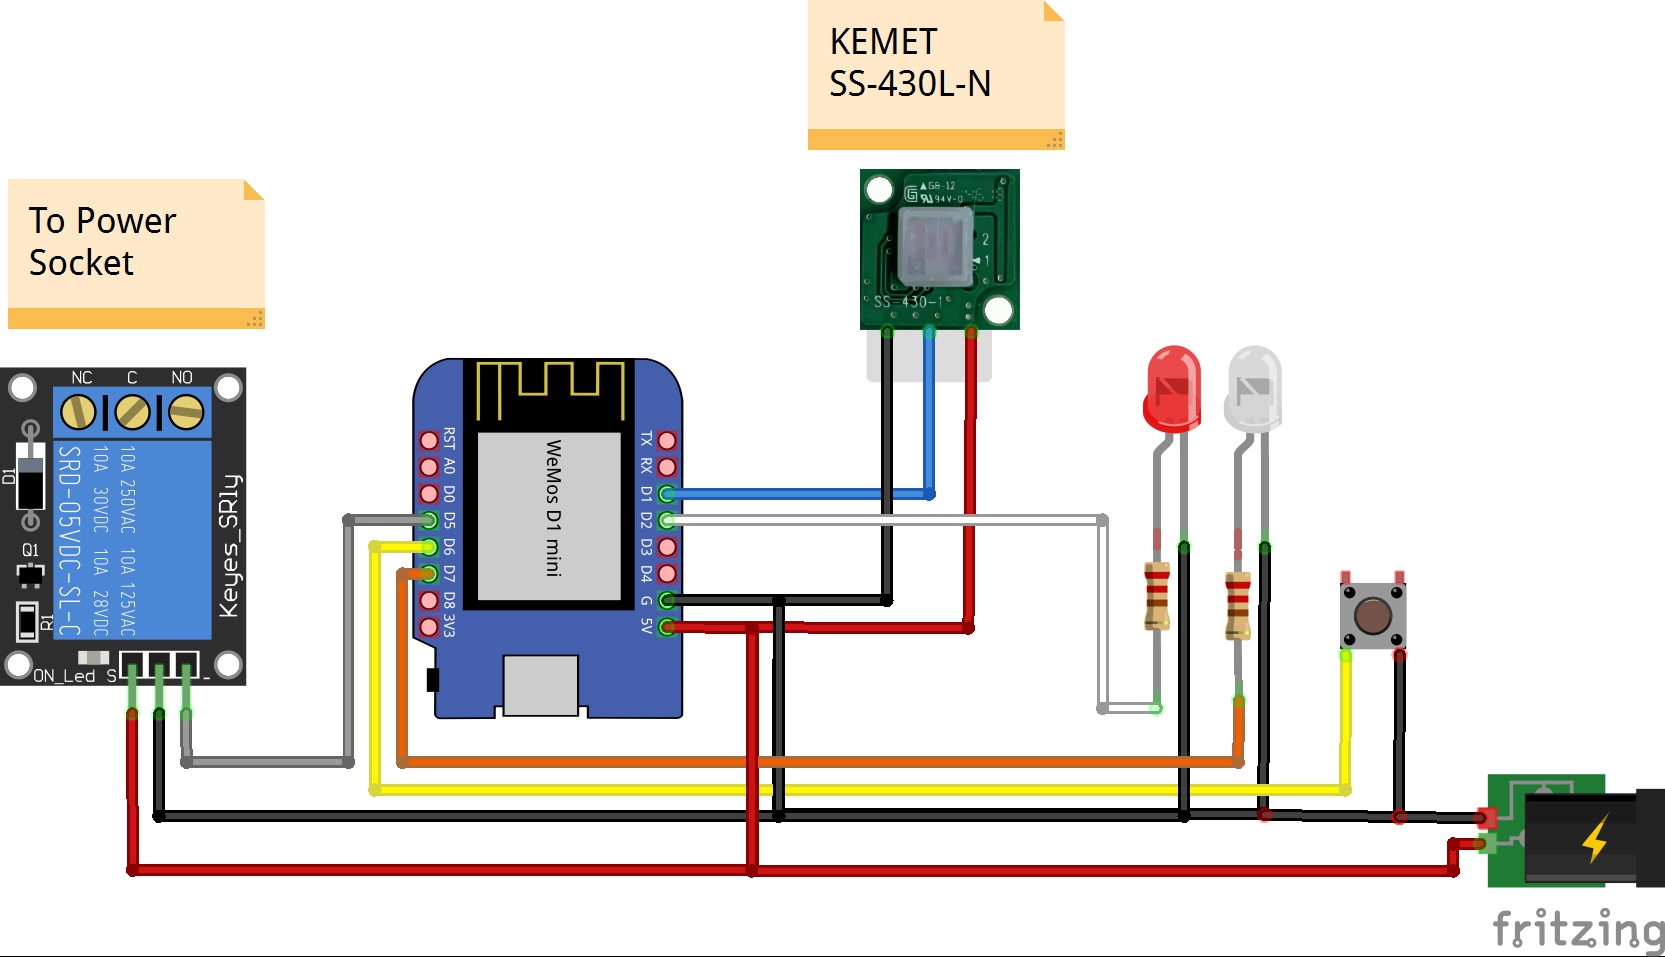
With a FDM 3D printer, I printed all the parts use PLA with 25% infill. The STL files are attached. Wiring the rest of the circuit according to the wiring schematic as well as the comments in the Arduino sketch. The pictures below show the detailed parts, circuit assembly and finished product of the Smart Workbench Power. I used a 5v power supply inside the case as power source. It is also possible to power it from the USB port. You can use the power socket and plug as shown in the picture. Use caution when working with mains voltage.
Download Blynk app to your phone or tablet, register and sign in your account.
- Create a New Project.
- Select WeMos D1 mini as Device model.
- Copy the AUTH TOKEN to be used in the code.
- Include two LED and a Styled Button widget.
- Include a SuperChart widget.
- Includes a Push Notification widget.
- Press Play (Triangle icon at upper right corner)
You'll need to download the latest version of the Arduino IDE which is available at https://www.arduino.cc/en/Main/Software, and add ESP8266 board to your boards manager. There are a lot of great tutorials can be found online, I will skip the step-by-step instructions here.
1. Install the Blynk library for ESP8266 from https://github.com/blynkkk/blynk-library
2. Connect your WeMos D1 mini to the computer use USB cable and load the sketch.
An example Arduino sketch is attached with 10 minutes no motion time-out for demonstration purpose. There are many additional improvements such as turning the PIR function on/off, setting customized delay timer etc. can be implemented.
// Set up no motion time-out value in seconds
#define timeSeconds 600
Before uploading, make sure to paste your authorization token into the auth [] variable. Also make sure to load your Wifi network settings into the ssid[] and pass[] variables.
// You should get Auth Token in the Blynk App.
char auth[] = " ";
// Your WiFi credentials.
char ssid[] = " ";
char pass[] = " ";The sensor have a active range around 1 meter (3 feet). You can turn the dome to the desired orientation to minimize false triggering. I set it up next to the soldering iron handle so it will be monitoring the hand movement on the work bench surface. The video shows how everything works.


Comments
Please log in or sign up to comment.