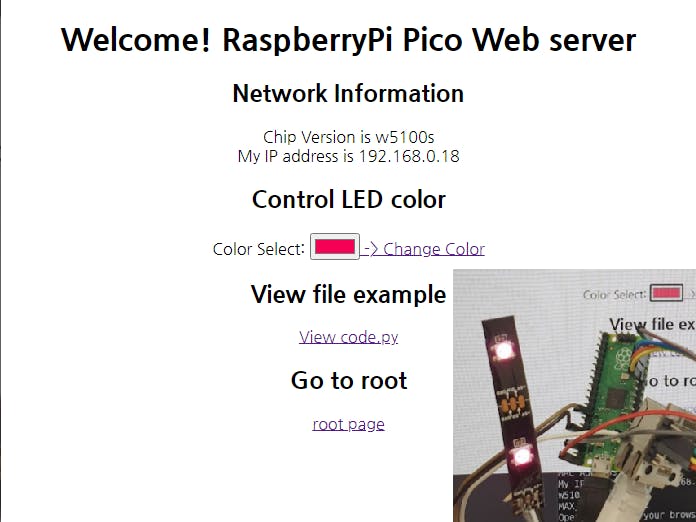
In the RaspberryPi Pico SIMPLE web server RGB LED control project we will use an WIZnet W5100S, WIZ810Sio and we will create a small http web server on our Ethernet LAN which will control an RGB LED with an interactive web interface.
2. Prepare CircuitPython and network libraryBefore this, you should learn this project.
https://www.hackster.io/bjnhur/how-to-add-w5100s-ethernet-to-raspberry-pi-pico-iot-demo-fed492
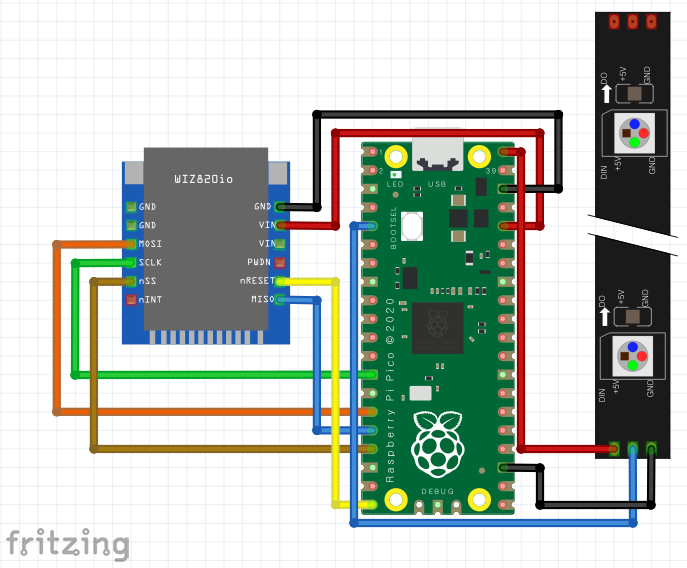
3. Hardware connectionRefer to below connection.
This code is based on Adafruit wsgi test code. https://github.com/adafruit/Adafruit_CircuitPython_Wiznet5k/blob/main/examples/wiznet5k_wsgiserver_test.py
1. Copy and Paste all /lib directory into your RaspberryPi drive from https://github.com/bjnhur/pico-W5500
2. Copy the code from https://github.com/bjnhur/pico-W5500/blob/main/Pico_W5100S_wsgiserver_test.py or below code section
3. Paste code into code.py on your RaspberryPi.
4. Save it! Done
In the code, if you want to change endpoint url address or add your endpoint, you can modify the below code on simple webserver. just change "YOUR_ENDPOINT" and "YOUR_ENDPOINT_FUNC" string.
@web_app.route("YOURURL_ENDPOINT")
def YOURURL_ENDPOINT_FUNC(request):  # pylint: disable=unused-argument
    print("LED handler")
    return ("200 OK", [], ["hello endpoint"])
The example is: Get the <color> code value from url and change the Neopixel LED color.
@web_app.route("/led/<color>")
def led_on(request, color):  # pylint: disable=unused-argument
    print("LED handler")
    color_value = int(color, 16)
    pixels.fill(color_value)
    pixels.show()
    html_string_led = html_string.replace("#000000", "#"+color)
    return ("200 OK", [], [html_string_led])
If you change the page view, you just change the "html_string" variable on the code.
html_string = '''
<!DOCTYPE html>
<html lang="en">
<head>
...
<p>
<a href="/code">View code.py</a>
</p>
...
</body>
</html>
'''If the code is ok, you can see the below log from REPL of Pico board. (For REPL open, please refer this page "How to add W5500 Ethernet to Raspberry Pi Pico (Python) - 1" - 6. REPL, Open serial terminal for printf() )
On your PC, open the browser (Recommend Chrome).
Type your board IP on the browser. I got "192.168.0.18" from my DHCP server.
Let's change the LED color. click "Color Selector" color box, then you can see color picker as below. Select color as you want.
Then, click "Change Color" link.
See your LED~~~
There are 2 more functions in simple webserver.
1. File read in RaspberryPi Pico USB drive.
Click "View code.py", then you can see "code.py" in your RaspberryPi Pico board.
2. Getting JSON data from other web service.
Click "currentprice/USD.json" link, then you can see JSON data from http://api.coindesk.com/v1/bpi/currentprice/USD.json
Done. Enjoy the demo code~~~ :)


_xcg7vos8ax_LjVH1Q6mKB.png?auto=compress%2Cformat&w=48&h=48&fit=fill&bg=ffffff)


Comments