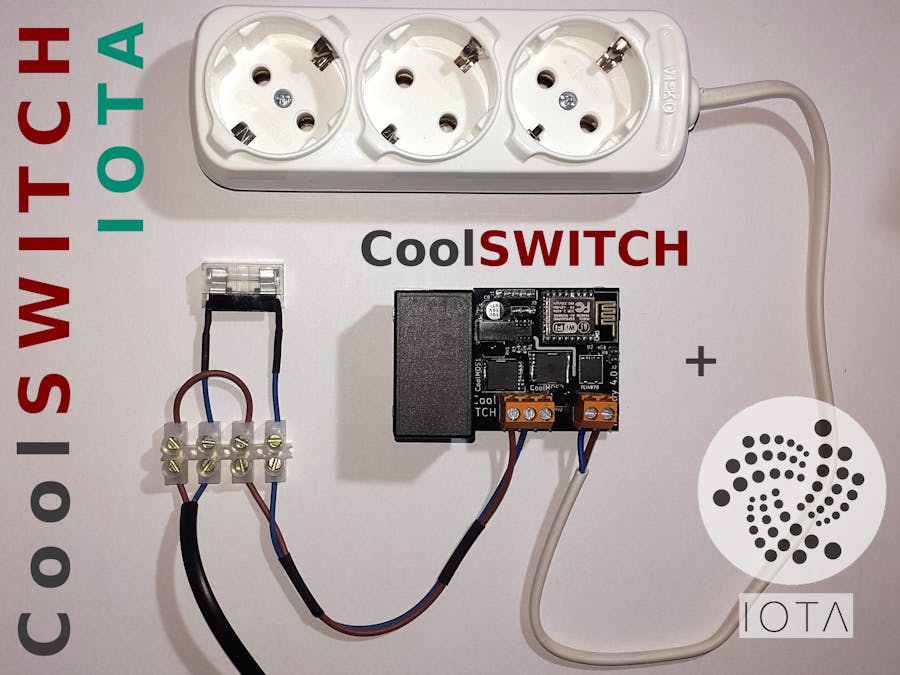
In this project I will show how to use a smart wireless switch device to IOTA-based applications such like IOTA-based payment, energy source tracking, malfunction detection and preventive maintenance.
CoolSWITCHThe device I will use is the CoolSWITCH, which is a wireless solid state switch with power measuring capabilities, I built couple of months ago.
Its main features are:
- secure wireless switching - communication and firmware updates secured with modern cryptography
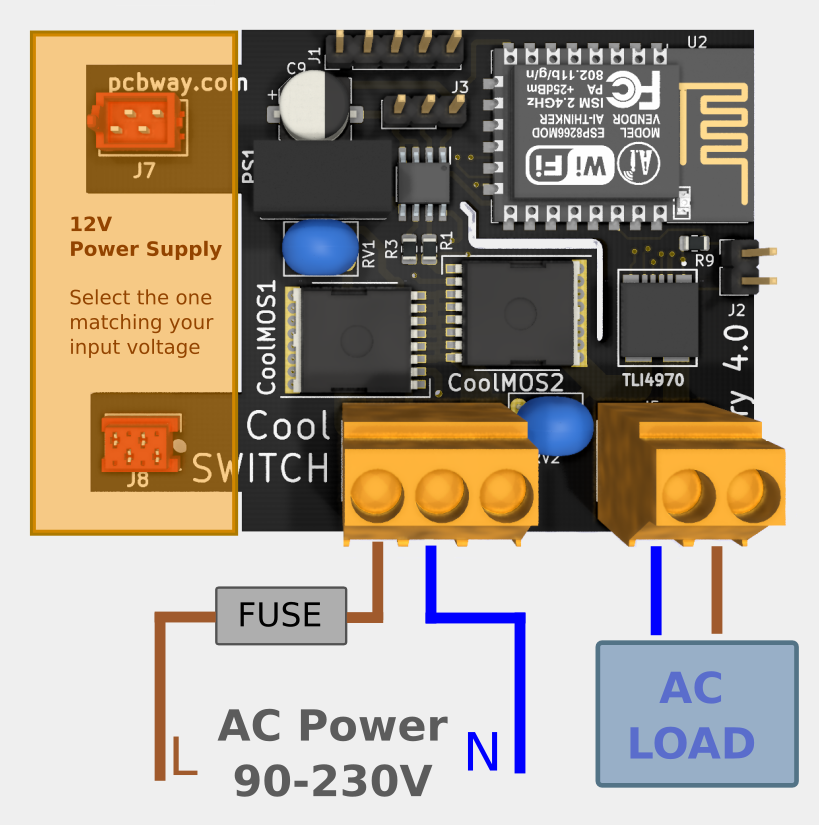
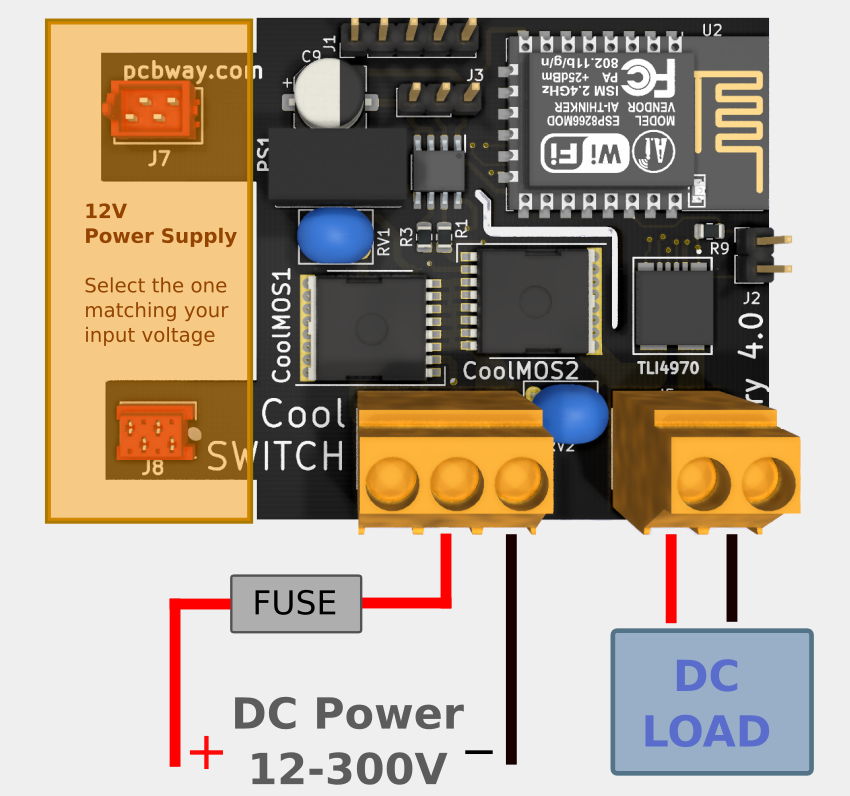
- wide voltage range: 12-300 VDC, 87-230 VAC
- high current range: 0-50 A (DC / AC)
- high reliability & efficiency - do to use of MOSFET-s instead of relays
- truly wireless operation - does not needs a separate power supply - it has built in (modular) power supplies for logic (3.3V) and gate drive (12V)
- high resolution current measurement
- compact size
- advanced features such as speed / power control, safety features, over-current detection
You can find more details about the device in the original project:CoolSWITCH - Wireless High Power Smart Switch
Use CasesUse Case #1:IOTA Based Energy Consumption Monitoring and Payment System
- the CoolSWITCH acts as switch and power meter- a power source is connected as power input- a consumer device is connected as the load- the power source and consumer device can be either AC or DC, in the voltage range supported by the CoolSWITCH
- the power is activated by IOTA payments:- an unique IOTA Address is associated to the device- the user will to payments to this address- the device provides power for the received IOTA tokens- both time (s) and power consumption(kWh) based systems can be implemented
- this device could be used in- Smart Buildings- 230 V Power Sockets, Home Appliances- Vehicles - Charger Stations,Energy Consumption based Transportation Services
- using IOTA MAM, the power consumption of the devices can be streamed to the IOTA Tangle
Use Case #2:Energy Source Tracking
- bigger version of the CoolSWITCH could be used for Energy Source Tracking in the Power Delivery Infrastructure:
- each Link of the Power Delivery Infrastructure has a CoolSWITCH device installed
- the device is used Switching and Power Monitoring
- the Sensor Data is published in the IOTA Tangle using IOTA MAMStreams
- as the Source and Destination of each Link is known, the Path of the Energy can be fully tracked from the Power Plant right to the End Users
Use Case #3:IOTA Based Device Monitoring and Preventive Maintenance
- simplified versions of the CoolSWITCH could be embedded in smart devices
- the current usage measured by the CoolSWITCH can be published to the IOTA distributed ledger using MAM channels- the CoolSWITCH also supports connecting additional sensors(ex. temperature)- the data produced by these sensor can be also published
- the device sensordata then can be collected and used for predictive maintenance
- privacy and data protection can be implemented using IOTA MAM Private / Restricted channels
Bellow is a proof of concept implementation of the use case #1:IOTA Based Energy Consumption Monitoring and Payment System
Raspberry Pi Based ImplementationFor the PoC implementation, along the CoolSWITCH we also need a Raspberry Pi(or a PC / home server) to run the IOTA client.
The Raspberry PI will also communicate with the CoolSWITCH, through its HTTP and MQTT interfaces.
> CoolSWITCH HTTP and MQTT InterfacesOn the software side the CoolSWITCH exposes a secure HTTP interface(HMAC secured) and an MQTT interface.
It also has small HTTP client(written in Pyhton), which can be used configure and control the device. This client also implements the HMAC based authentication used be secure the access to the CoolSWITCH device.
Here are some example commands:
- turn ON the connected device:
$ python3 coolSwitchClient.py -d CoolSWITCH-4548297 --command /turnOn --secret PqVnwQ/OVshA1R34f46WCO41whkiBIiORyGx7DJ5Ujo=
HTTP request: http://CoolSWITCH-4548297.local/turnOn?seqNr=1553970894267.0&nonce=21606532&hmac=2bbeebaf13b6de4869af751a5f6f052d6178143dcde81bc8c758c151d7536379
(200) Ok

(note: HMAC secured request)- turn OFF the connected device:
$ python3 coolSwitchClient.py -d CoolSWITCH-4548297 --command /turnOff --secret PqVnwQ/OVshA1R34f46WCO41whkiBIiORyGx7DJ5Ujo=
HTTP request: http://CoolSWITCH-4548297.local/turnOff?seqNr=1553970903117.0&nonce=74661856&hmac=468a6bd1eaed93aed1a9f72649daf56cd2813fa632c851def87c7ffe29e90664
(200) Ok

(note: HMAC secured request)- get the current consumption of the connected device:
$ python3 coolSwitchClient.py -d CoolSWITCH-4548297 --command /current
HTTP request: http://CoolSWITCH-4548297.local/current
(200) 2.90          // (amps)

(note: read-only request are not secured by default)
More details about the HTTP and MQTT interfaces can be found in the here.
> PreparationFor the software part we will need a Raspberry Pi with Raspbian, or a PC / home server with some kind of Linux distribution.
As preparation we will need to install the CoolSWITCH client library and the Node.js:
- clone the CoolSWITCH repository:
$ git clone https://github.com/bluetiger9/CoolSWITCH- install Node.js and the IOTA node.js
$ curl -sL http://deb.nodesource.com/setup_8.x | sudo bash -
$ sudo apt-get install -y nodejs

$ npm init
$ npm install @iota/core @iota/converter --saveNext we will create an IOTA address for the device:
- clone the iota-workshop repository and install npm dependencies
$ git clone https://github.com/iota-community/iota-workshop.git
$ cd iota-workshop/
$ npm -i- next we need to generate a random Seed of 81 trytes
$ cat /dev/urandom |LC_ALL=C tr -dc 'A-Z9' | fold -w 81 | head -n 1
FSRK........................ <-- save this value, this will be the Seed for out IOTA address- using this Seed we can generate an IOTA address
$ vim code/3.1-create-address.js
--> replace the 'seed' with the your seed
$ node code/3.1-create-address.js
`GetNewAddressOptions`: 1 options are deprecated and will be removed in v.2.0.0.
Your address is: 9WFZOAHLRXNFYGBBXMLFCZPNCHDKXKRDTSH9LF9KJTIPDMTXUMUCHKVNMNJKCHOLWJYGDD9ZVMXGM9MD9
Paste this address into https://faucet.devnet.iota.org- initially the balance of the of address is 0
$ vim code/3.2-check-balance.js
--> replace the 'address' with your seed

$ node code/3.2-check-balance.js
[ 0 ]- but, we can use the IOTA Faucet to obtain some tokens. After a couple of minutes you should have some tokens
$ node code/3.2-check-balance.js
[ 1000 ]Now, as we have the IOTA address, we can start creating the app.
Start by creating new directory for our IOTA application:
$ mkdir CoolSWITCH-IOTA
$ cd CoolSWITCH-IOTA
Then, we can create the application based on approach from the EV Charing project (see resources):
- a
checkBalance()function periodically checks the balance of our IOTA address - when someone sends us tokens, the balance will increase - the
checkBalance()function detects this and calls thenewTokensCBfunction - in the
newTokensCB()function we can provide services for the received tokens
let checkBalance = function() {
 iota
   .getBalances([address], 100)
   .then(({ balances }) => {
     console.log(balances)
     let balance = balances[0]
     if (prevBalance > 0 && prevBalance < balance) {
       let newTokens = balance - prevBalance
       if (newTokens > 0) {
         newTokensCB(newTokens)
       }
     }
     prevBalance = balance
   })
   .catch(err => {
     console.error(err)
   })
 schedule()
}
let newTokensCB = function(newTokens) {
 console.log("\t+" + newTokens)
}
let schedule = function() {
 setTimeout(checkBalance, 1000);
}
When we receive tokens, the script will print something like this:
$ node CoolSwitch-IOTA.js
...
[ 1000 ]
[ 1000 ]
[ 2000 ]
	+1000                        <--- 1000 IOTA received
[ 2000 ]
[ 2000 ]
...
Now, we can change the newTokensCB() function to provide something useful for the received tokens.
In the 1st version, I added some logic to turn ON the power for a time amount proportional to the amount of received tokens. This works as follows:
- when tokens are received, the an ON time is based on a price constant(IOTA / seconds)
- the CoolSWITCH device is turned ON, but invoking a Python script
- a task is scheduled to turn OFF the CoolSWITCH after the ON time expires
let newTokensCB = function(newTokens) {
 console.log("Got " + newTokens + " IOTA tokens")
 const onMillis = 1000.0 * newTokens / priceSeconds;
 console.log("  \- ON time: " + (onMillis / 1000.0) + "s");
 sendCommand("turnOn");
 setTimeout(sendCommand, onMillis, "turnOff")
}

let sendCommand = function(cmd) {
 let command = coolSwitchScript.replace("{command}", cmd)
 console.log("Sending command: " + command)
 exec(command, function callback(error, stdout, stderr){
   console.log(" -\error code: " + error)
   console.log(" -\stdout: " + stdout)
   console.log(" -\stderr: " + stderr)
 });
}

const coolSwitchScript = "python3 " + __dirname.replace("CoolSWITCH-IOTA", "") + "/CoolSWITCH/coolSwitchClient.py -d " + coolSwitchId + " --command /{command} --secret " + coolSwitchSecret
Also, I added a command line interface with the following arguments:
iotaAddress- the IOTA to monitoredcoolSwitchId- the device ID of our CoolSWITCHcoolSwitchSecret- the secret used for HMAC authentication with CoolSWITCHpriceSeconds- how much IOTA tokens one seconds of usage costs
const coolSwitchId = argv["coolSwitchId"]
const coolSwitchSecret = argv["coolSwitchSecret"]
const iotaAddress = argv["iotaAddress"]
const priceSeconds = argv["priceSeconds"]

console.log("CoolSwitch Device ID: " + coolSwitchId)
console.log("CoolSwitch Secret: " + coolSwitchSecret)
console.log("IOTA Addres: " + iotaAddress);
console.log("Price (/secs): " + priceSeconds + " IOTA");
An example run, with a price of 100 IOTA / seconds (~0.1 $ / hour), looks like this:
pi@raspberrypi:~/dev/CoolSWITCH-IOTA $ node CoolSwitch-IOTA.js --iotaAddress 9WFZOAHLRXNFYGBBXMLFCZPNCHDKXKRDTSH9LF9KJTIPDMTXUMUCHKVNMNJKCHOLWJYGDD9ZVMXGM9MD9 --coolSwitchId CoolSWITCH-4548297 --coolSwitchSecret PqVnwQ/OVshA1R34f46WCO41whkiBIiORyGx7DJ5Ujo= --priceSeconds 100
CoolSwitch Device ID: CoolSWITCH-4548297
CoolSwitch Secret: PqVnwQ/OVshA1R34f46WCO41whkiBIiORyGx7DJ5Ujo=
IOTA Addres: 9WFZOAHLRXNFYGBBXMLFCZPNCHDKXKRDTSH9LF9KJTIPDMTXUMUCHKVNMNJKCHOLWJYGDD9ZVMXGM9MD9
Price (/secs): 100 IOTA
Balance: 4000
...

Balance: 4000            <-- waiting for balance change
Balance: 5000
Got 1000 IOTA tokens
 - ON time: 10s          <-- 1000 IOTA = 1000 / 100 = 10 sec
Sending command: python3 /home/pi/dev/CoolSWITCH/coolSwitchClient.py -d CoolSWITCH-4548297 --command /turnOn --secret PqVnwQ/OVshA1R34f46WCO41whkiBIiORyGx7DJ5Ujo=    <-- CoolSWITCH client invoked to turn ON the device
-error code: null
-stdout: HTTP request: http://CoolSWITCH-4548297.local/turnOn?seqNr=1553978136489.0&nonce=33204783&hmac=e53c35bdaedc711f32431a252519d79a6b7e8c1edb95bf0710c6d33478697b2e
(200) Ok
-stderr:

... 10 seconds later

Sending command: python3 /home/pi/dev/CoolSWITCH/coolSwitchClient.py -d CoolSWITCH-4548297 --command /turnOff --secret PqVnwQ/OVshA1R34f46WCO41whkiBIiORyGx7DJ5Ujo=
    <-- CoolSWITCH client invoked to turn OFF the device
Balance: 5000
-exit code: null
-stdout: HTTP request: http://CoolSWITCH-4548297.local/turnOff?seqNr=1553978146548.0&nonce=1881195&hmac=c7919a476c326d794ec273bb193e84cd53f9cfc4ef43dded4d1d1be97c562fe5
(200) Ok
-stderr:The CoolSWITCH continuously measures the current consumption of the load. The current measurement(A) from the retrieved either over the HTTP or the MQTT interface.
The power consumption(W) can be calculated / estimated (in the case of AC) from the current consumption(A) and the input voltage (V). From this we can calculate the consumed energy (kWh).
Based on the consumed energy we could implement features like:
- Energy Consumption based Charging- instead of charging for duration, we can charge for energy consumption- a combined approach(duration for low power applications + energy consumption for high power applications) can be also implemented- the a command line interface would also receive a new argument:
priceKWh- how much IOTA tokens one kWh of energy costs - Publishing the Energy Consumption as a IOTA MAM Stream
(note: actual implementation will follow)
ESP8266 (Arduino) based ImplementationThe ultimate goal would be to run an IOTA client directly on the ESP12-E module, so the Raspberry Pi would be no longer needed.
The most suitable library would be official IOTA C++ library, the thibault-martinez/iota.lib.cpp. The embedded support, including ESP-s, seems to be planned for the v2.0.0 release (issue #252).(work in progress)
DEMOI tested the setup with some standard 230Vs socket connected to the CoolSWITCH and a table lamp used as the load. I activated the switch by sending IOTA tokens using the IOTA Faucet.
Here is a demo video showing the CoolSWITCH in action (without IOTA features):
Resources- Sending your first transaction with IOTA
- IOTA Beginners Workshop
- EV Charging: How ElaadNL built a PoC Charge Station running fully on IOTA, and IOTA only
- Running the IOTA C libs on Arduino
Enjoy! :)


Comments
Please log in or sign up to comment.