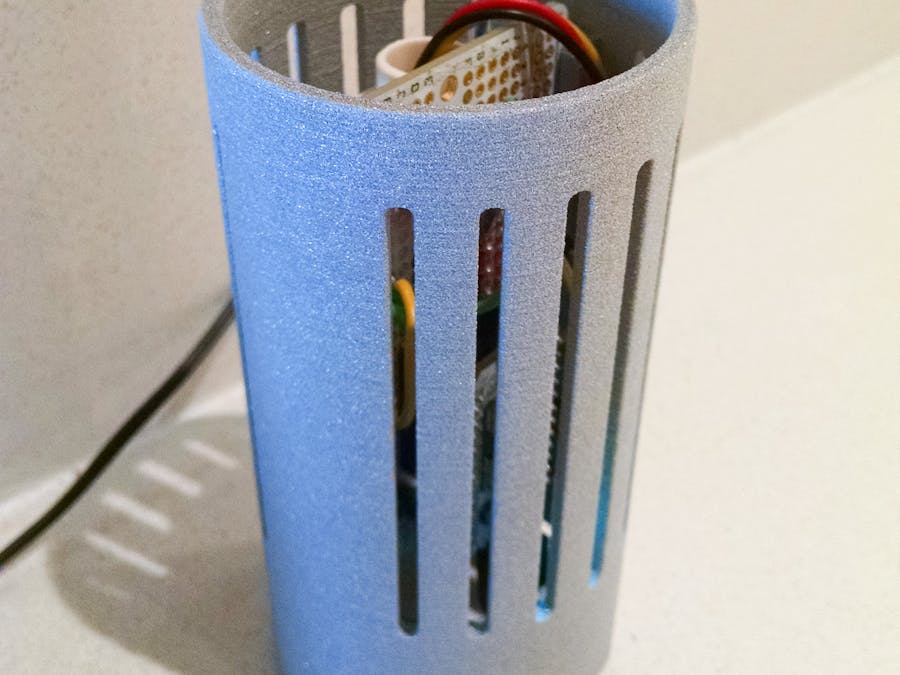
The goal of this project was to build an environment monitoring system for my apartment. I was curious to see what it would take to build something like this. I also wanted to see how the sensor data changes over time and if there were any patterns I could detect. I suppose I could have just purchased a Netatmo or a set of sensors from SmartThings, etc. Buying something certainly isn't as much fun but it certainly would have been cheaper!
I had a few Particle Cores around so I decided to try and build my sensor network with Cores as the processor and the connection to the internet. The hardware from Particle always works really well and their cloud-based IDE makes it easy to write and update the code running on the device. Once you have their devices connected to your home wifi it only takes a few minutes to start pulling data from a connected device.
I have three rooms in my apartment so I knew I was going to build at least three of these devices. Unfortunately I didn't build them all at once and I used different sensors for each so that added some complications to my code. Ideally, I would have purchased all the hardware for this project at once so they all would be the same. Instead I patched together sensors and components I had already (purchased for or salvaged from other projects).
Each sensor measures light levels (in lux), temperature, humidity, sound, and vibration. Each sensor device also has a piezo buzzer on it so I can provide audio feedback on the status of the device. All I have this buzzer doing now is playing a segment from the Super Mario Bros. theme when the device first boots up. It's useful to know when they reset themselves (and they sometimes do).
One other requirement for the project was to have the case of the project look halfway decent. These are going to be in each room of my apartment. My apartment is not very big so there's really no room for them to hide. I wanted something simple and functional and fairly inexpensive.
Since I am a huge fan of 3D printing and rapid fabrication I decided to just design it myself and use a cloud-fab company to print it. I had been meaning to try out AutoDesk Fusion 360 so it made sense to build the housing for my sensors using that tool. After a few tutorials and videos I got started and found it was really easy to use. I was really surprised at the results. It came out way better than I expected.
The board I based this whole project on was the 1/2 sized bread/proto board from Adafruit. https://www.adafruit.com/products/571 It's a little strange to build off this board at first. I'm used to building circuits off just plain old perf board and hand connecting my own traces. Once you accept the wiring conventions of the board it actually makes prototyping pretty quick (even if the resulting circuit takes up more space).
I designed the shell here based on the proto board so once that was done I ordered my 3D prints from Sculpteo. It takes 3-4 weeks on the el cheapo' plan so I had plenty of lead time to actually build my circuits before the shells arrived. I'm so glad everything fit!
Here's a link to the model on Sculpteo http://www.sculpteo.com/en/print/mm-temphumv1/uUaevYC8
So after building a few of these I started to get a little fancy with the placement of my components. Here you can see some photos of the most recent version of my circuit. I moved the Particle Core to the top of the board so I could make room for the little plastic bit on the end of the microUSB wall wart. I found that if I put the Core at the bottom, and plugged in the microUSB cable that the rubber strain-relief pushed the board up out of the top of the shell.
I also ordered some 3D prints from Shapeways, just to compare. Shapeways is actually much cheaper for just the plain-ol-nylon 3D prints. Here's a link to the design there http://www.shapeways.com/product/PDHW246SD/environment-sensor-housing?li=shop-results&optionId=57234348&rc=SearchResults
I really like the blue one!
To actually view the data coming from these sensors I followed a tutorial by Particle on how to use Librato to log data from sensors. https://docs.particle.io/guide/tools-and-features/webhooks/#logging-to-librato
Here's what 7 days of data looks like in my apartment. It's actually not all that exciting. I attribute this to being in the SanFrancisco Bay area. The weather here doesn't change all that much. I even wrote a small Heroku app that pulls data from WeatherUnderground for my zipcode and sends that data to Librato as well. That way I could at least have the context of the outside temperature, humidity, light, etc... It was interesting to look at but I didn't really discover any major insights. Also, I think the code to measure the sound levels is not correct. I need to revisit that. I just grabbed some code from an audio dbl sampling loop and plopped it in there without much thought. It's roughly correct but not really useful given I was hoping the audio sensor could show when I was home/not home (again not really groundbreaking insight here as I generally know that information already).
I hope to continue to chip away at this project and see if I can improve the code and the quality of the data. I've been experimenting with other air quality sensors and would like to add those in as well. Comments and feedback always welcome!


_t9PF3orMPd.png?auto=compress%2Cformat&w=40&h=40&fit=fillmax&bg=fff&dpr=2)


_3u05Tpwasz.png?auto=compress%2Cformat&w=40&h=40&fit=fillmax&bg=fff&dpr=2)
Comments
Please log in or sign up to comment.