Simply put, I decided this project needed something a bit more realistic when it comes to its security. I have always wanted to play around with the D1 Mini ESP8266. Lo and behold, it was the best and cheapest choice of a wifi module add-on to this project!
So now whenever it detects a movement, it will send out a message to the Telegram app.
I could already think of the many things we can do with this thing! 🤩
P.s. I also found out recently there's a similar Arduino board that is also capable of IoT stuffs.... the Arduino Nano 33 IoT!! 😲 (already thinking of getting that for future IoT projects 🤯)
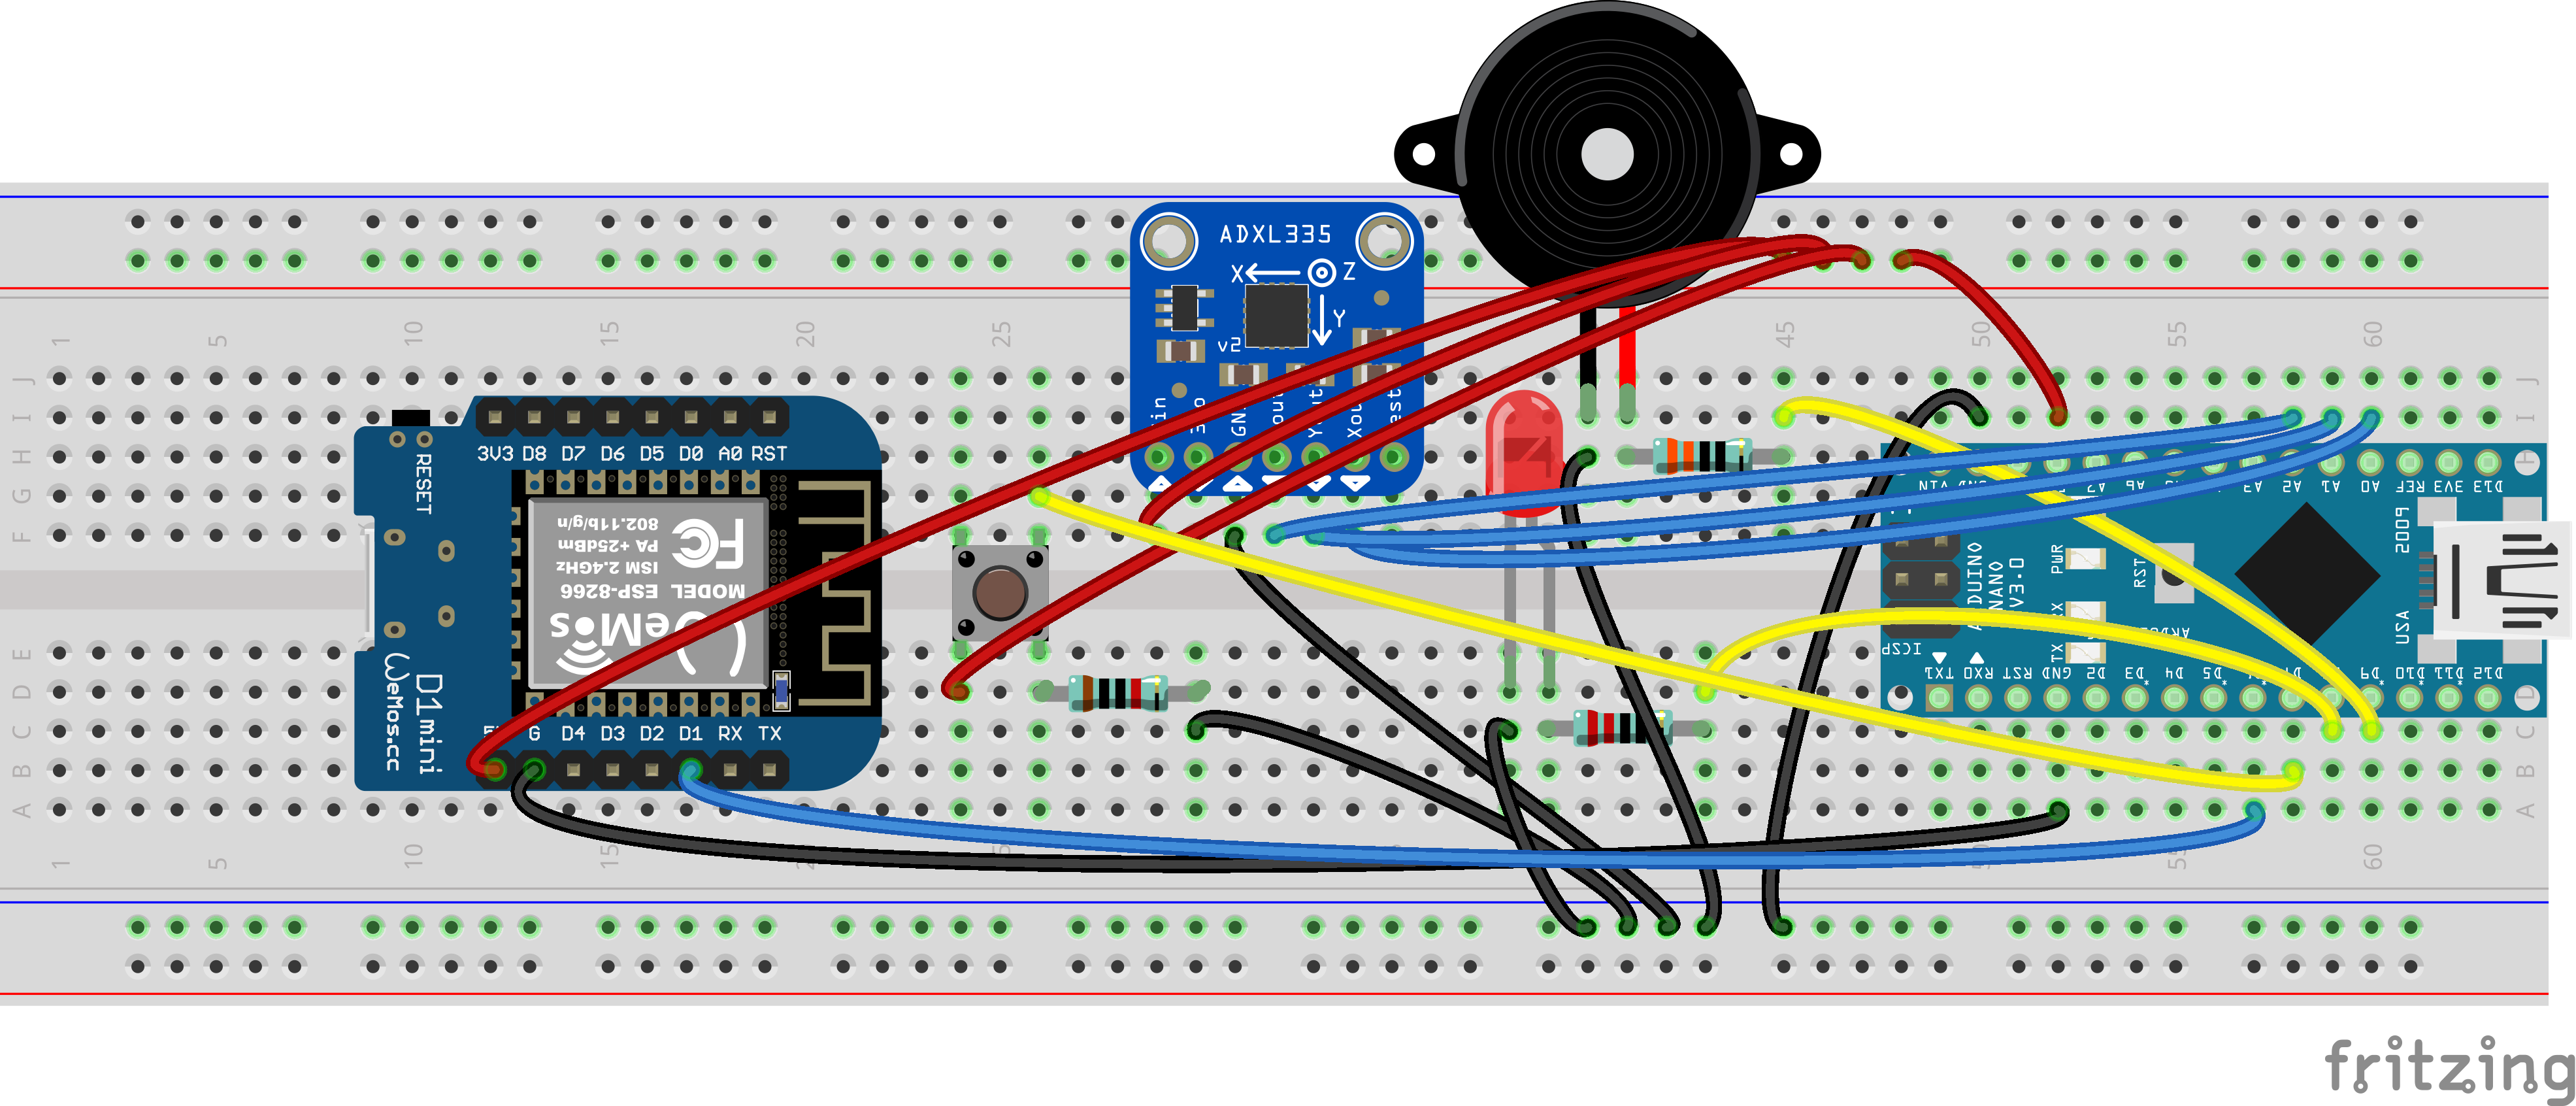
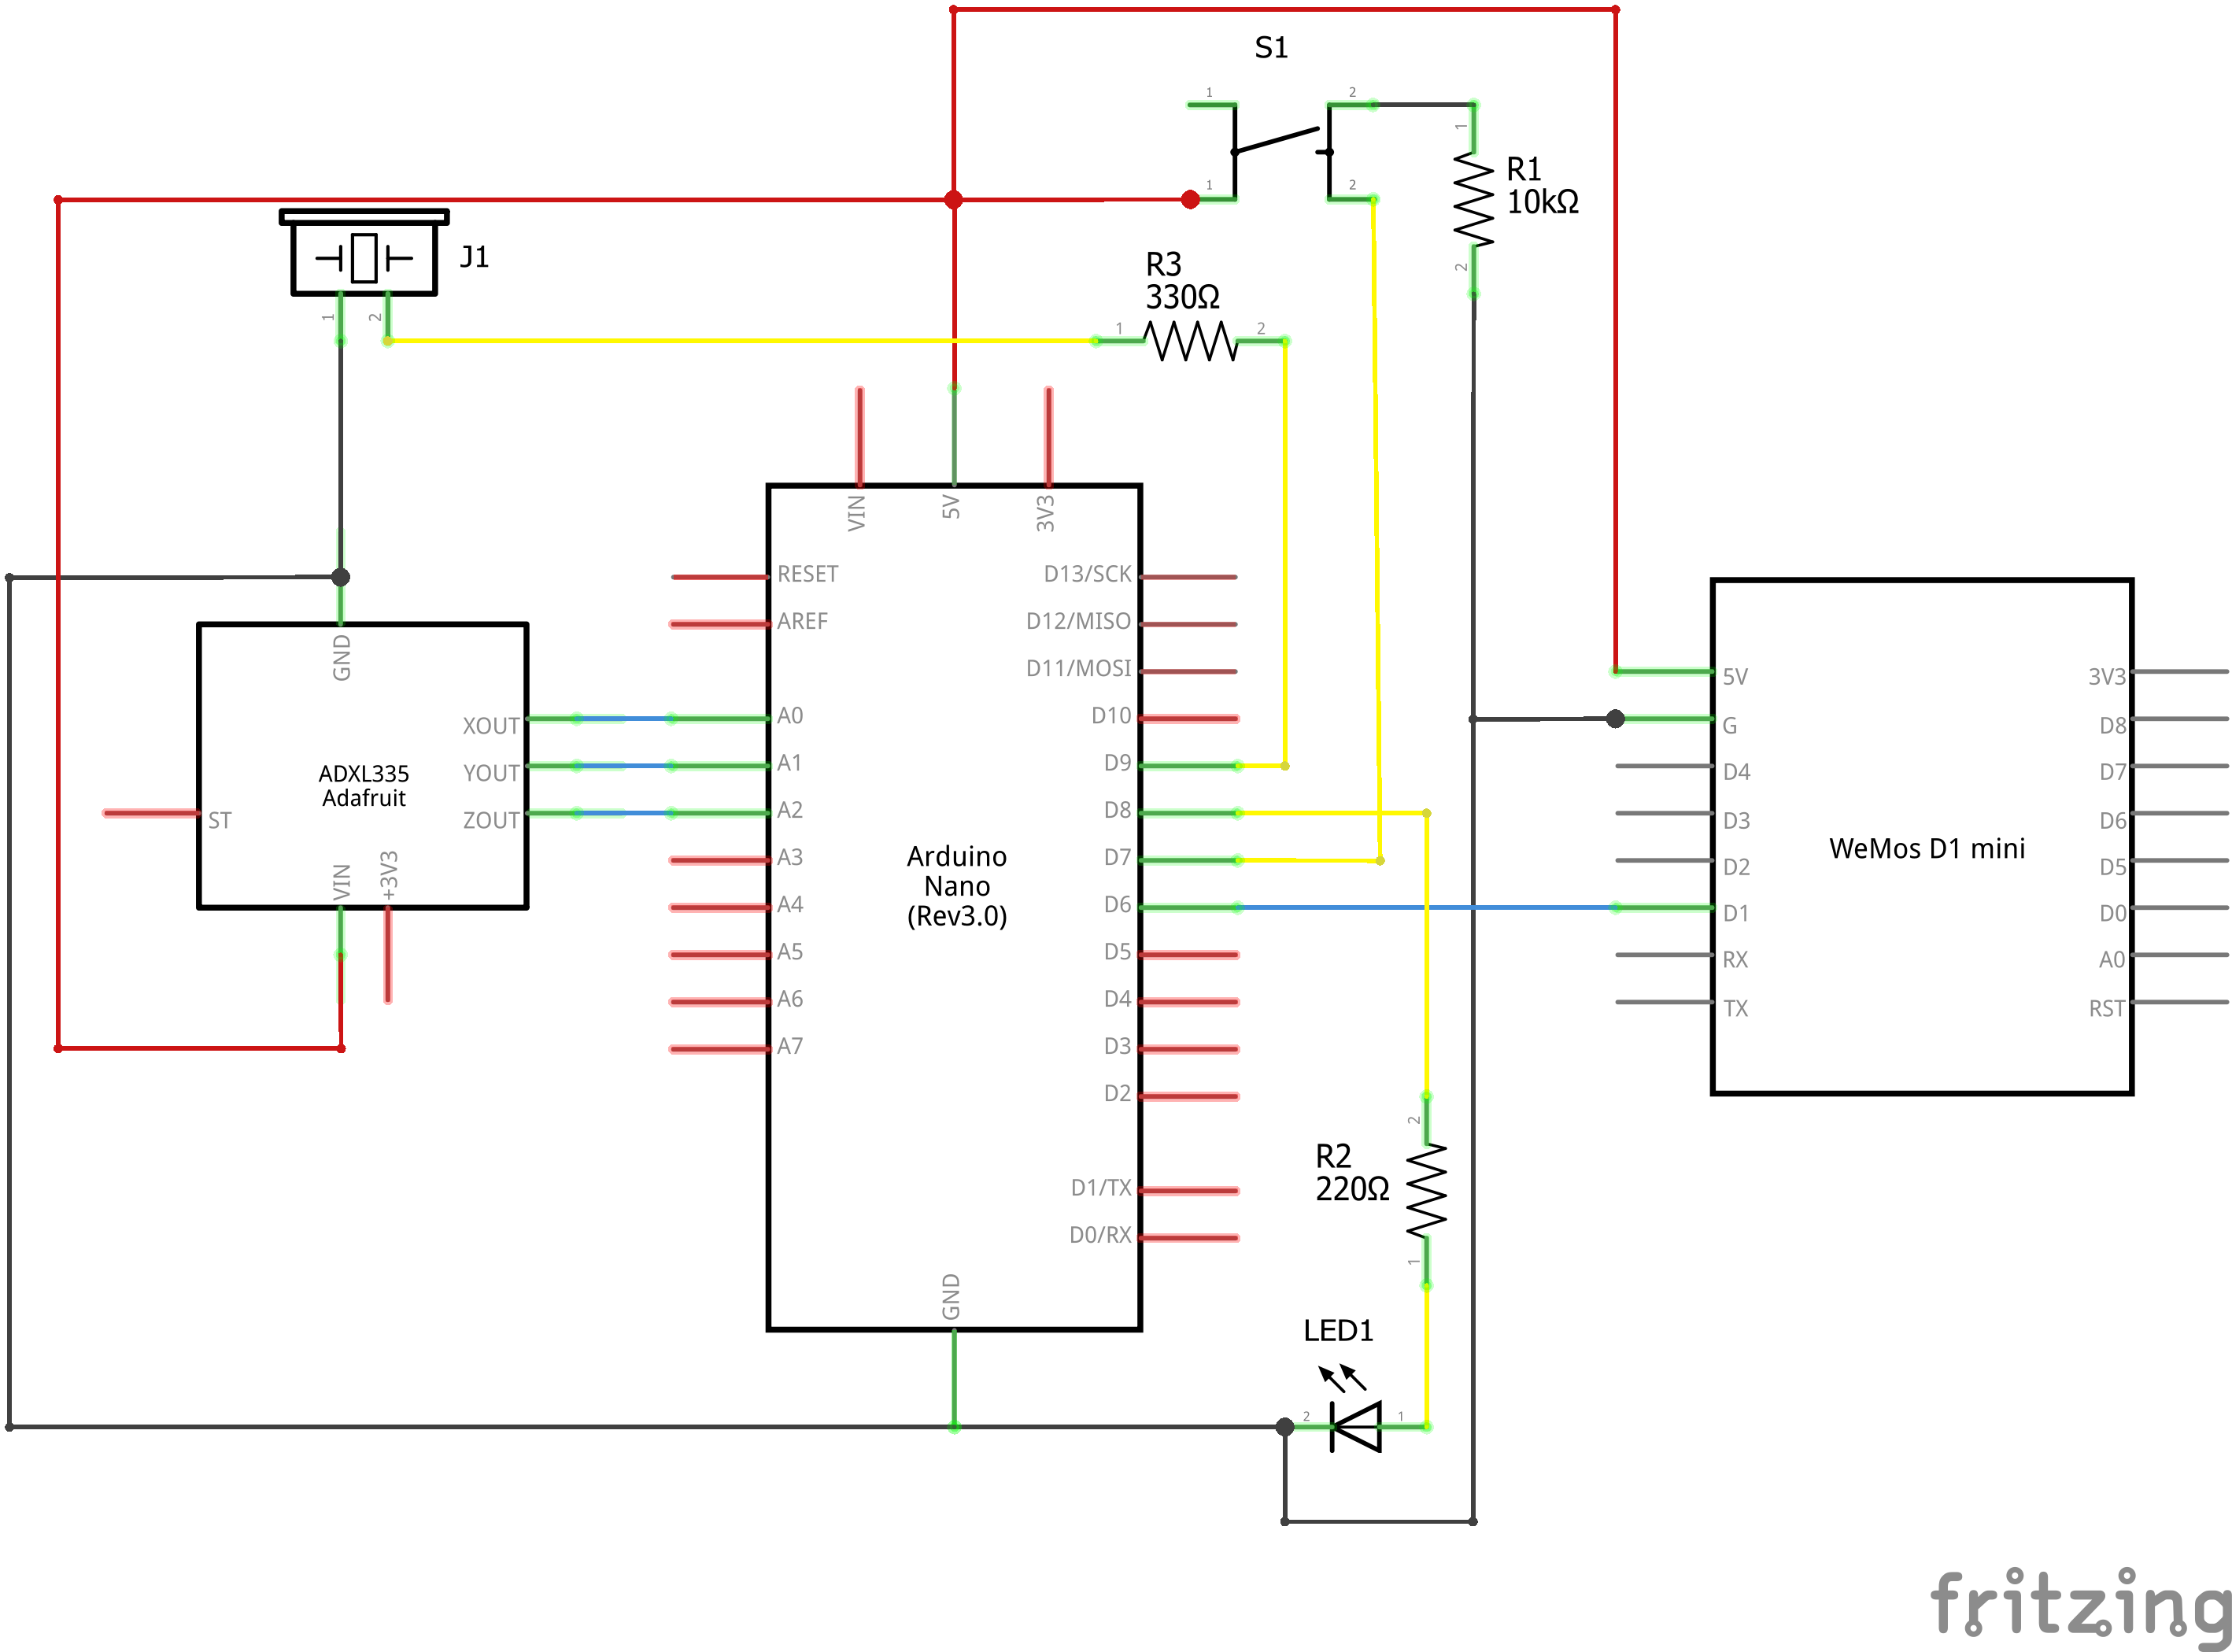
/* Arduino 'Can't Touch This' Version 2 Components: - Arduino Nano - D1 Mini (ESP8266) module - ADXL335 - Passive Buzzer - Push button tactile switch - Red LED - 220Ohm resistor - 330Ohm resistor - 10kOhm resistor - Breadboard - Some jumper wires Libraries: - https://arduino.esp8266.com/stable/package_esp8266com_index.json Created on 23 August 2022 by c010blind3ngineer*/#define trigPin 6 // this will be the pin that triggers the D1 Mini pin D1#define buzzerPin 9#define LEDpin 8#define btnPin 7intX_axis=A0;intY_axis=A1;intZ_axis=A2;constintdeg_acc=3;booleantrigAlarm=false;intx,y,z;intt=0;intSTILL[4];voidsetup(){pinMode(buzzerPin,OUTPUT);pinMode(LEDpin,OUTPUT);pinMode(btnPin,INPUT);pinMode(trigPin,OUTPUT);Serial.begin(9600);while(digitalRead(btnPin)!=HIGH){}}voidloop(){if(digitalRead(btnPin)==HIGH){Serial.print("Calibrating");delay(500);inti=0;// reset 'i' counterwhile(i<3){// read XYZ readings 3 times, it also gives the User time to stabilise the device properlySerial.print(".");STILL[0]=analogRead(X_axis);STILL[1]=analogRead(Y_axis);STILL[2]=analogRead(Z_axis);delay(500);i++;}digitalWrite(LEDpin,HIGH);tone(buzzerPin,2000);delay(100);digitalWrite(LEDpin,LOW);noTone(buzzerPin);delay(100);digitalWrite(LEDpin,HIGH);tone(buzzerPin,2000);delay(100);digitalWrite(LEDpin,LOW);noTone(buzzerPin);trigAlarm=false;t=0;digitalWrite(trigPin,LOW);}// Read XYZ axis valuesx=analogRead(X_axis);y=analogRead(Y_axis);z=analogRead(Z_axis);// Check to see if the device is in the same position when the User set it initiallyif((x>(STILL[0]-deg_acc))&&(x<(STILL[0]+deg_acc))&&(y>(STILL[1]-deg_acc))&&(y<(STILL[1]+deg_acc))&&(z>(STILL[2]-deg_acc))&&(z<(STILL[2]+deg_acc))){// You can uncomment the lines below to see the XYZ values in the Serial Monitor// Serial.print(x);// Serial.print("\t");// Serial.print(y);// Serial.print("\t");// Serial.print(z);// Serial.println();}else{trigAlarm=true;while(t<1){// will only trigger pin 6 on the Arduino Nano oncedigitalWrite(trigPin,HIGH);// trigger pin D1 on the D1 Mini (ESP8266) modulet=1;}}// Alarm goes off when someone moves the device out of positionif(trigAlarm==true){digitalWrite(LEDpin,HIGH);tone(buzzerPin,2000);delay(100);digitalWrite(LEDpin,LOW);noTone(buzzerPin);}delay(100);}
Code 2:
Arduino
To be uploaded to your D1 Mini ESP8266
/* Arduino 'Can't Touch This' Version 2 Components: - Arduino Nano - D1 Mini (ESP8266) module - ADXL335 - Passive Buzzer - Push button tactile switch - Red LED - 220Ohm resistor - 330Ohm resistor - 10kOhm resistor - Breadboard - Some jumper wires Libraries: - https://arduino.esp8266.com/stable/package_esp8266com_index.json Created on 23 August 2022 by c010blind3ngineer*/#include<ESP8266WiFi.h>#include<WiFiClientSecure.h>#include<UniversalTelegramBot.h>#include<ArduinoJson.h>#define btnPin D1// Wifi network station credentials#define WIFI_SSID "YOUR WIFI NETWORK"#define WIFI_PASSWORD "YOUR WIFI PASSWORD"// Telegram BOT Token (Get from Botfather)#define BOT_TOKEN "**********:***********************************"// Use @myidbot (IDBot) to find out the chat ID of an individual or a group// Also note that you need to click "start" on a bot before it can// message you#define CHAT_ID "**********"X509Listcert(TELEGRAM_CERTIFICATE_ROOT);WiFiClientSecuresecured_client;UniversalTelegramBotbot(BOT_TOKEN,secured_client);voidsetup(){pinMode(btnPin,INPUT);pinMode(LED_BUILTIN,OUTPUT);digitalWrite(LED_BUILTIN,HIGH);// active LOW, means it will ON when it is LOW. We set it OFF (HIGH) it first.// attempt to connect to Wifi network:WiFi.begin(WIFI_SSID,WIFI_PASSWORD);secured_client.setTrustAnchors(&cert);// Add root certificate for api.telegram.orgwhile(WiFi.status()!=WL_CONNECTED){digitalWrite(LED_BUILTIN,LOW);delay(500);digitalWrite(LED_BUILTIN,HIGH);delay(500);}digitalWrite(LED_BUILTIN,LOW);delay(1000);digitalWrite(LED_BUILTIN,HIGH);delay(500);digitalWrite(LED_BUILTIN,LOW);delay(1000);digitalWrite(LED_BUILTIN,HIGH);configTime(0,0,"pool.ntp.org");// get UTC time via NTPtime_tnow=time(nullptr);while(now<24*3600){delay(100);now=time(nullptr);}}voidloop(){if(digitalRead(btnPin)==HIGH){bot.sendMessage(CHAT_ID,"Movement detected!","");}}


Comments
Please log in or sign up to comment.