


Hardware components | ||||||
 |
| × | 1 | |||
 |
| × | 1 | |||
| × | 1 | ||||
| × | 2 | ||||
| × | 2 | ||||
| × | 2 | ||||
| × | 2 | ||||
| × | 1 | ||||
| × | 1 | ||||
| × | 1 | ||||
| × | 2 | ||||
| × | 4 | ||||
| × | 2 | ||||
| × | 1 | ||||
| × | 2 | ||||
| × | 2 | ||||
| × | 1 | ||||
| × | 1 | ||||
 |
| × | 1 | |||
| × | 1 | ||||
Software apps and online services | ||||||
| ||||||
Hand tools and fabrication machines | ||||||
| ||||||
Hello! Thanks for taking a look at our project! This bubble fogger was a lot of fun to make and I thoroughly enjoyed working with Dan. Things came together really well and we have decided to share this project for others to enjoy. Each part of the project requires some advance skills but feel free to ask questions if any part of the instructions are not clear.
Fun Video of the Working Project:Preparing the vape:1. To prevent the vent on the vape from turning you will need to lock it in place. This step is optional but I highly recommend doing it so that you don't accidentally close the vent while installing into the mount. I did this by drilling a small hole and inserting a small screw. When drilling, add oil to the hole to prevent wearing out your drill bit.
2. Add vape juice or fogger juice to the vape. Do not use pure Glycerin as it is too thick and will cause your MOSFET to burn up!
Preparing the Female Spout End:1. Open a bottle of Super Miracle Bubbles and remove the bubble wand.
2. Cut off the bubble making end (ring) and remove any excess plastic.
3. Insert the bubble ring into the opening on the Female Spout. You may need to apply some super glue to secure it to the opening.
4. Ensure that the ring is flush with the spout rim.
1. Clean up the opening of the Single 40mm fan mount so that there is a good seal around the vape device. Then insert the bottom of the vape into the large opening as far as you can push it in with your hand.
2. Using a pair of extra long needle nose pliers, lift the edge of the open above the bottom rim of the vape. This should give you a tight seal around the vape. Any air leaks will cause problems with controlling bubbles.
3. Attached the 510 adapter to secure the vape into the mount. The 510 will be removed later for soldering, etc.
4. Next you need to assemble the servo mount using the two push pins. Please note the servo arm should NOT be attached at this time.
5. Insert the two push pins as shown to attach the servo mount.
6. Make sure the servo pins are pushed in completely to ensure the servo is secure.
7. Attach the servo mount to the shelf using the two 10mm screws. The servo mount holes will line up with the holes on either end of the shelf.
8. You should now have the servo attached like the picture below.
Now its time to calibrate the rotation of the servo gear to receive the servo arm. To so this you will need to temporarily connect the servo to the Particle Photon. The Photon will need the code for this project loaded as well. Login to your Photon account an create a new file to copy the code into. Once the code is loaded connect your servo to the Photon as shown below.
9. Attach jumper leads to the servo wire connection and power the Photon from a 5V power source. The batteries will be assembled later on. If you need to use the batteries as a power source skip to step 28.
10. Attach the jumpers from the servo wire to the breadboard aligned with the Particle pins - 3.3 (red), GND(black) and WKP(yellow). Attach the 5V power source to the Photon. Black to GND and red to VIN.
11. After the Photon boots up and the code runs you will hear the servo operate four times. Then the blue LED will turn on from two seconds to confirm the calibration is complete.
12. Attach the servo arm to the servo gear with the other end extended as far back as possible. It's a tight fit but the servo arm will slip on to the gea. The end with the smallest hole attaches to the servo. Don't worry about the exact location. You will be able to adjust for clearance in the code later on. The goal is to get an approximate position at this point.
13. Next insert the shelf into the tub and reset the Photon. Ensure that the servo arm operates without any interference.
14. secure the servo arm with screw and tighten with a small Phillips screwdrive.
15. Using the 20mm nylon screw and nut attach the Pull Arm. The head of the nylon screw should fit into the countersink to clear the shelf wall
16. Insert a 20mm SS screw into the Male Spout Swivel Mount.
17. Attach the swivel mount to the shelf with the screw to a snug fit. The mount should be loose enough to move by hand so that the spout does not bind when operating. If the screw does not go in far enough you may need to drill with a 3/32 bit
18. Screw the Male and Female spout together completely and attach to the swivel mount starting with one side and then the other as shown in the pictures below.
19. The spout should snap into place and fit without any slack.
20. Insert the 15mm nylon screw attaching the Female spout to the Pull Arm
21. Place the shelf back in the tub and connect to the Photon to check the movement and clearance of the spout.
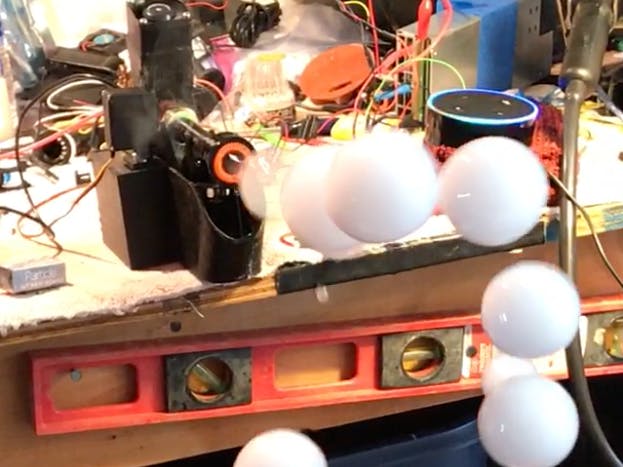
22. Insert the Mouth Piece into the vape so that the catch arms are at the bottom.
23. Align the vape mouth piece with the spout. The fan mount should turn left and right so that you can align the vape and the spout like the picture below.
24. Press down with your finger to ensure the Mouth Piece and spout meet to make a good seal.
25. Next you need to adjust the servo angle so that the spout seals with the mouth piece and the bubble wand is submerged in the bubble juice. To so this you need to increase the SERVO_ANGLE_OFFSET to the setting for your fogger. Start with an offset of 5 and work your way up until you have a good seal with mouth piece. The fan mount should flex as the spout end pushes down on the catch arms of the mouth piece. I ended up with an offset angle of 10. Yours may be a little different.
After compiling and loading the code the fogger should operate similar to my setup in this video.
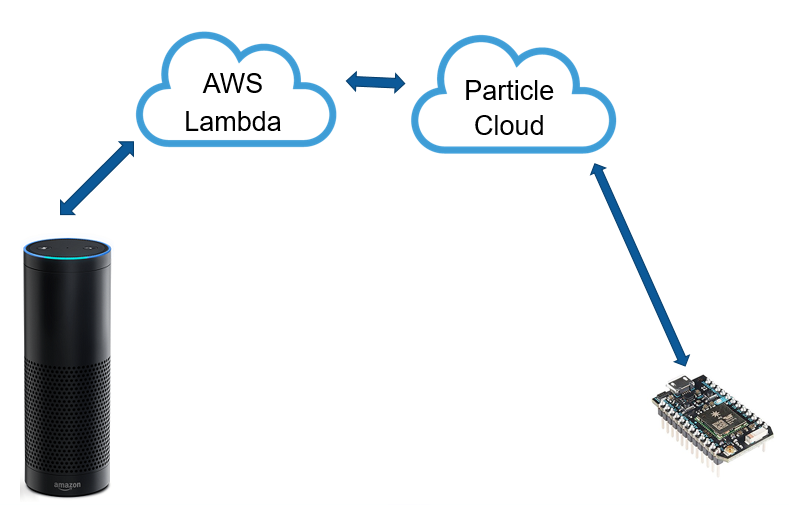
26. Once you have the angle set correctly you will need to setup your Alexa skills per the instructions located here. After starting the skill you can say "Move Servo Up" or "Move Servo Down" to confirm operation of the spout. See video below to see an example of inspecting the seal between the spout and the mouth piece.
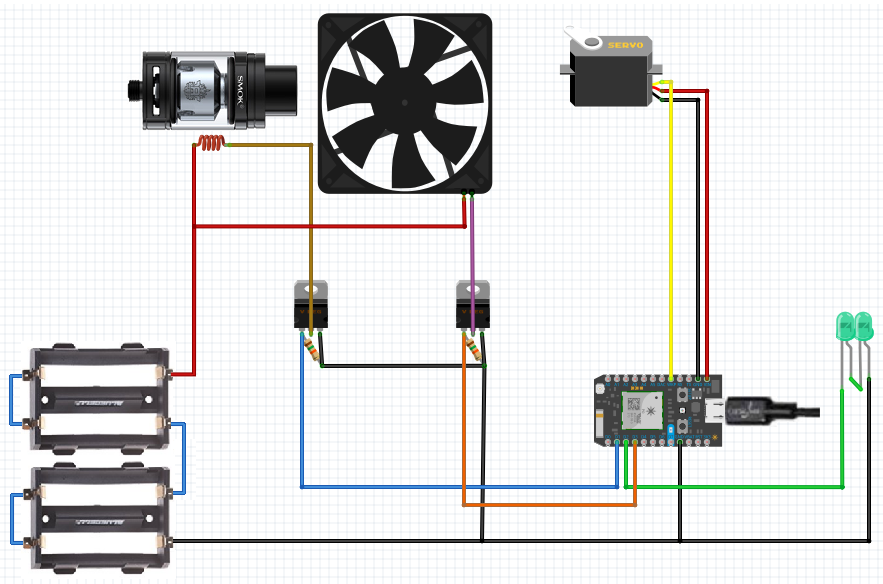
27. Next you need to install the 12V high speed fan and connect it to the breadboard. Use the 35mm screws to attach the fan to the top of the Fan Mount. Before installing the ensure that you have a way to connect jumpers to the black(GND) and red(VCC) the fan. If you are using a PWM fan only the power leads are used.
28. Next prepare the batteries and the battery holder for powering the fogger. You will want to arrange the batteries in series configuration. There are several options for doing this. See pictures below:
The batteries should be fully charged before use. The bubbles will become bigger as the voltage drops. Fully charged should be around 16V
29. Next remove the 510 fron the vape so that it can be soldered. When soldering be careful not to melt the insulation inside the 510.
30. Solder power leads as shown in the picture below to the 510. Be sure to use heat shrink and ohm test the connection prior to installation.
Attach the soldered 510 to the vape.
31. Add Super Miracle Bubble to the tub from the front. Pour up to the edge of the tub spout. During operation some of the bubble juice will splash out so place a towel on the floor to prevent a mess!
32. To manually test the full operation of the fogger do the following:
- Install the batteries with only the power lead (VCC) connected to the vape 510. The GND lead will be used later in the testing of the vape.
- Connect the fan to 12V power so that it is constantly running.
- Start the skill with Alexa and ask to "Move Servo Up"...you should get a stream of bubbles. If not you may need to add Dawn dish detergent to the bubble juice.
- Now ask to "Move Servo Down" to reload the bubble wand.
- To test the vape and fogger you will want to "Move Servo Up" and, with timing, manually contact the GND lead of the battery and vape. You will hear a sizzling sound. Only do this for 1 - 2 seconds otherwise the cotton fiber in the vape will burn.
Here's some videos of me testing the fogger in prep for installing the MOSFETs:
AWS Lambda to Particle Photon


_t9PF3orMPd.png?auto=compress%2Cformat&w=40&h=40&fit=fillmax&bg=fff&dpr=2)

Comments