I sometimes bike at night passing through a segment of park trail without lights. One time I speed downhill almost bumped into a night time jogger on a moonless night. It'll be nice if the jogger wears a portable flashy lights. Perhaps a multi purpose device with build in safety alarm, pepper spray, decorative LED, functional portable fan to cool off.
So the idea for multi-functional portable light stick is born. Wouldn't it be cool to have colorful, flashy lights that react to your body motion? Great for night time safety. Stage performance, or just wave along to the concert, Karaoke bar.
I'll show you my process of creating a prototype using Maxim MAX32620FTHR board. With build in battery monitor & charger. Its small board form factor is great for wearable and portable devices.
Features- Check battery level status and drain.
- Low power mode when low on battery.
- Battery charging via usb / Solar
- Sounds alarm when exceeding tilt limit
- Motion triggered mode define range of motion where activation of portable attached devices.
- Change light color based on rotation.UP Down, Side to Side, shake,
- Optional attachment for Motor driven accessory. (Add lights, Rotating Fan, decor)
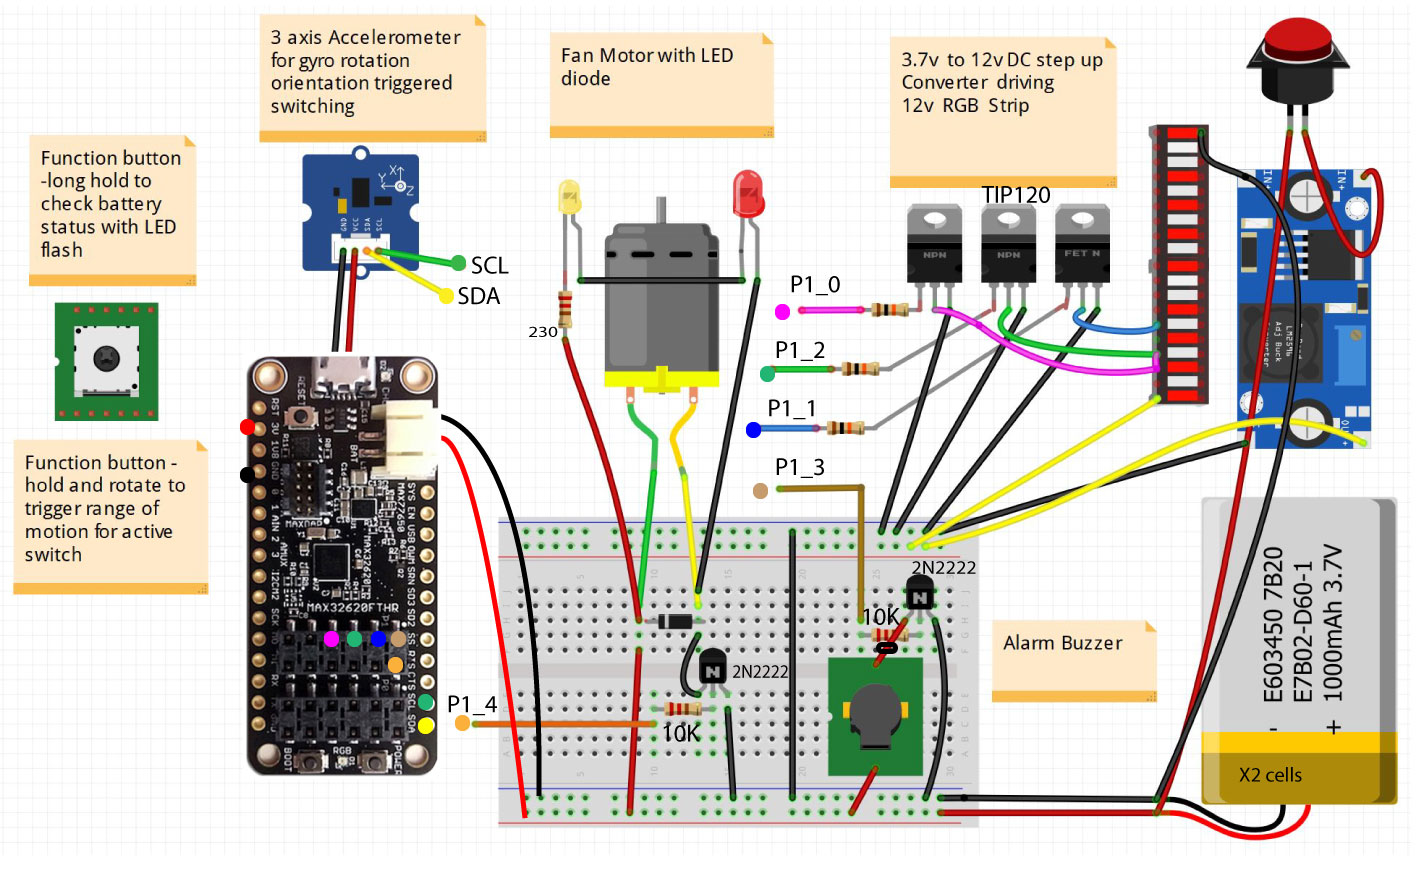
This portable stick prototype houses a single battery. With PWM output to control lights, motors. Battery status is shown with it's build in 3 colored RGB LED light indicator. The motion and tilt is measured with 3 axis tilt accelerometer.
The base module powered with single battery, attached accelerometer, and mini audio buzzer is so small it can fit inside a medicine bottle.
Other Possible ApplicationsWith just firmware implementation, the base module can be used for:
- Stand alone, safety tilt fall alarm sensor attached to vertical items.
- Portable vibration triggered alarm hidden in bag
- Exercise step count
Addition of Motor and LED Lights:
- Portable rotating sign with gear reduction 3d printed gear
- Motor driven decor and lights for Cosplay costume
- Color changing light stick for concerts and stage performance
Battery Status Light Indicator:
Addition of motor and bright LED lights drains lot more battery power. so the state of battery is shown with onboard RGB led indicator
For voltage and current consumption, battery status can be checked with flashing lights
Green = good, Yellow = low, Red = needs charging.
The rate of current discharge is indicated by rate of flashing LED.
Blue charging light when plugged in USB.
Make sure the safely secure to prevent injuries with fast spinning motor.
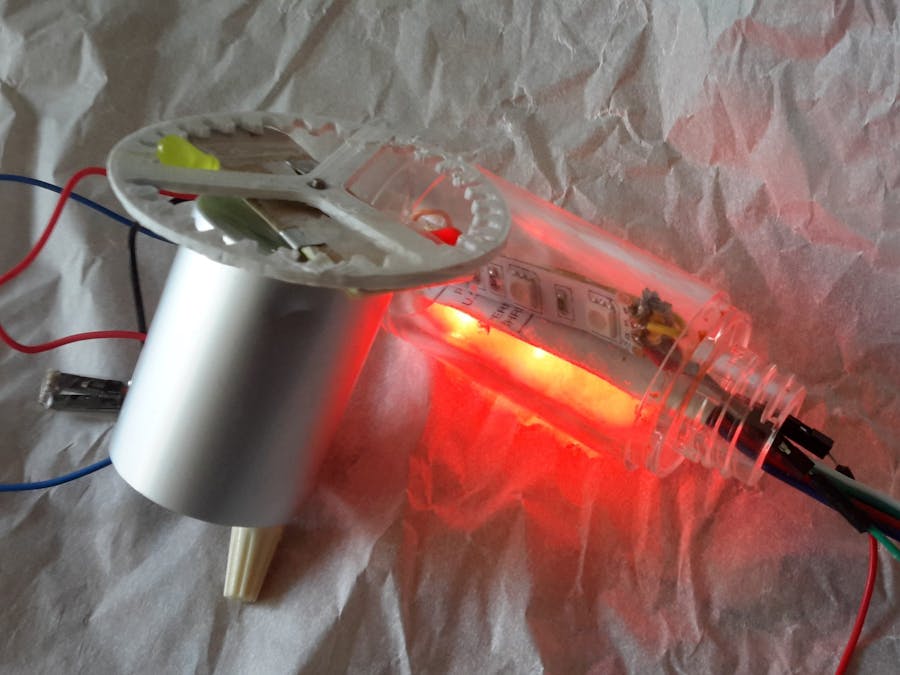
To house the unit. I used an empty medicine spray bottle. Any other disposable bottle like medicine capsule, or round perfume dispenser can be re purposed. This bottle cap happens to fit the motor,
- Drilled a Hole and fit in the motor.
- Used a gold tinted cake serving holder. Used tape to create a flashing bling bling to reflect off lights.
- To house led, Used fixed led with resistors, red, green, yellow, blue
- Created a rotor brush contact from heavy gauge multi strand wire.
- Used the motor exterior with motor rod for ground. Added the positive wire with brush protrude for power.
I used aluminum tabs used for the 3 hold note binder. Easily cut and malleable, Shaped into with tweezers.
Led will flash when brush run over the plate.
The fan is a partial print of the gear reduction 3D-printed assembly gear.
It's great to add to the front of the motor for some fancy spin. To mechanically reduce rate of rotation. I make a holder that can attach additional 3d print to be rotated. Such as signs and printed cards for customization.
Building LED BulbI first inserted continuous strip of LED inside the clear plastic tube. Lights look uneven. Adding thin white plastic to diffuse the light doesn't help. I decided to place individual strip in the center to bounce light off the round surface.
- Cut 12V RGB LED strip into 3 pieces at boundary cut line. Each strip have 3 LED.
- Align and solder 4 connection tab to each other with thin wire. Negative terminal of red, green, and blue line. Also the positive terminal.
- Arrange strips into triangular shape to fit inside the thin tube.
Since strip runs on 12V, I used a DC voltage step up converter to boost battery 3.7V voltage to 12V.
To control individual light, added TIP120 transistor and 10k resistor for each RGB color to amplify 3V GPIO signal to switch 12V power.
Light tested ok with different colors based on Red, Green, Wire.
I added wire harness and wrap the individual components with plastic tape for insulation. Arranging each components to fit inside the tight space requires some spacial design.
My ideal design allows each module to be exchangeable like a Lego block. Add every thing for full function. Or just a part for specific purpose. This requires more work. This can be done with adding a twist switch with contact plates soldered into the bottle cap. And adding central wire to draw power and control signal.
This is the configuration with motor and lights. For better aesthetic, Just need a exterior skin wrap to cover up the base electronic guts.
Arm mbed allows cloud builds the firmware and installed using drag and drop.
Here are steps I used to program the firmware:
- Start Arm Mbed compiler page by Login or create an account in http://mbed.com
- Create a new program, Select "Example for onboard MAX17055 Fuel Gauage driver" as template.
- Import required libraries by entering the name of hardware into the search box
- Import Pulse Width Modulation library for LED "MAX326XXFTHR_PwmOut"
- Import LedStripRainbow Library for Addressable LED Strip
- Import MMA7660FC Grove 3Axis accelerometer.
- Click on the main c++. Paste in the code at the bottom for Motion Stick LED.
- Press Compile
- Save the compiled code into the folder with Mbed drive.
- Press reset button on the board to test
I want to replace the prototype with 5V addressable led strip for more fancy color strobe effect and power saving. By addition of extra wire data line to motor assembly. Had problem converting 3.3V to 5V GPIO signal to drive NeoPixel LEDs. Perhaps due to quality of high frequency signal conversion on level shifter, or versions of mbed addressable LED library.


_1x_bGT19vVAby.png?auto=compress%2Cformat&w=40&h=40&fit=fillmax&bg=fff&dpr=2)

Comments
Please log in or sign up to comment.