

Hardware components | ||||||
| × | 3 | ||||
| × | 25 | ||||
| × | 1 | ||||
 |
| × | 1 | |||
| × | 1 | ||||
| × | 1 | ||||
Software apps and online services | ||||||
 |
| |||||
Hand tools and fabrication machines | ||||||
 |
| |||||
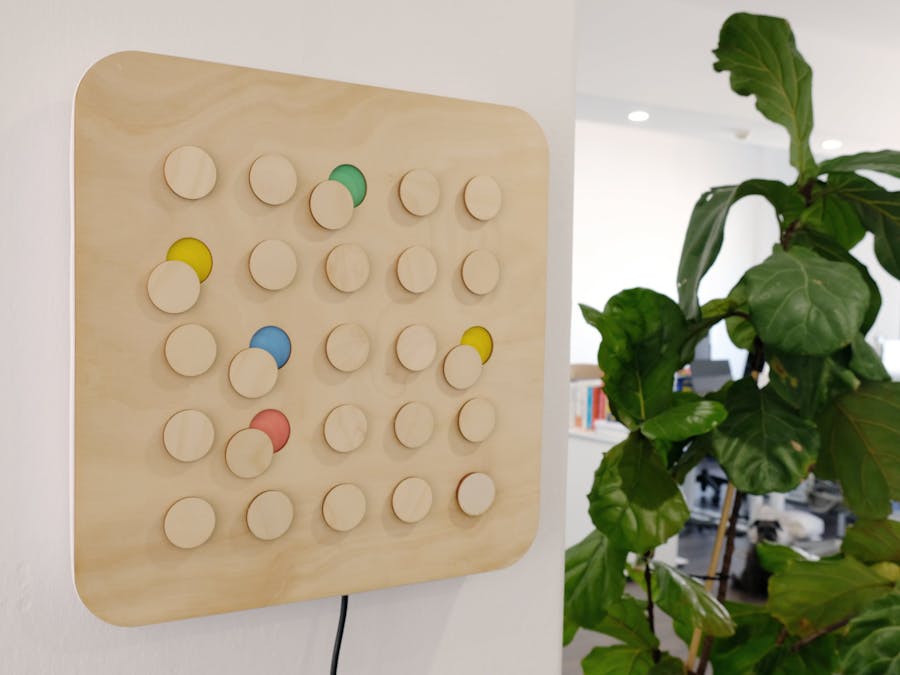
Whooooo's In is a prototype of the interactions between humans and their devices. It makes use of WiFi, laser cutting and open source code.
Whooooo's In tracks the presence of people in the workspace by constantly listening for WiFi signals identified by the MAC address. One MAC address is represented by one servo. When present, the servo (attached to a disc) rotates opening the eye to reveal the colours behind.
The BuildMechanics
- (16x) Screws
- (8x) Nails
- (1x) 3m Wood Strip (20mmW x 35mmH)
- (3x) 3mm Plywood Sheets (~500mm x 500mm)
- (1x) UHU Glue
- (5x) Hot Glue Sticks
Electronics
- (3x) Assembled Adafruit Feather HUZZAH board with ESP8266 with headers.
- (+25x) Micro Servo Motors
- (1x) USB Micro-B Breakout Board
- (1x) Universal Bakelite Perfboard
- (1x) Solid-Core Wire Spool Black
- (1x) Solid-Core Wire Spool Red
- (1x) Solid-Core Wire Spool White
- (1x) USB cable - USB A to MicroB
- (1x) Single Port USB Wall Charger
Toolsyou'llneed
- Screw driver
- Soldering Kit (incl. heat shrink)
- Wire Striper and Cutter
- Hot glue gun
- Clamps
- A Saw of sorts to cut the wood strips
- Sand paper variety grit (optional)
- Measuring Tape
1. Download ZIP file.
Download the ZIP file from Hackster.
2. Open laser file.
Get the SVG file, labelled "laserplan". Open the SVG file in Illustrator to be adjusted for laser cutting. Each CNC laser cutter reads colours and line thicknesses to determine, cut depth and effect. So be sure to check the requirements for your laser cutter or for where you're sending your file to be cut.
3. Cut it.
We used our local university CNC machine to laser cut, but you could use laser printing services, such as The Laser Co. as well. They have the format specs online. Just upload the SVG file and they’ll ship ‘em right to your door.
If you print it yourself, lightly sand to remove any burn marks.
Chapter 2: Visualising for your environment.1. Consider your colour palette.
We were inspired by the Craig Walker colours, and after many prototypes we decided to use bright colours inside the eyes and keep the appearance minimalistic with a lightly sanded exterior. What would you choose?
2. Paint it.
Use the backing board to mark the painting areas. Make sure the painting area is well-ventilated and any surfaces you don’t want speckled with paint are covered. Whether you decide to spray paint or hand paint, painting a few layers is always good. Ensure the paint is touch-dry after each layer to get the best effect.
Chapter 3: Software.1. Get the code.
Note: Arduino is an open source programming platform, available for Windows, Linux and Mac. Make sure to get the desktop installer to enable the use of the huzzah boards. Ensure to load the Adafruit Huzzah Libraries.
Open the code from the github zip download in Arduino.
Gather your colleagues smart phone Mac Addresses and add them to the MacAddresses Catalogue, following the sample layout below.
In your phone as...
...1a:b2:cd:34:e5:6f
changes to...
...{0x1A, 0xB2, 0xCD, 0x34, 0xE5, 0x6F}
2. Learn the code.
There are instructions throughout the code explaining the structure of the code. The code was developed from an existing open source code which you can explore through the Github link.
3. Modify the Code.
If your set up is the same, only the friendmac, friendlist and LIST_SIZE need to be manually changed between uploads to each board.
a. Fill freindmac list with your first nine mac addresses. Edit the friendlist respectively. Go to step 4.
b. For your second board, delete one mac address line and fill the rest with your next eight mac address and, and edit friendlist respectively. Also reduce LIST_SIZE to 8. Go to step 4 to upload.
c. Fill friendmac with the last eight mac addresses, and edit friendlist respectively. Go to step 4 to upload.
4. Upload Code.
Use a USB micro-B to A cable to connect to one of the Huzzah Boards. Upload the first set of codes to the first board, and unplug.
Follow steps 3b and 3c to complete uploads.
Chapter 4: Assemble the hardware.1. Schematic of connections.
Repeat power, ground and data connections shown for the first set of servos and first HUZZAH board.
2. Solder boards.
Solder the three HUZZAH boards and the Micro-b breakout board to the perfboard according to the schematic above.
3. Glue servos.
Using the UHU glue, stick the servos to the back board following the shape of the cut-out.
4. Strip, solder and heat shrink.
Cut the wires to length, add the heat shrink, and, strip and solder the appropriate wires and parts together.
5. Organise wires and boards.
Glue the perfboard in place and tape wires together to reduce any strain on parts or wires caused by motion.
Chapter 5: Building the frame.1. Cut wood.
Measure wood lengths to fit inside the laser cut frame parts and an extra piece for mounting.
2. Glue and nail.
Glue the wood strips to one side of the back board and hammer nails through the back board into the wood strips to further secure the frame.
3. Glue onthe face.
After wood strips are secured, glue the front board to the back board.
Tip: There is only one way the front and back board fit together. So best to test before getting glue everywhere!
4. Prepare the circles.
Snip the servo arms and glue to the circles using the hot glue gun.
5. Attach mounting board.
Place mounting board on top of wood strips. Mark and drill holes through to the wood strips, four for each side of the frame. Fasten the screws, to attach firmly.
Chapter 6: Pulling it together.1. Make french cleat.
Angle cut a piece of wood (long-ways) on a 45 degree angle.
2. Mount.
Attach one side of the french cleat to the mounting board and other to the wall with screws.
From wood strip scrapes create small blocks (~10x10mm) to be glued to the bottom of the back to support the french cleat mounting.
3. Attach circles.
Clip on the circles at the appropriate angle.
4. Plug in.
Connect cable from MicroB breakout board to wall charger and plug into wall.
Here, as the servos move to there start position you might want to unclip and adjust the circles so they appear closed.
Chapter 7: Next steps.1. Enjoy!
Get everyone to turn their wifi on to see the magic happen.
TroubleshootingIf any of the servos are constantly adjusting or are quite loud, we found the easiest solution is to switch out the problem servo with a new one.


_3u05Tpwasz.png?auto=compress%2Cformat&w=40&h=40&fit=fillmax&bg=fff&dpr=2)
Comments