Update 2: The project is still growing and a lot of new features are already implemented (like a Twitter-Client and the integration of Telegram-Bots). Please check the GitHub repository and release notes to learn more about the new features (or follow me on Twitter) . I hope I am able to update this project page as soon as possible.
Update 1: First I want to say "thank you" to everyone who has read this project page and gave me feedback (either private or at the comments). It was a lot of fun to present this project at Maker Faire Rome 2015 and Microsoft Technical Summit 2015 and future events are still waiting. I added some pictures from the events.
I am developing a home automation solution for the last 3 years. This includes the physical installation of the hardware and developing the software.
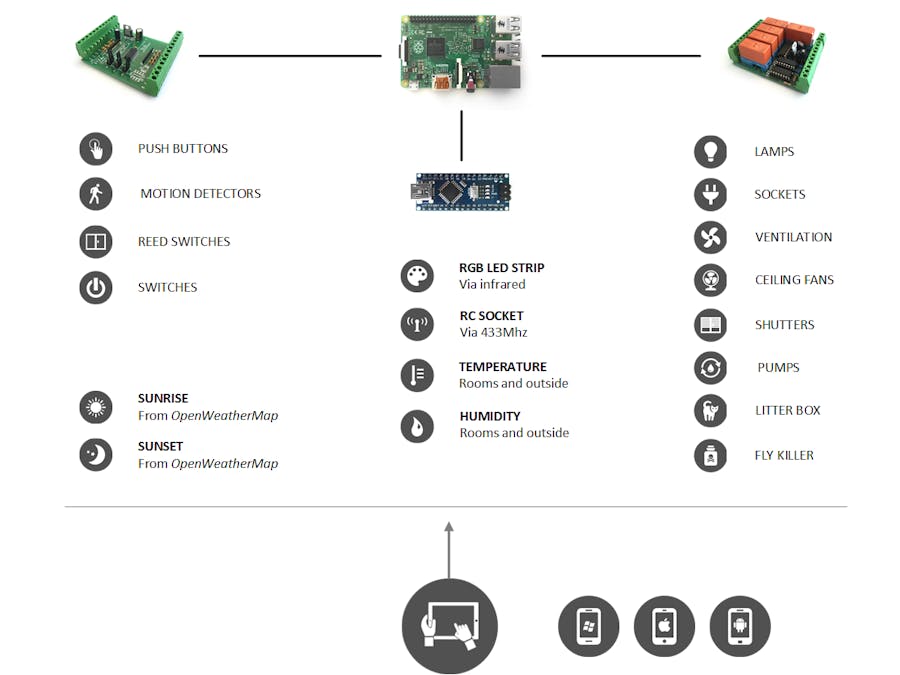
FeaturesAt this time, the following features are supported.
Inputs- Push button (BUSCH-JAEGER 2020US)
- Motion detector (Abus 360° BW8085)
- Room temperature (My own device based on DHT22)
- Room humidity (My own device based on DHT22)
- Window state (open or closed using Honeywell Slimline reed contact)
- Sunrise, Sunset, Temperature & Humidity (Taken from OpenWeatherMap)
- Lamp (ceiling) (driven by relay, no dimming)
- Socket (driven by relay, no dimming)
- Roller shutter (window) (driven by two relays for up and down)
- Fan (ceiling) (driven by 3 relays for every gear)
- Bathroom fan (driven by 2 relays for every gear)
- The solution contains a web app for iOS, Android, Windows, Mac OSX which can be used to control the virtual actuators. The configuration for the web app is loaded from the controller (Windows IoT instance).
- All events generated by inputs and outputs can be published to a Microsoft Azure Event Hub and/or logged to a CSV file.
- The controller (Windows IoT instance) provides UDP based tracing which can be shown using a console application. The trace is very detailed and can be used to find bugs or wrong connected actuators etc.
- Custom actuators can be added to support more hardware.
- Physical outputs can be combined to logical outputs.
- Animations (the physical outputs within a logical output can be animated).
- The whole system is designed to be as resistant to errors/hardware failures as possible. Even if multiple core components are disconnected/broken the remaining system still works as intended (e.g. some of the boards in the living room are not reachable due to a hardware failure, but the bathroom still functions as intended)
- Support for 433Mhz remote relays.
As we renovated our home 3 years ago, I decided to implement my own home automation solution. The main idea behind the implementation is to control everything from the power distributor using relays. Due to this decision every button, lamp, socket, roller shutter etc. needs to be connected by it's own cable via the actuator to the power distributor. A bus like KNX or EIB is not required.
Note: Due to the fact that I live in Germany, every component is designed to work with the 230V power supply. Other kinds of power supplies may need further modifications. The installation of 230V cables (NYM), new power distributors etc. are done by my preferred electrician and not by myself.
We installed a new power distributor which is responsible for the two floors of our home.
In general, the I2C bus is not designed to work with longer cables but it is possible to increase the maximally possible length using some tricks (I do not know the reason for every optimization but these are the things I found at the WWW).
- Drive the bus at 5V. The RaspberryPi drives the bus at 3.3V, so a I2C level shifter (P82B96) is required. This is the first (and only) device which is added to the RaspberryPi 2 (called Controller in my solution). The cable for this connection should be as short as possible. The specification allows running the bus at up to 15V but the slaves like PCF8574 only support max 5V.
- Use a twisted pair cable like CAT7. It is important to use one pair for SDA&GND and another one with SCL&GND. Do not use a single twisted pair cable for SDA&SCL. Also ensure that the shielding of the cable is connected to PE (in Germany).
- Prefer a strand cable. This makes it more complex to connect everything but will boost up the length of the cable.
- Add pull-up resistors with 10k to the end of the bus for SDA and SCL.
- Limit the bus speed to 100kbits (Standard Mode) even if the slaves supporting faster speeds.
- Include a I2C buffer (P82B96). The IC can be used as a level shifter or can be used to separate the bus in physical segments. I used one of this buffers within the power distributor. The buffer should be placed at the middle of the bus.
This optimized I2C bus is used to connect every board within the power distributor.
CCTools from Germany sells boards with relays which can be connected to the I2C bus. It is also possible to buy the boards as individual parts or the circuit board only. This allows replacing the port expander with pin compatible alternatives. The former is required because the available addresses of the devices are limited. I added holders for the relay and ICs so I can replace them easier if one o them is broken. Another point is that I can use a PCA9555D instead of a MAX7311 because the PCA9555D is cheaper and can be ordered easier (in Germany).
The HSRel5 relay board has 5 relays and 3 GPIOs. All required ports are taken from the internal PCF8574 8bit port expander which has 8 GPIOs. The first 5 are used for the relays and the last 3 can be used for other outputs. The relays require 12V to operate which can't be provided by the port expander (which can only drive a LED). So, a relay driver is needed. The relays are connected with the relay driver and the relay driver in return is connected to an inverter. This inverter is required because the state of all ports at the port expander is HIGH after the IC gets power. This will close all relays, which is an unintentional behavior.
Conclusion: If the first relay should be closed, it is required to send 00011110 (MSB) to the port expander using the I2C bus. This will set the first port to LOW (the other ports are also updated). The first port of the port expander is wired to the first input of the inverter. And the first output of the inverter is wired to the first input of the relay driver (ULN2803). As the last part of the chain the relay is wired to the first output of the relay driver.
Another relay board from CCTools is the HSRel8(+8) which uses a MAX7311 as the port expander and contains 8 relays and 8 GPIOs. This board does not need a hardware inverter. This means that a HIGH state for a relay at the HSRel5 means OFF and a HIGH state at the HSRel8(+8) means ON. This different behavior is handled by the driver for those devices and is part of the software.
Every lamp, socket, etc. is connected to one of these relays. At my home I currently use 8 HSRel5 and 4 HSRel8. I also use boards with solid state relays and other kinds of relays but to keep it short I won’t go into the details here. The HSRel5 is the simplest relay board. But the PCF8574 only allows 8 distinct addresses. The PCF8574A is the same port expander but has 8 different addresses. This means that 16 HSRel5 can be wired to the I2C bus.
Buttons, motion detectors and reed switches (for the windows) are wired to a board called I2C-Port16 HS from CCTools. This board contains a port expander (MAX7311), pull-up resistors (5V, 10K) for every port and ceramic capacitors (100NF). The board can be used with 12V or 5V power supply. The ceramic capacitors are used to filter out noise (glitch filter).
Every input device (button, motion detector, reed switch) has its own cable leading to the power distributor. A CAT7 cable is used for every input device since it needs to have shielding, which is connected with PE (protection ground). Spots which have more than one button like the buttons for the roller shutters can be connected using only a single CAT7 cable.
At the power distributor, every input device is wired to one port of the port expander and GND. Due to the pull-up resistors, the state at the ports is HIGH by default. Pushing the button will connect the port to GND which results in a LOW state of the port. The motion detectors and reed contacts are working that way too.
An shared interrupt cable is wired to all input boards. This cable is pulled-up by default. In the case of a changed state at any of the port expanders, the corresponding port expander will set the state of the interrupt to LOW. This behavior prevents continuous polling of all port expanders using the I2C bus. The software at the Pi2 is only polling the corresponding GPIO. If the state at the interrupt-GPIO has been changed, the current state of each input board is polled accordingly and events are fired if needed.
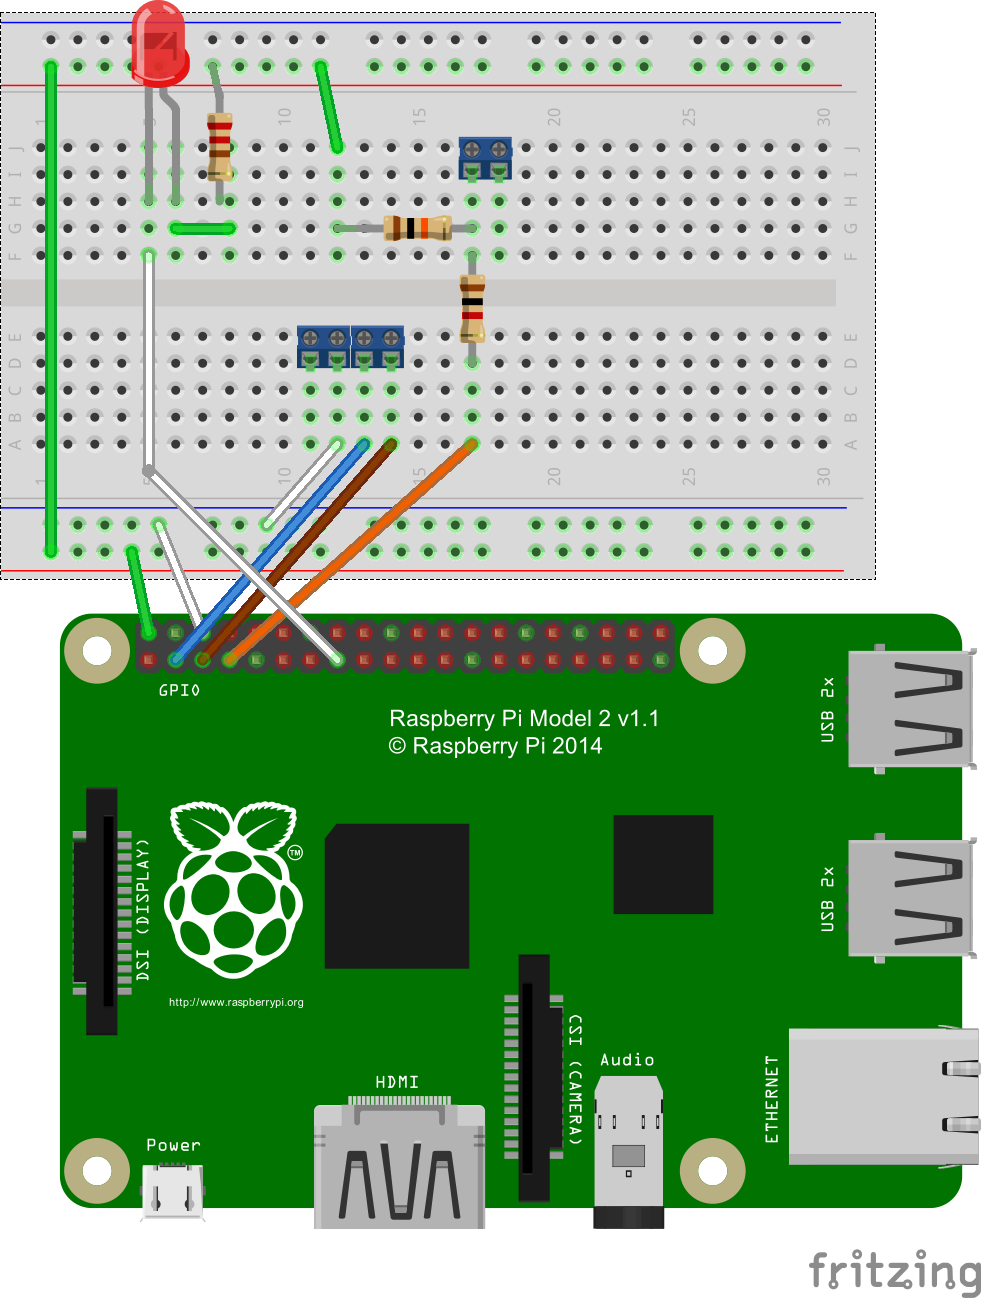
The Raspberry Pi 2 is running Windows 10 IoT and is mounted with a custom case to the power distributor. It also has a prototyping shield with a status-LED, the interrupt port with a pull-up resistor (10K), a protection resistor (1K), and a ceramic capacitor (100NF) for glitch filtering. All cables can be wired using a screw-terminal.
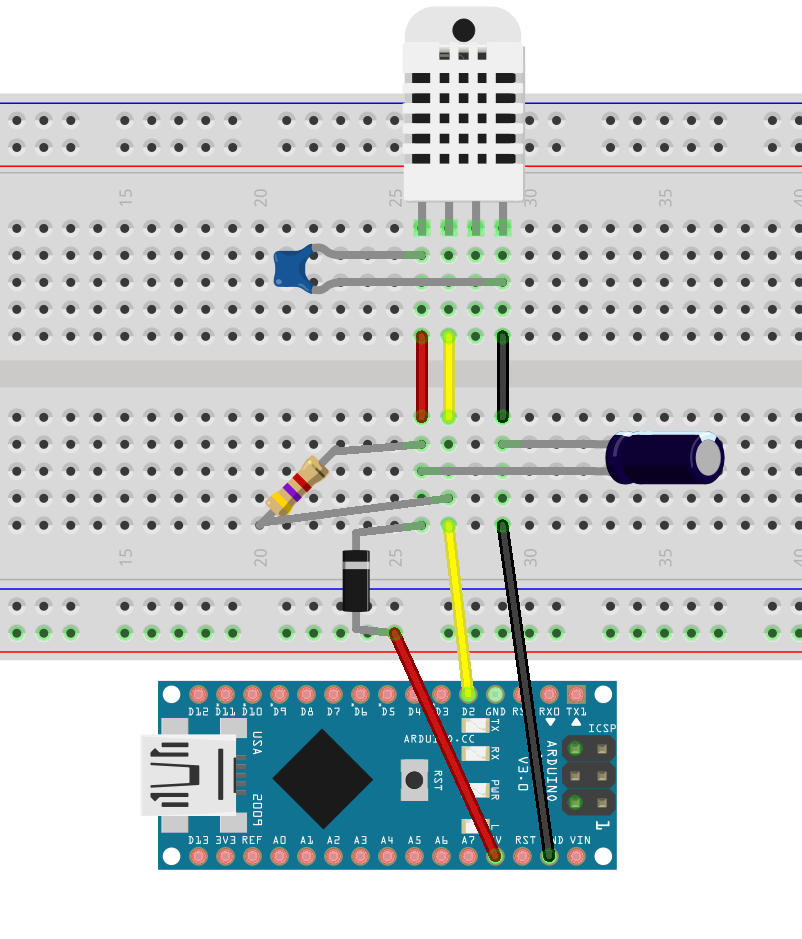
The current temperature and humidity at every room/place (currently 10) is measured using a DHT22 (AOSONG). This sensor provides the current temperature and humidity using a proprietary protocol which does not support addressing. This requires that every sensor is wired to a micro controller. For my solution I decided to add an Arduino Nano V3.0 as a slave to the I2C bus. The Arduino Nano reads the values from all attached sensors every 2.5 seconds and caches them locally. These values can be read from the Arduino Nano after sending the port id (0-10). It is the same behavior when reading data from registers using the I2C bus.
The temperature and humidity is shown at the web app using two different views.
The icon on the right side of the humidity ("Luftfeuchtigkeit") entry indicates whether or not there is an increased risk of growing mold at the walls. A value less than 60% is green, less than 70% is yellow and above 70% is red.
The web app also provides an overview of all sensors.
The following image illustrates a hardware setup at the power distributor using input- and output-boards. The 12V/5V power supply and the N/PE connections are not shown.
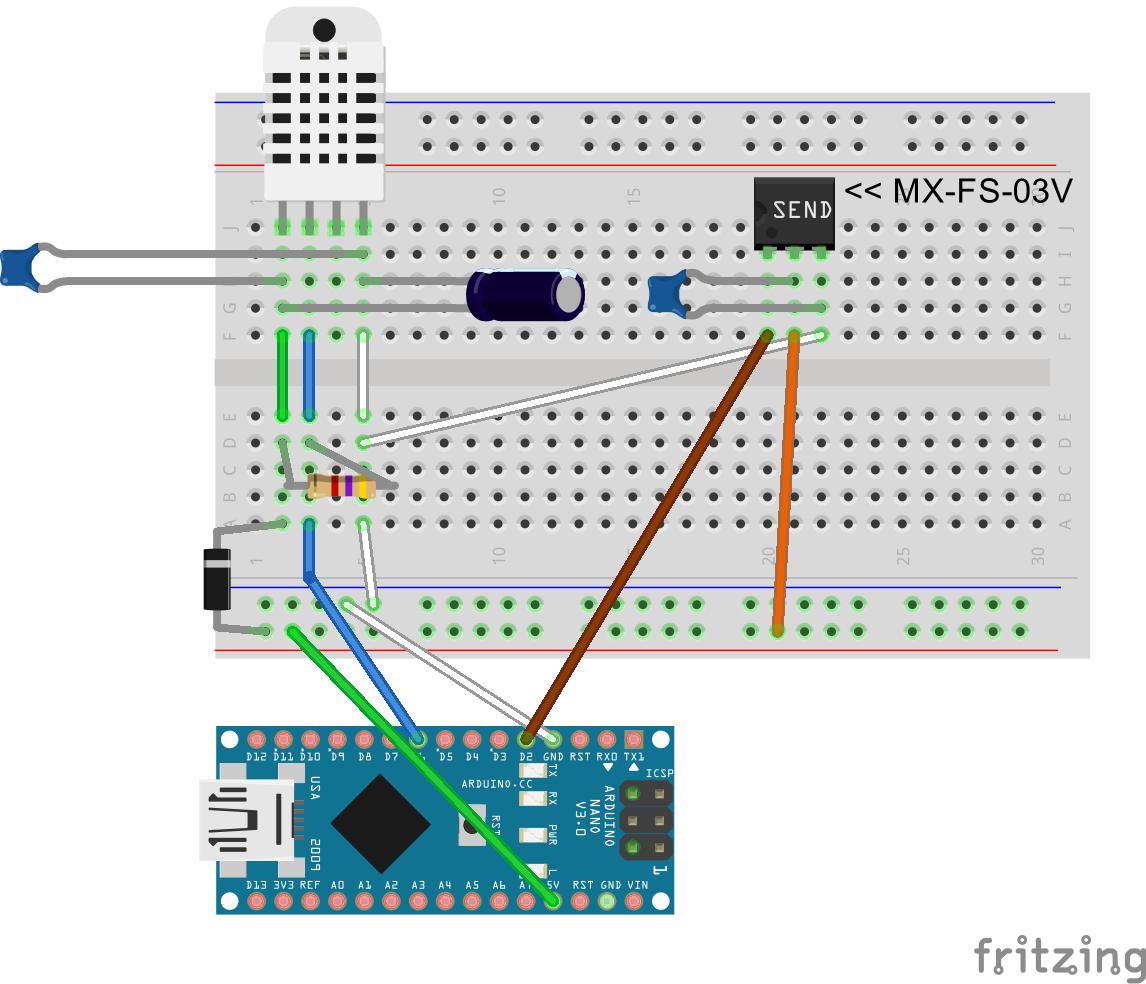
While migrating and documenting the project in the course of this challenge I also developed the 433Mhz sender unit which is conveniently hidden inside a plain case together with the temperature and humidity sensors.
This feature makes relay boards optional. The Arduino Nano which is responsible for the DHT22 (Temperature and Humidity) sensors is also sending the 433Mhz signals. The sender (FS1000A) is mounted together with the temperature and humidity sensor within a case at a central room of the house. To increase the range of the sender even further, it is additionally powered with 12V (also working with 3.3 but short range).
One of the main problems with the remote relays is that they are not sending any state information. So it is absolutely possible for the user to introduce state changes to the system by using the original remote. To force synchronization, the software solution automatically updates the state every 5 seconds. This keeps the state which is shown on the web app as reliable as possible (but making the usage of the original remotes useless).
Remote relays can be used within every automation and providing the same features as relays from a relay board.
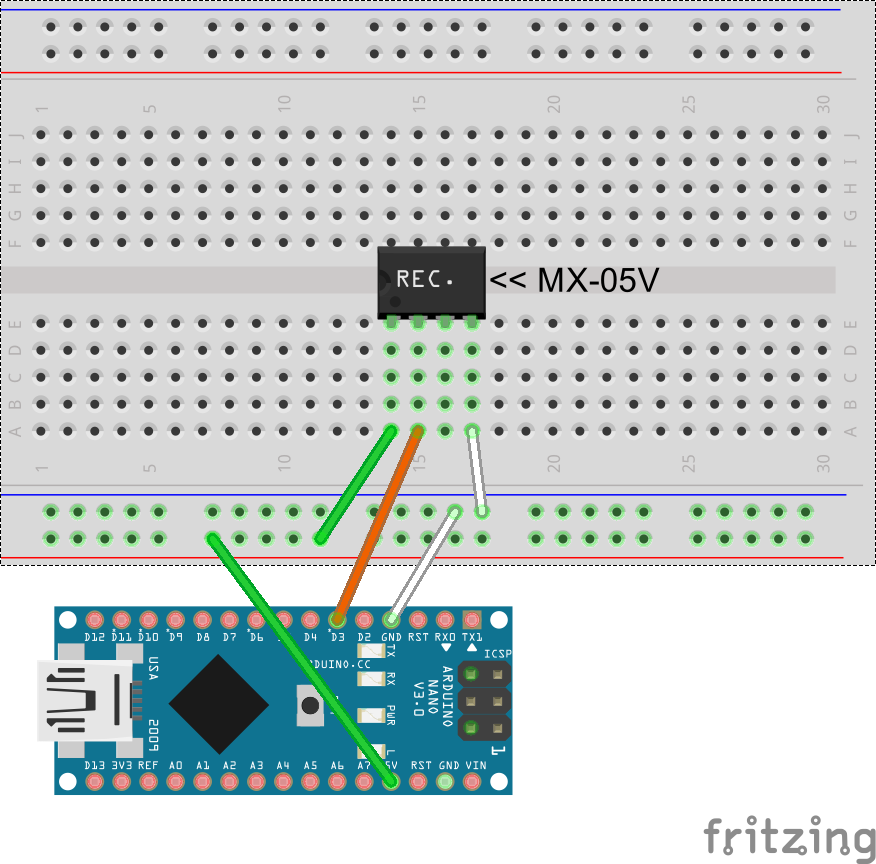
The 433Mhz remote's codes can currently only be manually configured via a circuit build on a prototyping board. Those codes are then copied to the configuration. The fritzing sketch for the required circuit board is referenced below and the Arduino sketch is located at the repository at the folder CK.HomeAutomation.SensorsBridge\RemoteCodeFinder.
The cat litter box for our cat is placed at the storage room which is sadly lacking any window to let in some fresh air after usage. Due to this problem, the box is connected to an old unused flue. In front of the tube which is connected to the flue, there is a fan wired to a relay at the power distributor. A motion detector at the storeroom detects even the cat and starts the fan for some minutes.
The cat litter box has its own icon at the web app which allows for controlling the fan remotely.
By analyzing the generated logs and filtering by the corresponding actuator changes (Azure SQL DB or CSV file) it is possible for us to track the cat’s litter box usage over time and therefore improve upon the required cleaning intervals.
Before the release of Windows 10 IoT, the software was running on a G120 from GHI electronics using the .NET Micro Framework in Version 4.3. But mainly due to the lack of performance (120Mhz, 16MB RAM and interpreter) not all planned features were working as planned.
A couple of weeks ago I started migrating the code base to run as a Windows 10 IoT background task, while also adding features like the Microsoft Azure integration.
The repository which is referenced below contains the Visual Studio 2015 Solution and all depending projects. It is all that is required to use the Raspberry Pi 2 as a Home Automation Controller, while being open for extension by writing custom drivers for other relay boards or sensors.
The projects of the software solution are grouped into:
- App (Contains the web app)
- Controllers (Contains the startup project for the Pi and the home configuration)
- SDK (Contains all shared projects)
This project contains a console application which displays trace messages sent by the controller (Pi2 instance). Currently all notifications are continuously sent to a broadcast address using an UDP socket. Therefore opening a port (e.g. 19227) at the firewall is required. I use the TraceViewer mainly to find bugs and/or misconfigurations.
All classes which are required to send notifications are located at the project CK.HomeAutomation.Notifications.
This project contains the implementation of a basic HTTP server. The HTTP server is required for the web app and provides status information in JSON format and accepts requests with status changes.
The HTTP server is also able to host the web app. Due to different package names, the content of the web app must be manually uploaded to the destination folder using the administrative SMB share.
Target folder: \\[IP]\c$\Users\DefaultAccount\AppData\Local\Packages\CK.HomeAutomation.Controller-uwp_p2wxv0ry6mv8g\LocalState\app
Each project in the Controllers folder is a startup project implementing an IoT Background Task. Until a detailed documentation is provided one can use these projects (currently at use in my home) as an example.
Additionally I provide the project CK.HomeAutomation.Controller.Empty as starting point for playing around with the solution. NOTE: The controller named Cellar which is responsible for the garden and parking lot lights is not covered in this documentation.
Before testing the solution you should be familiar with the following tasks:
- Setting up a Raspberry Pi2 with Windows 10 IoT from scratch (https://ms-iot.github.io/content/en-US/win10/SetupRPI.htm)
- Connect with the Raspberry Pi2 using a Microsoft PowerShell remote session (https://ms-iot.github.io/content/en-US/win10/samples/PowerShell.htm)
- Deploying an universal windows app to the Raspberry Pi2.
The solution directory also includes a small PowerShell script called SetupRaspberryPi.ps1 to execute a common chain of commands to setup the Raspberry Pi2. It is recommended but not required that you execute the script (make sure to adjust all IP settings according to your own infrastructure).
This project provides the highest level of abstraction. The home, rooms end every actuator like push buttons, lamps, socket etc. are implemented in this project and provide special events and methods according to the features of every actuator.
Rooms can be created using a fluent API which makes the configuration easy to read and understand.
This actuator is used to detect people and motion at the rooms. I use the motion detector BW8085 360° from Abus which is mounted at the ceiling of every room.
The implementation of a motion detector actuator provides two events. The first of the two is the MotionDetected event which is fired if motion is detected. The physical motion detector keeps the output at a HIGH level until no further motion is detected, at which point the second event DetectionCompleted is fired.
The following image shows an entry for a motion detector in the web app. Every motion detector can be deactivated (in software only) using the web app. The red dot indicates that motion is currently detected.
This actuator represents a physical push button. The button has two events which are indicating that it was pressed. The event PressedShort is fired if the button was pressed for a short duration (< 1.5 seconds), while the event PressedLong is fired only if the button was pressed for a longer duration (> 1.5 seconds). The second event is also automatically fired if the duration (1.5 seconds) has exceeded and the push button is not released. This two events allowing buttons with multiple features.
Example:
The solution also contains a VirtualButton. This button implements the same interface (IButton) and can be "pressed" using the web app only.
The base class BinaryStateOutput is used for every actuator which supports a binary state (ON and OFF) only. Examples for those actuators are Socket and Lamp. The base implementation provides methods for updating (ON and OFF) or toggling the state. Buttons can interact with objects implementing the IBinaryStateOutputActuator, this allows the addition of multiple custom actuators.
The following image shows the template for every binary state outputs. The icon on the left side is different for sockets and lamps. Custom icons like the poison bottle at the "Mückenstecker" entry can be defined using the configuration file (Configuration.js) for the web app.
Every physical actuator of type BinaryStateOutput can be used to create a logical binary state actuator. One actuator must be set to "master" which is required to determine the new state if the state should be toggled. The actuator has its own ID and can be used like any other binary state output actuator (the required interface is implemented).
One important advantage of this implementation is the way state updates are handled.
Usually the new state of a binary state output is directly committed to each device one by one via the I2C bus. This behavior creates short but visible delays between each actuator state update. The CombinedBinaryStateActuator prevents this delay using internal change tracking.
Example:
More complex states than ON and OFF are possible to configure using the StateMachine. This actuator allows multiple states for ports (relays) or other binary output actuators.
Example with a fan:
The state machine provides methods to turn it off or moving to the next state. The state is reset to OFF if the last state of the state machine has been reached and the initial state should be applied next.
Another use case for the state machine is creating templates or "moods" for a couple of other actuators.
Example mood:
The method WithTurnOffIfStateIsAppliedTwice ensures that the state of the state machine will change to OFF if a particular trigger has been activated a second time as the configured state is still active (Example: Pressing the push button for "DeskOnly" will activate the "DeskOnly" mood. If the push button is pressed again while the "DeskOnly" mood is still active, the actuator applies the OFF state. A dedicated push button for the OFF state is not needed.).
The following image shows the template for state machines. The caption and image of each state can be changed using the configuration file of the web app.
The values for temperature and humidity are read using the I2C sensors bridge. Both values are read from a single physical device but separated into an actuator for temperature and an actuator for humidity. The values are automatically polled every 10 seconds.
As mentioned before the importing thing is automation. Without automations, the whole solution is only one big remote for the home. This solution provides several automations:
This automation sets the connected binary state outputs to ON. A push button or motion detector can be used as the trigger. It is required to specify the desired duration of the ON state. The state is set to OFF if that range exceeds. The state is automatically set to OFF if the specified range is exceeded. An optional time range can be provided in which the automation rule is enabled. Predefined ranges for "day only" or "night only" are available (requires a weather station object).
Example:
This automation is used to move several roller shutters automatically according to several conditions. One of these conditions is sunrise and sunset which means that the roller shutters are automatically moving up at sunrise and moving down at sunset (requires a weather station object). It is also possible to add a diff to sunrise and sunset. According to the sunrise and sunset feature, it is possible to specify a time for "do not open before" which will ensure that the roller shutter is never opened before that point in time has been reached. Another condition is the outside temperature (also requires a weather station object), which enables the roller shutters to be closed automatically if the outside temperature exceeds a certain value like for example 28°C. This feature is intended for roof windows.
The position of the roller shutter is also tracked via time measuring. The required duration between up and fully closed must be configured.
Example:
The following screenshot shows an entry for roller shutters at the web app. The progress bar over the buttons is showing the current position.
This automation is used to set the state of several binary state outputs to ON while conditions are matching. This automation is used for lamps in the garden which are only ON at night. It is possible to specify one time range for the ON state and multiple time ranges for the OFF state. It is also possible to use sunrise and sunset for the ON state (requires a weather station object).
Example:
The latest feature of the new implementation is a generic automation and condition framework. The generic automations are designed to execute custom actions if the configured conditions are met. This is checked every time a trigger is invoked via a push button, motion detector, interval or any other code.
Many of the automations and conditions are depend on environment conditions like the current weather, sunrise and sunset times, outside temperature or humidity. All of these information is currently provided every 60 seconds by a virtual weather station backed by WebApi of OpenWeatherMap. The virtual weather station is implemented using the interface IWeatherStation, this makes it easy to seamlessly integrate physical stations located in garden.
This project contains the drivers for all currently supported input and output devices. Specifically the relay boards, input boards from CCTools and 433Mhz remote switches. The driver and source code of the Arduino Nano (sensor bridge and 433Mhz sender) is included too. All higher level objects like actuators and automations are implemented against interfaces to add an abstraction layer to the concrete bare to the metal hardware classes. This makes it easy to later add further drivers for other boards and sensors.
This project contains two components. The first one is a CSV writer which writes every changed state to the "LocalState" directory of the package. This file can be downloaded from the Pi2 using the administrative SMB share: \\192.168.1.15\c$\Users\DefaultAccount\AppData\Local\Packages\CK.HomeAutomation.Controller-uwp_p2wxv0ry6mv8g\LocalState\BinaryStateOutputActuatorChanges.csv.
Example content of the the CSV file:
The second component is the AzureEventHubPublisher.
This component sends events for any state has change and the values of any sensor change to an Microsoft Azure EventHub. Events are also generated if push buttons are pressed or motion is detected. The solution contains the SQL scripts for creating the required SQL database tables and the required query for a StreamAnalytics job (in folder #Azure).
Every changed actuator state generates to entries at the Azure SQL database. The first entry contains the START event and the new state. The second entry contains the END event with the total duration of that state in seconds.
I already created some reports using a free Microsoft PowerBI account.
The software solution contains the project CK.HomeAutomation.App. This project is a web app building on top of AngularJS, jQuery and Bootstrap. The room configuration is read from the controller (Pi2) and the UI is generated according to the existing rooms.
The web app can be opened directly from the file system using the index.html file or uploaded to a web server. The file Configuration.js is used to configure and translate the web app. The IP address of the Controller (Pi2 instance) must be set in the configuration file.
The web app can be added to the home screen of iOS only if it is hosted at a web server (I am personally using a BananaPi with nginx). Adding a web app to the home screen is described here: http://www.tech-recipes.com/rx/44908/ios-add-website-shortcut-to-home-screen/
Hosting the web app at the Raspberry Pi2 is already in progress but currently not supported completely.
TerminalThe web app also runs at the living room. An old iPad 3 is used as the terminal.
The solution described above is still under development and will get more features in the future. Some of the planned are:
- Support for actuators based on infra red signals (like an RGB-LED-Strip).
- Support for XML based configuration files in addition to code based configuration.
- Implementation of a dedicated tablet web app with a different layout.
- Support for reed switches for windows which are showing the state at the web app.
- Libraries with drivers for devices from other manufacturers (like 433Mhz remote switches).
- Controlling of the valves of the heating system (outputs and temperature reading already implemented).
- Alarm system which sends notifications if motion is detected or windows are opened (requires implementation of point 4).
- A hardware weather station.
- Automatically closing roller shutters if the window is open and rain is detected (the currently used weather API already provides the required information).
- More Unit Tests.
- Detailed documentation at the GitHub wiki.
- Animations (this feature was already implemented using NETMF but I was not able to migrate it completely within the time range of the IoT contest)
If you are interested to contribute to this project (hardware, software, documentation or anything else), feel free to contact me.






Comments