Although many traffic systems have been upgraded with ultrasonic sensing capabilities, many systems remain old-fashioned and outdated. This project uses the classic HC-SR04 ultrasonic sensor and a custom made traffic light case to produce a device that efficiently moves cars along an intersection, in order to minimize static, wasted time.
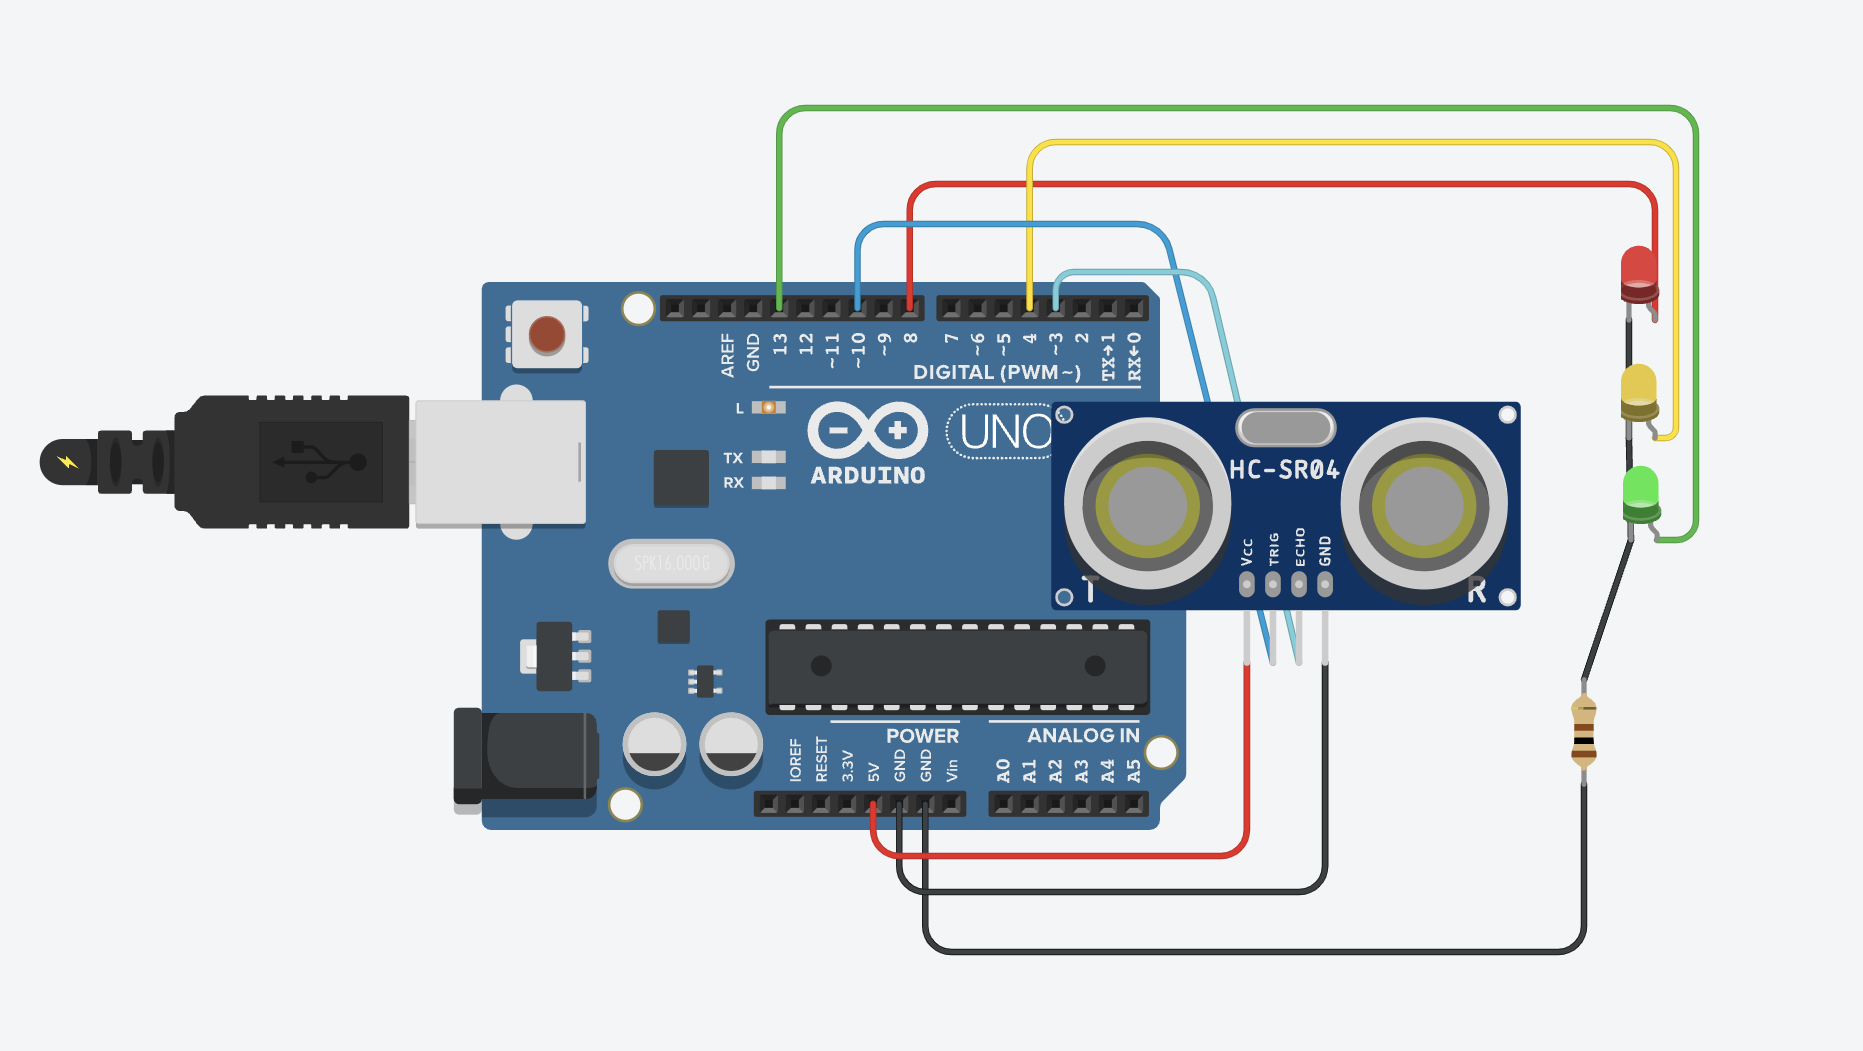
Step One: The CircuitThe circuit for the smart traffic system takes advantage of an HC-SR04 and three different color, red, yellow, and green, light-emitting diodes, or LEDs. To begin building this circuit, you must find the anode (+) and cathode (-) ends of the three LEDs. It is imperative to connect these in the correct order because connecting them incorrectly can lead to an LED burning up and becoming unusable. The standard among industry, hobby, and maker LEDs is the anode being the long lead of the LED, and the cathode being the short end of the LED. Connect the three LEDs to a resistor and GND of the Arduino. Connect the anodes to the digital I/O pins of the Arduino specified in the code (red: 8, yellow: 4, green: 13). Make the HC-SR04 connections specified in the image above and in the code.
Step Two: Device AssemblyYou may choose to create a mounting stand for the traffic light and ultrasonic sensor. I would recommend 3D printing one or creating a cardboard model, as seen in the image above. A little hot-glue will do the trick. The sensor should be pointed towards the "road" that is facing the traffic light. It can be mounted with a bit of hot-glue as well, or with a 3D-printed case.
Step Three: The SoftwareAbove is some of the code used for the smart traffic system. The code takes advantage of for loops and delays to keep certain lights on and wait for the HC-SR04 sensor to talk to the Arduino. Depending on what the value of the sensor is, the light will either remain in its certain cycle or switch to green and return to its cycle after remaining on for a duration of time. Then, after the cycle terminates, the process will repeat again. The function "ultrasonicDisplacement()" is my own and is what's used for this project's ultrasonic capabilities: it allows the sensor to operate properly.
Step Four: Going FurtherSimilar to my other projects, smart traffic can be scaled to a much smaller size. I would recommend creating your own 3D-printed module that has the ability to mount both the light and the HC-SR04. The wiring can be scaled down by creating your own custom PCB and a smaller microcontroller, instead of the relatively large Arduino Uno board. The ATtiny85 DIP is a good option for a smaller microcontroller that doesn't sacrifice too many pins.
I plan to update this project with a smart traffic version 2.0, which will include a custom PCB, printed 3D module, and concealed wiring.
Step Five: DiscoverCheck out my other projects on my dashboard:
- Arduino Uno DIY Drone
- Blindsight: a Wearable Device that Aids the Visually Impaired
- IAADL: an Infrared Activated Automatic Door Lock
- Arduino Functions Library
Check out all of my projects code at my GitHub repository.


_ztBMuBhMHo.jpg?auto=compress%2Cformat&w=48&h=48&fit=fill&bg=ffffff)


Comments
Please log in or sign up to comment.