Dave Clarke
Published © GPL3+

Holocron Lamp for the Discerning Jedi

With the wave of your hand, the Holocron opens up keeping you on the light-side.

IntermediateShowcase (no instructions)3 days8,338

Things used in this project

Hardware components

Photon
Particle Photon
×1
Servos (Tower Pro MG996R)
×1
White (8000K) LED (5mm)
×8
Infrared (940nm) LED (5mm)
×4
Infrared (940nm) Receiver Diode
×1
MPSA13 NPN Darlington Pair
×2
Resistor 47.5 ohm
Resistor 47.5 ohm
×8
Resistor 10k ohm
Resistor 10k ohm
×2
Resistor 180ohm
×4
Resistor 100k ohm
Resistor 100k ohm
×1
Gold PLA for the main enclosure
×1
Jumper wires (generic)
×20
Breadboard (generic)
×1
tinned copper wire
×1
superglue
×1
heatshrink
×1
t-glase petg blue
×1
heatshrink as required
×1
super glue and activator
×1

Software apps and online services

Particle Cloud API
Fusion
Autodesk Fusion

Hand tools and fabrication machines

Type A Machines Series 1 3D Printer

Story

Read more

Custom parts and enclosures

Holocron Enclosure

Here's the fusion 360 model of the enclosure, this is designed to press fit together, but a drop of superglue can be added to make it a little more permanent https://myhub.autodesk360.com/ue299db70/shares/public/SHabee1QT1a327cf2b7a8eeea6ffeb49753e

Holocron STL files

Use these pre-prepared STL files for 3D printing

Schematics

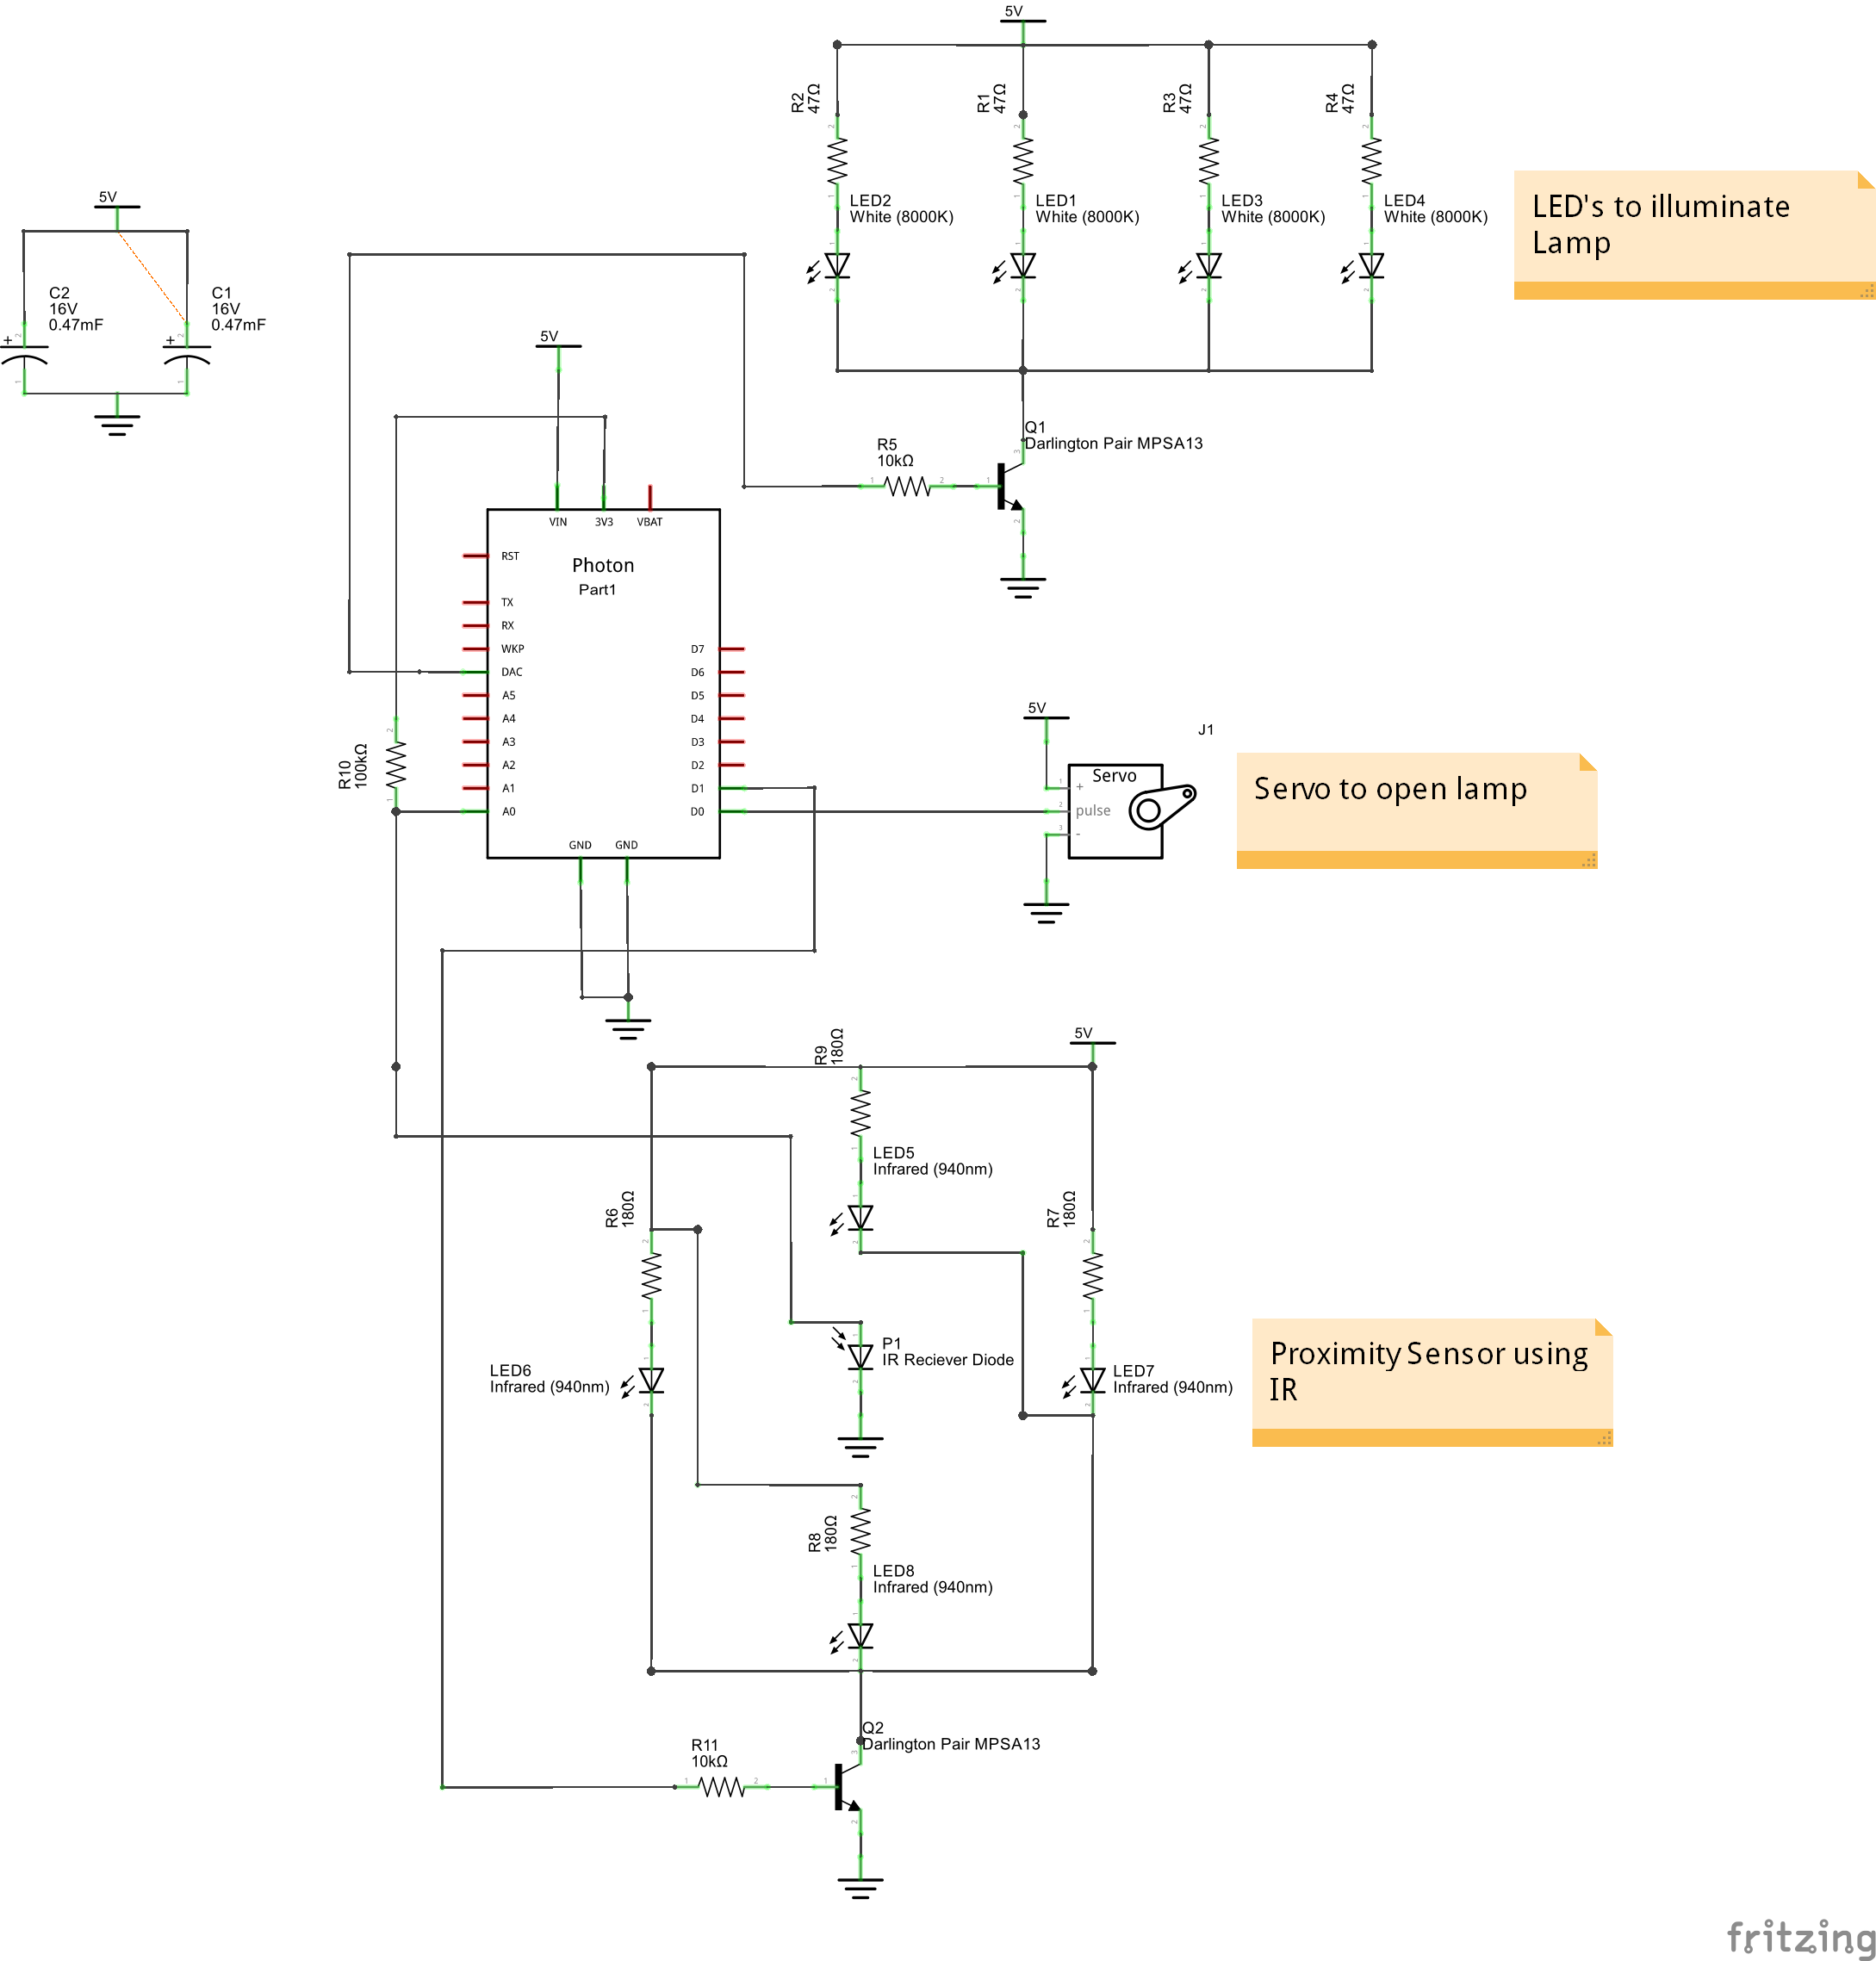
Holocron Schematics

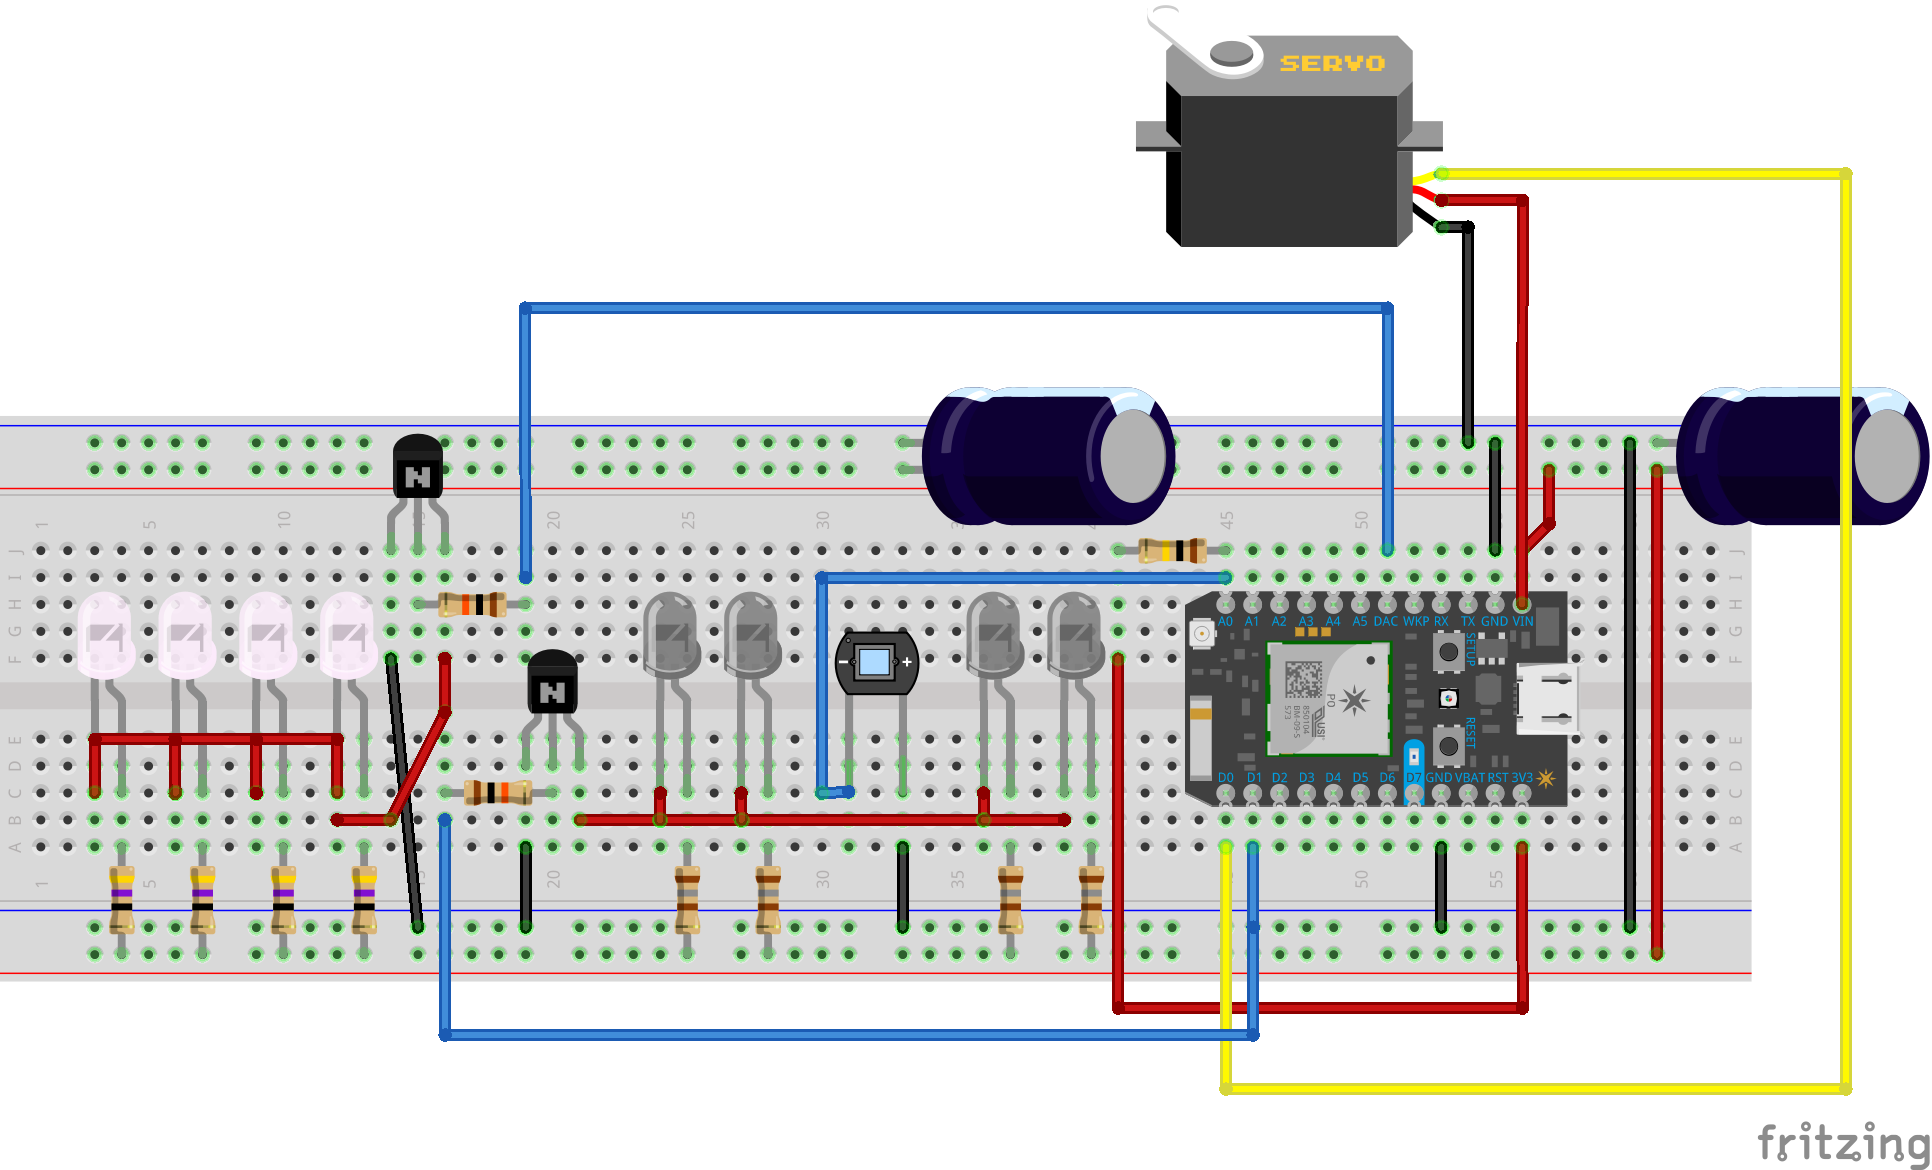
Holocron Breadboard example

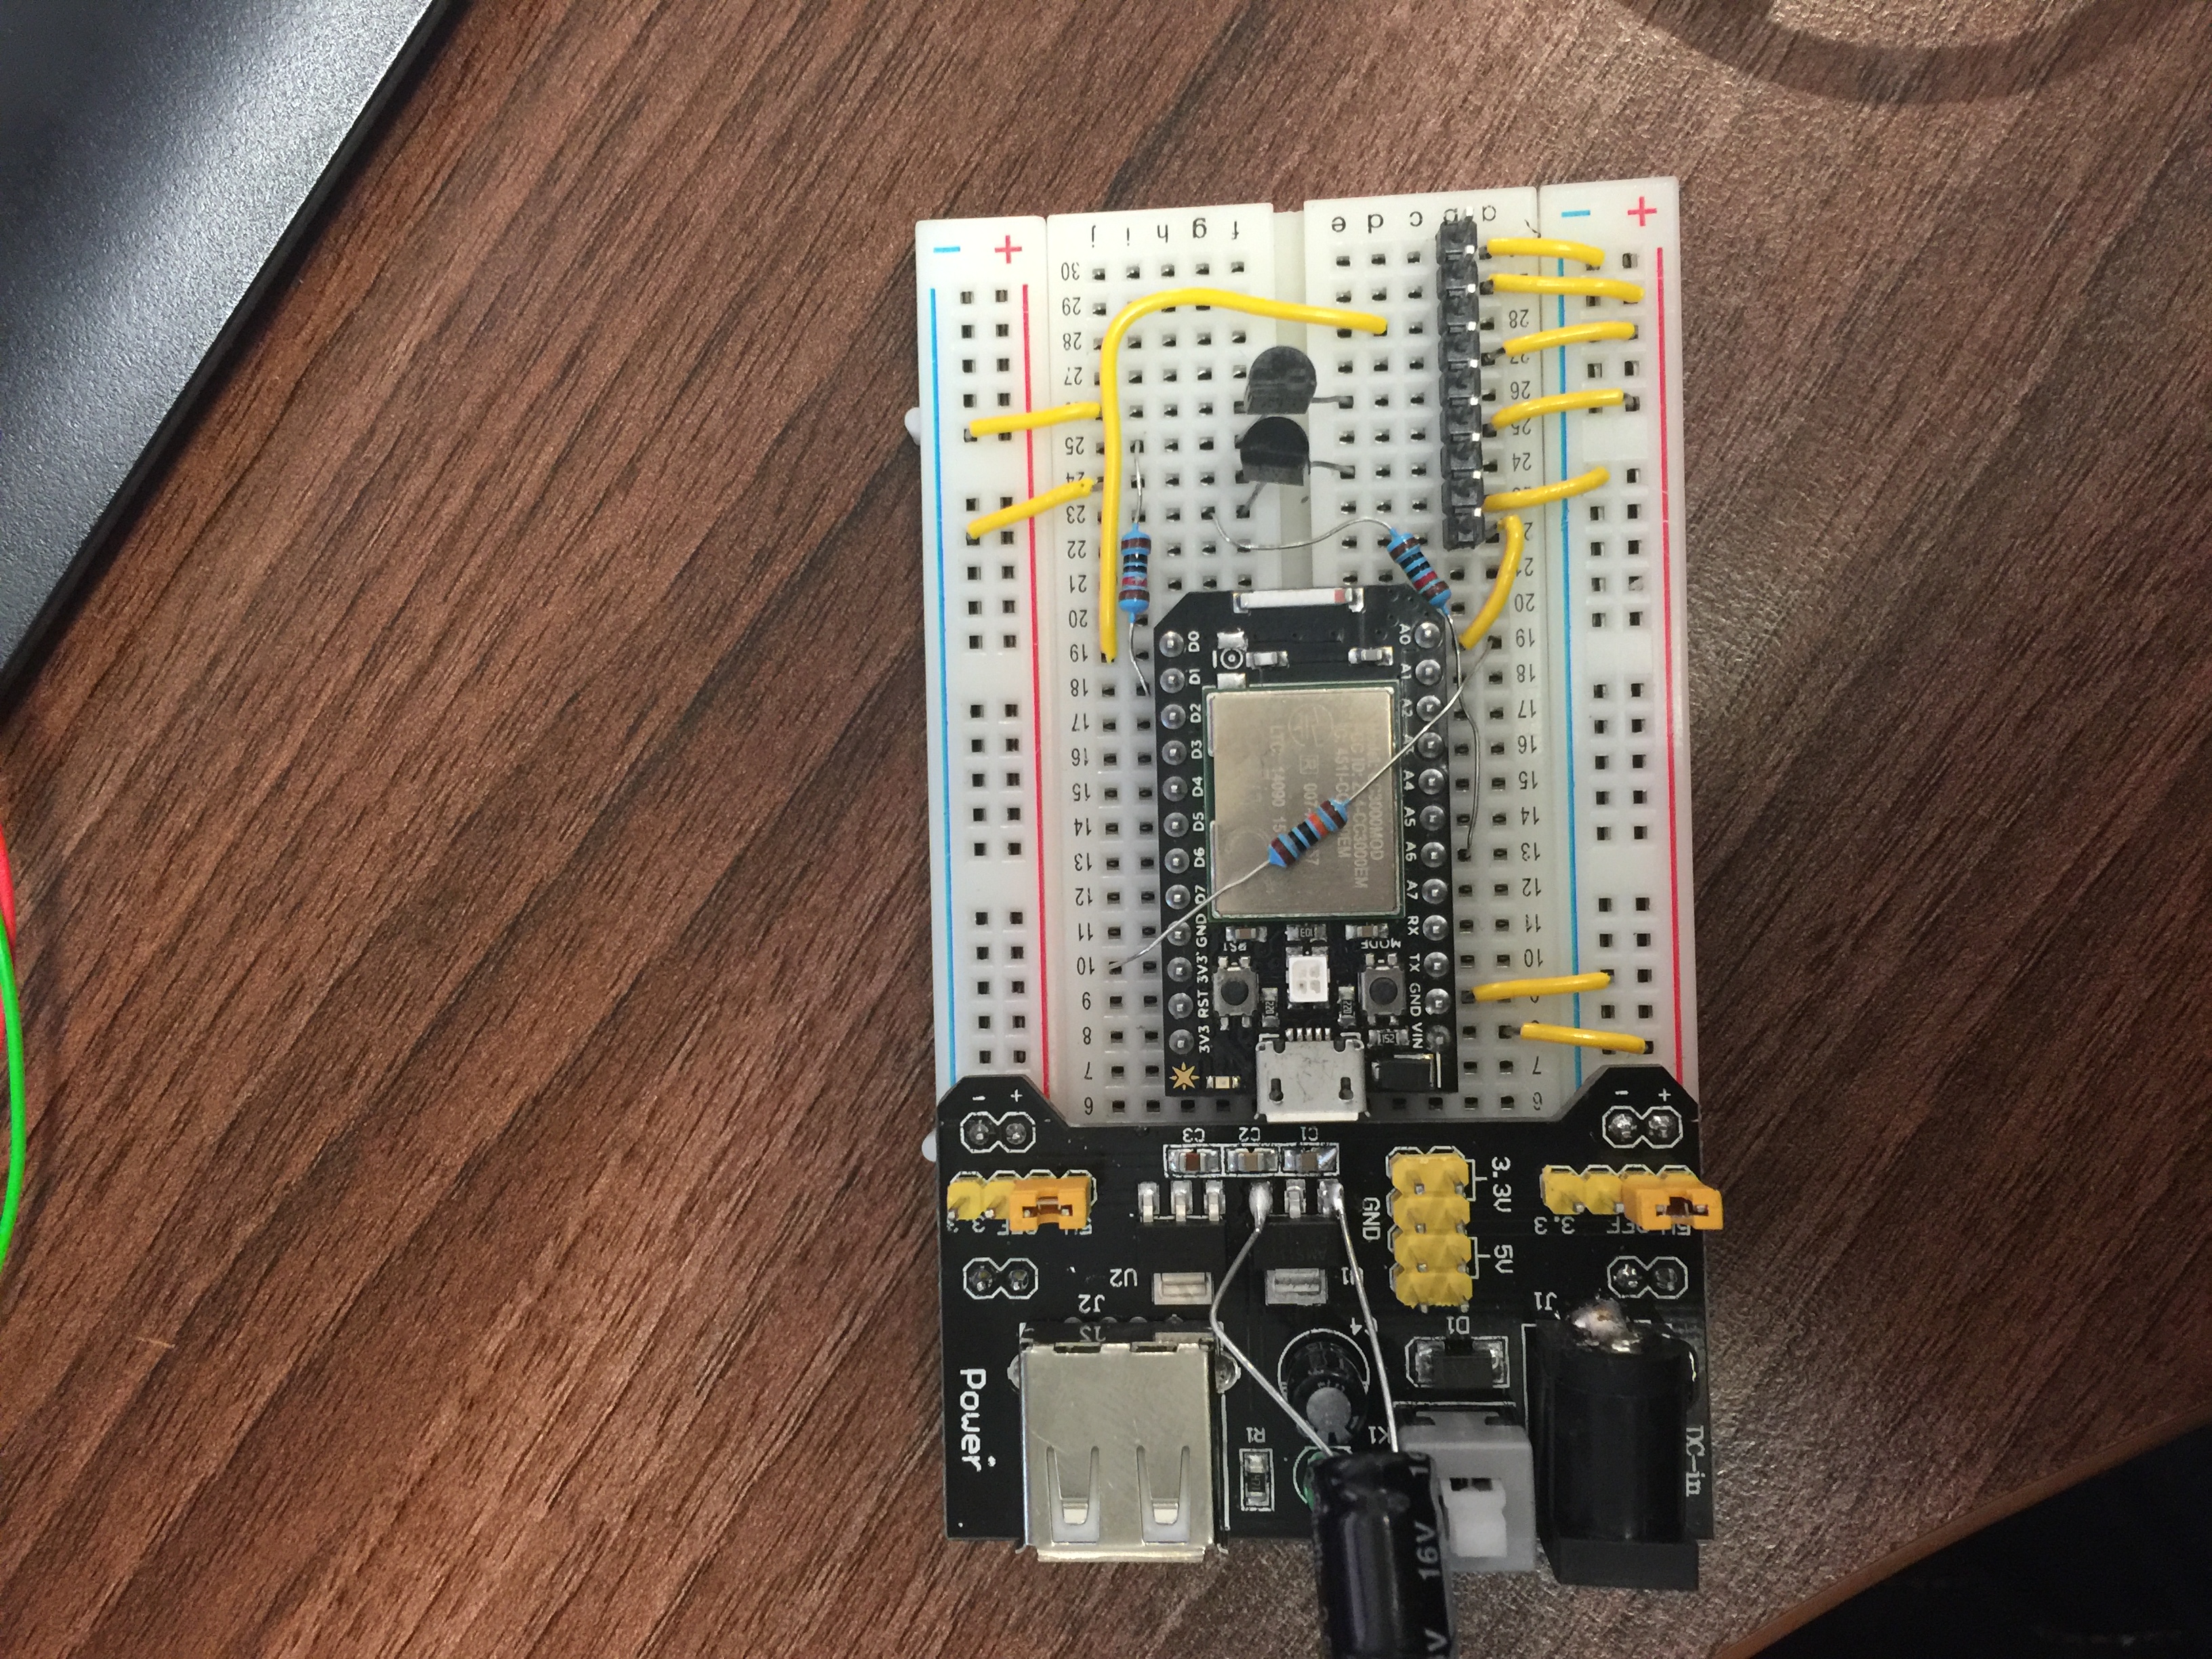
Photograph of the final Breadboard layout

copy this is you want your breadboard to look pretty!

Code

Holocron Firmware

Arduino
Load onto Particle by you prefered means! wave like a Jedi and you're done
/*
Holocron Particle Firmware V1.0
Dave Clarke
18/02/16

IR Proximty circuit modified from instructables
http://www.instructables.com/id/Simple-IR-proximity-sensor-with-Arduino
All other rights reserved.
*/

int readIR();           // prototype
void ServoControl();    // prototype
void ServoControlReset(); // prototype

Servo myservo;          // Create servo object

bool toggle = false;    // Used as a one shot
bool TheForce = false;  // Variable to know cloud function used.
bool powerON = true;    // initial start up flag

int pos = 0;            // initial servo position
int IRemitter = D1;     // IR Emiter LED on D1
int IRpin = A0;         // IR Photodiode on pin A0
int ambientIR;          // variable to store the IR coming from the ambient
int obstacleIR;         // variable to store the IR coming from the object
int value[10];          // variable to store the IR values
int distance = 0;       // variable that will tell if there is an obstacle or not
int mainLED = A6;       // control for the main lights
int closed = 20;         // Servo closed angle
int open = 155;         // servo open angle

void setup()
{
  // Initialise pin modes and assign servo pin
  myservo.attach(D0);
  pinMode(mainLED, OUTPUT);
  pinMode(IRemitter, OUTPUT);

  // Debug - Variables published to Cloud Variables
  Particle.variable("distance", distance);
  Particle.variable("ambientIR", ambientIR);
  Particle.variable("obstacleIR", obstacleIR);

  // Cloud function interface
  Particle.function("force", RemoteSwitch);

  //initial states
  digitalWrite(mainLED, LOW);
  digitalWrite(IRemitter, LOW);
  myservo.write(closed);

}

void loop()
{
  distance = readIR(10);                                      // Read value from IR sensor and store in distance Variable
  if ((distance > 15 || TheForce == true) && toggle == false) // open up lamp and turn on the lights
  {
    for(pos = closed; pos <= open; pos++)                     // goes from 5 degrees to 115 degrees
    {                                                         // in steps of 1 degree
      ServoControl(pos);                                      // Set Servo Position and Control LED Brightness
    }
      ServoControlReset();                                      // When finished, reset variables etc.
  }
  if ((distance > 15 || TheForce == true) && toggle == true)  // turn off lamp and close
  {
    for(pos = open; pos > closed; pos--)                     // goes from 115 degrees to 5 degrees
    {
      ServoControl(pos);                                      // Set Servo Position and Control LED Brightness
    }
    ServoControlReset();                                      // When finished, reset variables etc.
  }
}

// Function to read IR Proximity sensor
int readIR(int times)
{
  for(int x = 0; x < times; x++)
  {
    digitalWrite(IRemitter,LOW);    // turning the IR LEDs off to read the IR coming from the ambient
    delay(1);                       // minimum delay necessary to read values
    ambientIR = analogRead(IRpin);  // storing IR coming from the ambient
    digitalWrite(IRemitter,HIGH);   // turning the IR LEDs on to read the IR coming from the obstacle
    delay(1);                       // minimum delay necessary to read values
    obstacleIR = analogRead(IRpin); // storing IR coming from the obstacle
    value[x] = ambientIR-obstacleIR; // calculating changes in IR values and storing it for future average
  }
  for(int y = 0; y < times; y++)
  {
    distance+=value[y];              // calculating the average based on the "accuracy"
  }
  if (powerON == true)
  {
    delay(1000);                    // prevent bogus readings from servo noise on power up
    powerON = false;
  }
  else
  {
    //no start up delay
  }
  return(distance/times);            // return the final value
}

// Function for Cloud Variable Remote Switch
bool RemoteSwitch(String command)
{
  if (command == "theforce")
  {
    return TheForce = true;
  }
}

// Servo position control and LED brightness
void ServoControl(int ServoPosition)
{
  int LEDmap = ServoPosition;
  LEDmap = map(LEDmap, closed, open, 0, 255);  // Map servo position to LED brightness
  myservo.write(ServoPosition);                // tell servo to go to position in variable 'pos'
  delay(26);                                   // waits 25ms for the servo to reach the position
  analogWrite(mainLED, LEDmap);                //ramp light on using PWM Pin
}

// After servo has reached final position, reset variables and wait.
void ServoControlReset(void)
{
  toggle = !toggle;                           // toggle switch state
  TheForce = false;                           // Toggle The Force when using could remote switch on
  distance = 0;                               // reest distance to stop accidental operation
  if (toggle == false)                        // Make sure LED is High for open and low for closed
  {
      digitalWrite(mainLED, LOW);
  }
  else
  {
     digitalWrite(mainLED, HIGH);
  }
  delay(1000);                                // prevent operation too quickly
}

Simple web interface to turn the Holocron on and off

HTML
Want to turn you light off but you're on the other side of the world? use this!
<!DOCTYPE html>
<html>
<body style="">
  <img src="assets/Holocron_mk_1_2016-Feb-12_12-06-42PM-000_CustomizedView39472378.jpg" class="gwd-img-15tm">
  <div class="gwd-div-lpay" style="">
    <center class="gwd-center-1pot">
      <br>
      <br>
      <br>
      <form action="https://api.particle.io/v1/devices/<insert device ID here>/force?access_token=<insert token access key here>" method="POST">
        <br>
        <br>
        <input type="hidden" name="args" value="theforce">
        <br>
        <input type="submit" value="Use the Force">
      </form>
    </center>
  </div>
</body>

</html>

Credits

Dave Clarke

Dave Clarke

14 projects • 83 followers
Industrial Designer, Maker of Things, Lover of Phi and all around nice guy

Comments