


Hardware components | ||||||
 |
| × | 1 | |||
Software apps and online services | ||||||
| ||||||
3D Printers are great. They make iterating design versions so much quicker, and they can make things that other fabrication methods can't. But they are noisy. The stepper motors that are on mot every kind of 3D printer these days make a constant humming that isn't really so pleasing to the ear as they move back and forth, change directions, and start and stop. I had my printrbot simple metal set up next to my desk for the first few weeks I had it, and I almost went batty trying to focus on my assignments. I needed it to go somewhere else.
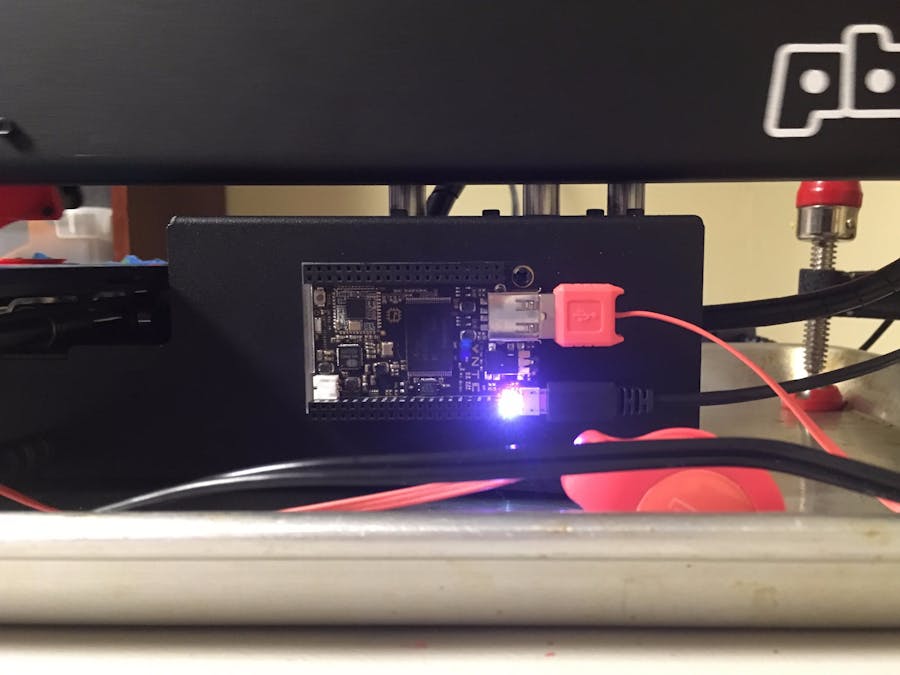
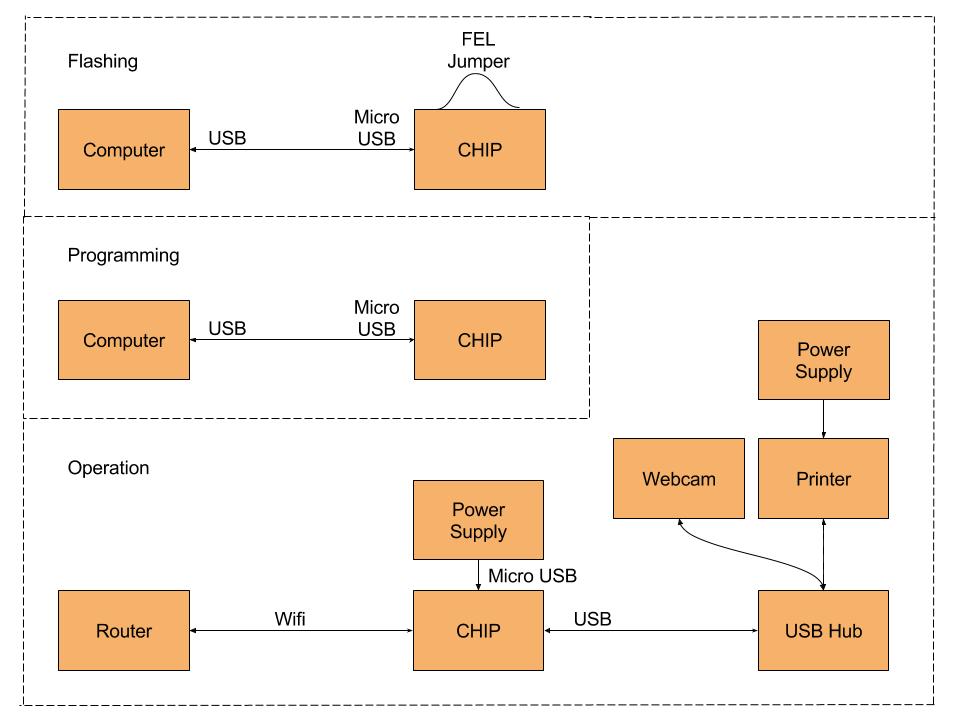
Finding a SolutionI had pledged for a C.H.I.P on Kickstarter a while back, and it had sat collecting dust for a few months. I couldn't get it to boot, so I went to flash.getchip.com and flashed it with new firmware.
I discovered a cloud-based service called 3DPrinterOS that allows you to securely control your printer over the web. You will need to make an account at www.3dprinteros.com
Building and CodingClick on "Headless 4.3" and follow the instructions. If you have trouble, make sure you are using a USB 2.0 port and that FEL is connected to GND. You will probably have to restart chrome and try again once or twice before it is successful.
Unplug the CHIP, remove the FEL jumper wire, and then plug the CHIP back into a USB port (USB on the computer to USB micro on the CHIP)
Next, install PuTTY. Enter "device manager" and under "Ports (COM & LPT)" find the address (COMx) of your device. Open PuTTY and start a serial connection using the COMx port and a 115200 baud rate, then click "Open"
PuTTY will open a terminal window. This window was blank for me, so I typed "chip" and it began to respond. the password is also "chip".
List wifi networks:
nmcli device wifi list
Connect to password protected network:
sudo nmcli device wifi connect '(wifi network name/SSID)' password '(wifi password)' ifname wlan0
Test wifi connection:
nmcli device status
Find your IP address:
sudo ifconfig
You will need to update and upgrade the packages and package lists on your C.H.I.P:
sudo apt-get update && sudo apt-get upgrade
And then install all of the packages you will need for the program:
sudo apt-get install python2.7 libusb-1.0 python-numpy python-opencv ca-certificates unzip ssh
Make and navigate to the folder for the install:
mkdir 3dprinteros && cd 3dprinteros
Download the .zip folder containing 3DprinterOS:
wget https://client-cdn-3dprinteros.azureedge.net/releases/3DPrinterOS-Client-5.9.11stable-build-18.zip
Unzip it and delete the .zip folder:
unzip 3DPrinterOS-Client-5.9.11stable-build-18.zip && rm 3D*.zip
Open the crontab file:
sudo crontab -e
And add the following line at the end, then save the file:
@reboot python /home/chip/3dprinteros/launcher.py > /dev/null 2>&1
Reboot your C.H.I.P and login again (User: Chip, Password: Chip):
reboot
You will be asked to log in to your 3DPrinterOS account (you should already have one, if not, make one).
Now you can unplug the CHIP from your computer, plug it into power (the micro USB port) and to your printer via the USB A port on the chip. That's all!
You now (a minute or two later) should be able to open a web browser and navigate to http://xxx.xxx.x.xxx:8008 where xxx.xxx.x.xxx is your IP address and 8008 is the port (should be 8008). This page should come up, where you will be able to change the name of your printer. You can now go to your account (the big orange button) and start using your printer!
I have now logged several hours of printing with my new setup. It is a very flexible system. I plan to add a webcam in the next week after I get a new USB hub. The 3DPrinterOS software allows you to monitor the printer through a live feed, and then will send you a GIF image via email that shows the printing process. Cool, eh?


Comments
Please log in or sign up to comment.