The pandemic has disrupted or restricted access and availability to many vital supplies such as food, medicine, resources, etc. But, with the help of the latest technology, it is now possible to overcome these barriers and provide help and support to the public in emergency cases like the ongoing pandemic scenario. Automation drastically reduces the amount of workforce required for carrying out highly sophisticated and dangerous tasks. Using an autonomous drone, instant support and delivery of essential supplies can be provided with little to no effort.
AimOur project aims at supporting the medical and emergency personnel team with autonomous capabilities to medicine and essential delivery, also making it affordable and easily accessible to the public.
The project uses a novel concept called HoverLive, which is particularly helpful because it allows the user to quickly deploy a drone in case of an emergency such as during the ongoing pandemic situation.Workflow
Our solution provides a medical intervention & response system based on an autonomous drone solution, with the help of a dedicated mobile application. The system uses the NXP Hovergames Kit, NavQ Companion computer with Coral camera & other associated accessories such as LTE & WiFi hubs, etc.
The aim, in brief, is as follows.
In case of a medical requirement, the user can use the dedicated app to register his request to alert the emergency & medical team. Based on his request priority (1: High Prority& 0: Low Priority) an emergency or support/delivery action is taken.
For High priority request:
The medical team will immediately dispatch the drone to the user location premises with an emergency first aid kit, as the medical team arrives at the location. The drone assumes an "emergency" role to deliver the emergency kit and the attached coral camera will aid the medical personnel to understand the severity of the condition as they arrive.
As the medical personnel arrives, the drone will switch its role to the "support" role, acting as a communication hub between the medical team and the hospital support team.
For Low priority request:
The user takes a remote video appointment with the medical team via the app. After the appointment, any prescribed medicine if any will be autonomously delivered to the patient via the drone which assumes a "delivery" role. Once the drone arrives at the premises, the attached coral camera identifies the patient/associate (biometric data should be registered via the app during the appointment with his/her consent) and releases the medical supplies.
In the case of the collection of blood samples, the drone asks for landing authorization from the user once it arrives at his premises. Landing is done either autonomously or in a predetermined area. The cargo box is controlled via an NFC authorization using the app to let users have access to the cargo (eg. blood collection kit). Once the blood samples are received back and secured inside the cargo box, the user can initiate a drone flyback request either within the app or via a dedicated button easily accessible on the drone.
The project takes advantage of the capabilities of the NXP FMU, NavQ companion module, and the Coral camera to successfully complete the requirements set above.Setting up NavQ
The 8MMNavQ is a small purpose-built experimental Linux computer based on the NXP i.MX 8M Mini SOC. It is focused on the common needs of Mobile Robotics systems. The system is built as a stack of boards, the top board is a SOM (system on module) containing the Processor, memory, and other components with strict layout requirements, and where the secondary boards are relatively inexpensive (often 4 layer boards) and allows for versions with customization to be easily built.
- The SD card included in the NavQ kit is preloaded with our HoverGames-Demo Linux distribution. The default username and password are:
username: navq | password: navq - Power on the NavQ using the included USB-C cable.
- Connect the Serial USB adapter to the UART2 port on the bottom port and connect to the laptop USB.
- Default NavQ terminal settings are: 115200 Baud, N, 8, 1 (no Parity, no flow control)
$ dmseg | tail # to check if USB serial connection established and port assigned.

$ minicom -D /dev/ttyUSB0 -b 115200 # connect to NavQ serial console.
Either u will get a login prompt.
Else press enter.
Log in using navq:navq as the credentials.
- When the NavQ arrives, the Demo image will already be loaded to the SD card. This image does not take up the full amount of space on the SD card, so you'll need to expand the space in order to install more packages such as ROS or OpenCV. Follow the steps below to expand the filesystem.
Download and run the following script resizeDisk.sh.
$ chmod a+x ./resizeDisk.sh
$ sudo ./resizeDisk.sh sd      # For SD card
$ sudo ./resizeDisk.sh eMMC # For eMMC- NavQ can be connected to the internet directly via an ethernet connection or via WiFi. To connect to WiFi, follow the steps below:
A package namedconnmanis included in the image to help you connect to WiFi through the command line. To connect to WiFi, run the following commands:
$ connmanctl
connmanctl> enable wifi
connmanctl> scan wifi
connmanctl> services
WIFI_SSID     wifi_name_managed_psk
connmanctl> agent on
connmanctl> connect wifi_name_managed_psk
<enter passphrase>
<wait for connection success message>
connmanctl> exit- Check for a successful connection
$ ping google.com- It is recommended to create a unique hostname to connect to the NavQ instead of using an IP address all the time.
To change the hostname we need to modify/etc/hostname.
$ sudo echo navq > /etc/hostname- For remote access, the navq needs to be connected to SSH.
Follow the steps below.openssh-serveris pre-installed.
Find IP of navq or assign a static one in your router
$ ssh navq@<ip>Type yes and this opens the terminal of navq on our laptop.
If you want to set up a desktop environment for navq, follow the guide here.
Now the NavQ is setup for HoverDrone.
HoverDrone is implemented using HoverLive, which is a high-level framework, that incorporates the NXP FMU, NavQ companion computer, and the coral camera, into a common framework based on the PX4 flight stack, MAVSDK, ROS, and additional software elements (such as OpenCV, TF Lite, etc) that can be easily deployed into their Hovergames drone for easy management of autonomous missions via a dedicated application.
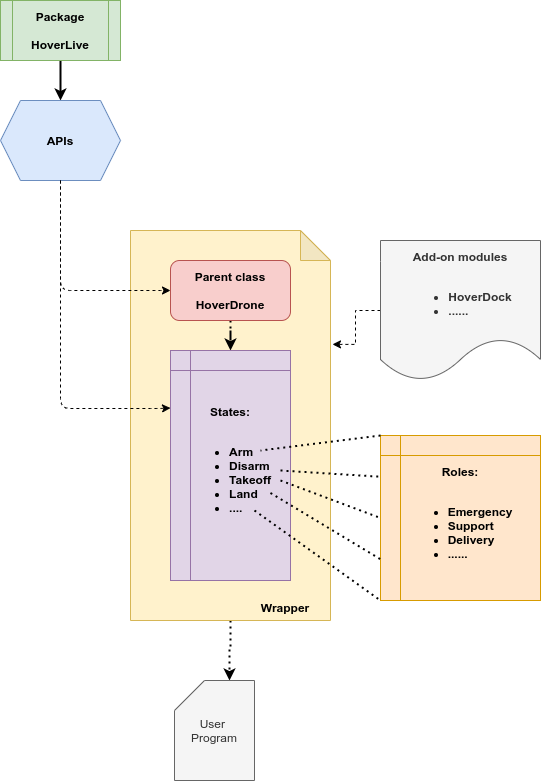
It gives complete freedom for the users to use their choice of drone API (currently supporting MAVSDK and MAVROS) in their choice of programming language (currently supporting C++ and Python). In the case of hardware-dependent parts, they are implemented as add-on modules for isolating the core package.
The capabilities of the framework include autonomous takeoff, simplified waypoint navigation with active obstacle avoidance, and vision-based autonomous landing.
- SSH into the navq and clone the HoverLive repository.
$ git clone https://github.com/crisdeodates/Hovergames-HoverLive.git
$ git checkout master- Build the project
$ cd Hovergames-HoverLive/
$ catkin init
$ mkdir build
$ cd build/
$ cmake ..
$ make
Now that the project is set up, let's go through the structure of HoverLive and how it can be used in our projects.
HoverDrone: DependenciesCurrently, HoverDrone, based on the HoverLive tries to implement high-level wrappers for MAVSDK and MAVROS. So both are dependencies for the package. In the case of firmware and SITL, PX4 is also a requirement. In the case of hardware-dependent parts, they are implemented as add-on modules for isolating the core package.
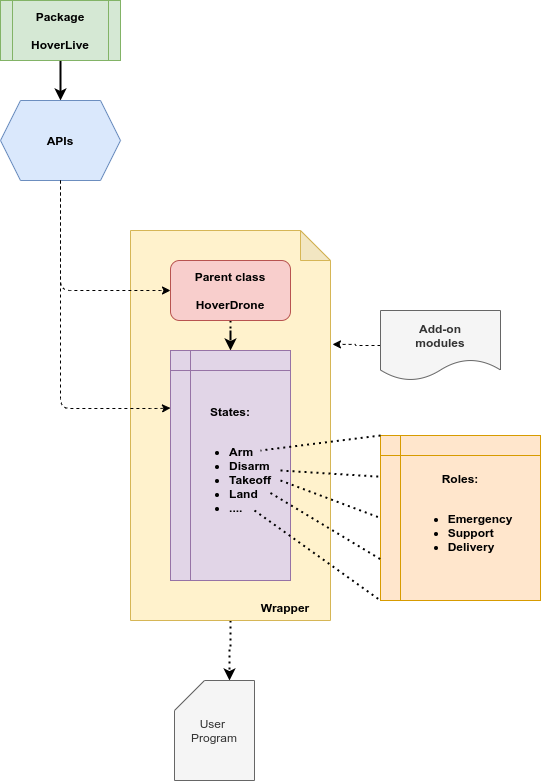
HoverDrone: WalkthroughThe basic implementation of HoverDrone is as follows:
- Here the basic implementation revolves around abstracting the core API features in such a way that it won't be ambiguous to the user.
- Here Roles are used. Each role can have multiple states associated with it.
- For eg: Delivery Role can have a Precision Landing state, but the Support Role does not have.
- The core features such as Arming the drone, Disarming, taking off, Landing, etc are extracted to user callable states to which the HoverDrone instance transits.
The main advantage is the ease of structured state callbacks that allows uniform implementation throughout each API and environment.HoverDrone: Usage
Integrating and using HoverDrone into a new or current project is quite easy.
Let's take the case of MAVSDK Python implementation of HoveLive.
- Import the HoverLive packages
$ from HoverDrone import Drone- Import the required states
from HoverDrone.states import Arm
from HoverDrone.states import Disarm
from HoverDrone.states import Takeoff
from HoverDrone.states import Land, PrecisionLand- Connect to the HoverDrone instance
my_drone = Drone.connect("myDrone", "udp://:14540")- Configure and add each required roles and connect the states.
my_drone.start()
my_drone.add_roles({"Emergency", "Support", "Delivery"})
my_drone.add_state(Disarm)
my_drone.add_state(Takeoff(5.0))
my_drone.add_state(land)
my_drone.add_state(PrecisionLand(threshold=3.0, Guided=True, MarkerID=xxx))
my_drone.add_states_to_role("Emergency", {Arm, Disarm, Takeoff, Land})
my_drone.add_states_to_role("Support", {Arm, Disarm, Takeoff, Land, Loiter})
my_drone.add_states_to_role("Delivery", {Arm, Disarm, Takeoff, PrecisionLand})- Execute the threads
my_drone.join()IMPORTANT: Some features may not work as the package is still in development and modifications might be done without notice that may change the current implementation and topology.HoverDrone: Testing
A simple SITL mission with a Support role is tested using the HoverDrone, (based on the HoverLive package) implemented on NavQ.
Due to the restriction of flying the hardware drone, a PX4 SITL with JMAVSim is run on the NavQ. Also it should be noted that in this season of Hovergames, the focus of the competition is based in NavQ and not Hovergames drone kit.
The capability of HoverDrone is vast. With the help of my contributors, we wish to extend the capability of the HoverDrone beyond the current use cases and also for other areas such as autonomous warehouse and inventory monitoring, Smart farming, etc.
Since the current implementation is not hardware-dependent, it can be applied to a wide range of hardware that supports the APIs and their subsets. Since the hardware-dependent parts are incorporated as add-on modules, it makes the core package scalable.
Contributing Projects:


.png?auto=compress%2Cformat&w=48&h=48&fit=fill&bg=ffffff)


Comments
Please log in or sign up to comment.