What is the project about?
3D scanning is a necessary tool in viewing an object or an environment in an immersive manner. A ton of solution exists for different purpose and different applications from scanning small to large objects.
Using different techniques from RGBD stereo mapping to laser scanning the problem of 3D scanning and reconstruction is being solved. 3D scanning is an important field of computer vision and 3D reconstruction and an ever growing field with lot of applications.
Low power commodity RGBD depth sensors have been in the market for a while and they are also used in 3D scanning, also the aren't completely portable. Custom portable 3D scanners cost a lot in thousands of $.
Portable Scanners available now :In recent years, research in scene reconstruction using RGB-D frameshas flourished with the presence of affordable, high-fidelityconsumer-level RGB-D sensors, and a number of off-the-shelf reconstruction systems have been introduced so far.
JETSCAN : The portable GPU accelerated RGBD 3D scannerMy system design is basically motivated by the problem of portable 3D scanning and making it cheaper and afforable by any creator and on the go processing on the 3D scanning module (edge computing) itself without requirement of external computing power. And instantly it gives the user a HD 3D model of the scanned object or environment instantly. This solution is also built keeping high portability in mind and overallcosteffective.
Jetscan is a open source 3D scanner based on
As mentioned above the RGBD sequence from the D435i flows in and then, the GPU accelerated CUDA code (C++) is activated after collecting the RGBD data intantly the reconstruction starts.
Components involved :
- RGBD sequence input
With Librealsense (intel realsense ) library, its python api and openCV we collect in desired RGB and its depth counterpart.
- Making Submaps
Submap fragment generation is initiated involving RGBD odometry on the evenly diveded input sequence followed by Pose estimation and optimization and TSDF volume integration and finally submaps are registered.
- Submap registration
The submaps are then registered temporally adjacent involving relative poses from RGBD V-Odometry from initial submaps
- Refine registration
the registered submaps are further refined using multi scale coloured ICP followed by global pose estimation
- Integration of final scene
Given the optimized poses of thesubmaps and the poses of every frame, TSDF integra-tion fuses the entire RGB-D sequence, and producesthe final 3D reconstruction
References:
http://www.open3d.org/wordpress/wp-content/paper.pdf
https://github.com/intel-isl/Open3D
https://github.com/theNded/Open3D
http://dongwei.info/publications/open3d-gpu.pdf
https://github.com/IntelRealSense/librealsense
https://github.com/JetsonHacksNano/installLibrealsense
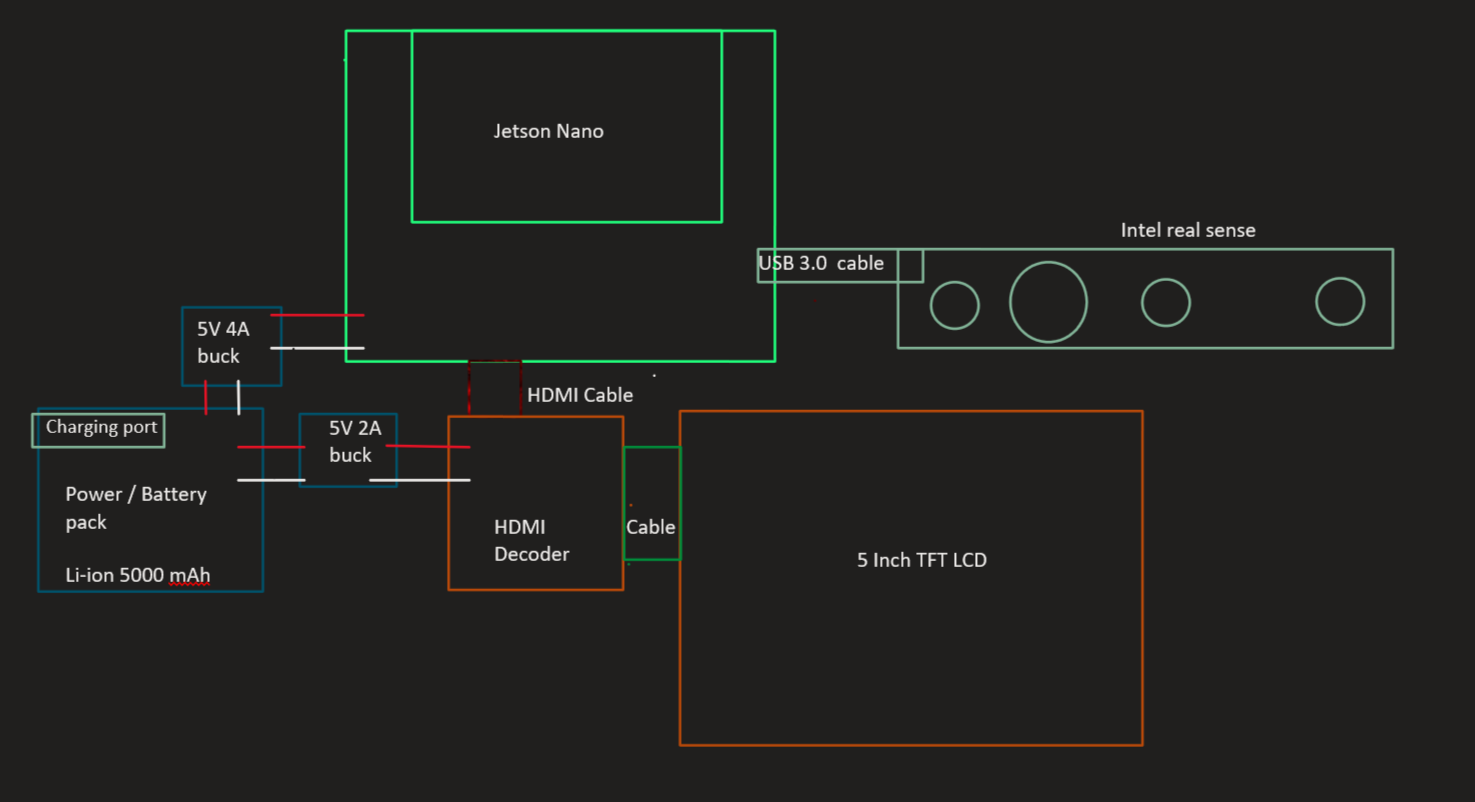
Hardware system overviewSchematic:
Electronicsassembly:
Collect the Electronics and Components :
- Jetson Nano
Initialize the SD card and Insert it in Jetson nano (For Open3Dsoftwarestack follow software guidelines )_______ This is for basic hardwaresetup
Follow Jetsonhacks tutorials ( best for starters)
- WIFI and Blutooth setup
you can use the Intel wifi card or you can go with simple usb WIFI adapter
- 5 inch adafruit thin display module
Assuming you have the 5 inch or 7 inch screen connect the TFT cable to the adapter in the driver (decoder) power the decoder with simple usb or a 5V 1A adapter is good enough
pluging in HDMI and powering Jetson nano the whole module should start
- Intel Realsense configuration (Follow this step after seting up the software Open3D reconstructionstack )
Follow this step after seting up the software Open3D reconstructionstack
dependency issue rise up !!!!! pls install Librealsense after Open3D build
- BMS Battery managment system
A good Li-Ion battery (5000 mAh) and a step down 5V upto 5A (important!!!!!!!)
Assemble it as given below:
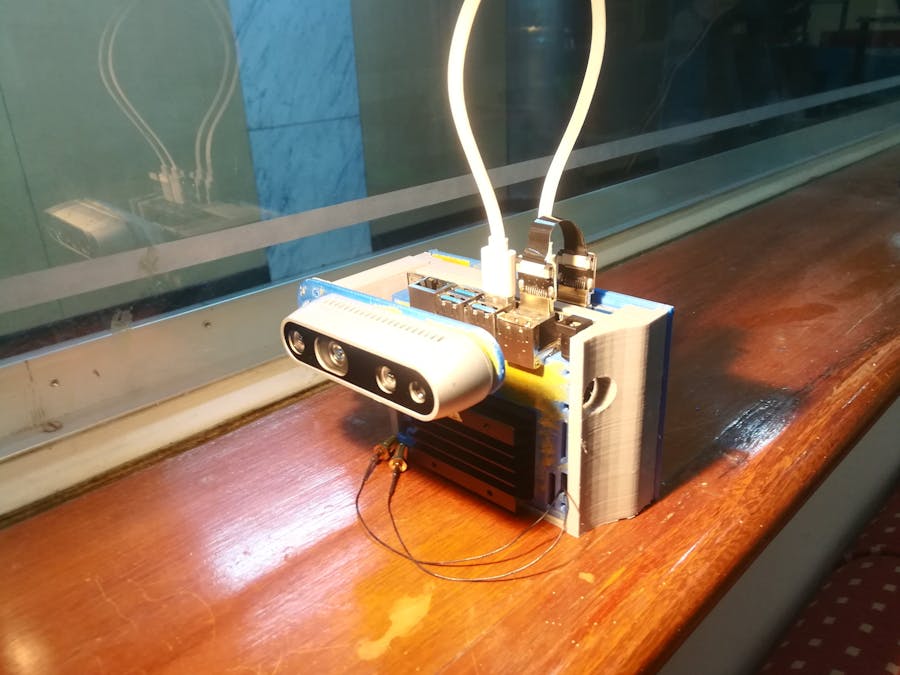
Casing up JetScan !!!!
Follow the picture guide for assembly and read the caption mentioned below :
Jetson module assembly: ( Follow next pictures by clicking arrow and read the caption below pics)
Realsense and BMS assembly: (Follow next pictures by clicking arrow and read the caption below pics)
Pleaseadd Jumper inside nano: setting up with barrel jack for max perf mode
Software overall setup:https://github.com/devshank3/Open3D-for-Jetson
https://github.com/devshank3/JetScan
https://github.com/theNded/Open3D
Software stack setup : JetScan
Jetson Nano setup
Collect the Jetson nano and a min 64 gb Class 10 sd Card and other pheripherals for initial setup
Follow the official Nvidia jetpack install steps from the link below:
https://developer.nvidia.com/embedded/learn/get-started-jetson-nano-devkit#intro
and setup credentials in the dev kit follow the Jetsonhacks tutorials : Getting started
Make sure you power up at max mode and operate in max mode follow Jetsonhacks tutorials : use more power
Pre - setups ( dependency correction)
In the terminal
Sudo apt-get update & upgrade
Purge inbuilt Cmake (issue with building)
sudo apt-get purge cmake
Install Install Cmake 3.14
Download cmake3.14 from 'https://cmake.org/files/v3.14/cmake-3.14.0.tar.Z'
tar -zxvf cmake-3.14.0.tar.gzcd
cmake-3.14.0
sudo ./bootstrap
sudo make
sudo make install
uninstall eigen3
Sudo apt-get uninstall eigen3
install eigen3 ver - 3.3.7
Cmake and install
$download from https://gitlab.com/libeigen/eigen/-/archive/3.3.7/eigen-3.3.7.tar.gzcd
$tar -zxvf eigen-3.3.7.tar.gzcd
$mkdir build
$cd build
$cmake ..
$make
$sudo make install
Open3D for Jetson
Clone the open3D for jetson Github repo
$ git clone https://github.com/devshank3/Open3D-for-Jetson.git
cd Open3D_for_Jetson/
Install dependencies util/scripts/install-deps-ubuntu.sh
$./install-deps-ubuntu.shSetup python dependencies pip3 install
1. Numpy
2. Matplotlib
3. Opencv
4. Joblib
5. cython
Build in dir Open3D_for_Jetson/
$ mkdir build
$ cd build
$ cmake -DBUILD_EIGEN3=OFF..
$ Sudo make -j4
Librealsense Install by jetsonhacks
follow this Jetson hacks tutorials : Librealsense Jetson nano
$ git clone https://github.com/JetsonHacksNano/installLibrealsense.git
$ cd installLibrealsense
$ ./installLibrealsense.sh
$ ./buildLibrealsense.shCheckfor installation of python library by importing
$ in python3
$ import pyrealsense2After setting up the package and buiilding it corrrectly, now its time to check out the reconstruction pipeline
Update :
Submaps or sub-fragment generation is accelerated by GPU, with multiple NN networks running behind. (This ones is the C++ cuda version)
further steps registration, refining, integration of scene is for know is carried out in CPU sequentially (Python version) for now (This step was taken in order to avoid memory crashes)
- Step 1
Open Open3D-for-Jetson/examples/Python/ReconstructionSystem/
Copy or Cut GUI2.py to Open3D-for-Jetson/build/bin/examples/
- Step 2
Open
Open3D-for-Jetson/examples/Cuda/ReconstructionSystem/config/intel/test.json
{
"name": "intel D435i Test",
"path_dataset": " python dataset path of d435i capture",
"path_intrinsic": " intel d435i intrinsics either from CUDA config file or captured dateset intrinsics file",
"n_frames_per_fragment": 100,
"n_keyframes_per_n_frame": 5,
"max_depth": 3.0,
"voxel_size": 0.05,
"max_depth_diff": 0.07,
"depth_factor": 1000.0,
"preference_loop_closure_odometry": 0.1,
"preference_loop_closure_registration": 10.0,
"tsdf_cubic_size": 3.0
}
path_dataset : Enter the dataset path of python d435i capture
path_intrinsic: Enter the intrinsics file generated by the realsense capture code
This directry with your system path Open3D-for-Jetson/examples/Python/ReconstructionSystem/dataset/realsense/
Open3D-for-Jetson/examples/Python/ReconstructionSystem/dataset/realsense/camera_intrinsic.json
- Step 3
In the respective directive path run the GUI.py files
Open3D-for-Jetson/examples/Python/ReconstructionSystem/
$ python3 GUI.pyOpen3D-for-Jetson/build/bin/examples/
$ python3 GUI2.pyTwo Graphical user interfaces pops up:
- Step 4 Recording :
Ensure the D435i or any realsense depth sensor is pluged in
Click on Recorder option :
Ensure you have less grey or black area while capturing
For a small scene < 1000 frames is ideal
you can see the frames running in terminal
Maximum distance of Depth captured can be adjusted by
realsense_recorder.pyCode snippet:
# Getting the depth sensor's depth scale (see rs-align example for explanation)
depth_scale = depth_sensor.get_depth_scale()

# We will not display the background of objects more than
#  clipping_distance_in_meters meters away
clipping_distance_in_meters = 1 # 3 meter
clipping_distance = clipping_distance_in_meters / depth_scale


# Create an align object
# rs.align allows us to perform alignment of depth frames to others frames
# The "align_to" is the stream type to which we plan to align depth frames.
align_to = rs.stream.color
align
=
rs
.
align
(
align_to
)
Mode settingsnippet :
class Preset(IntEnum):
Custom = 0
Default = 1
Hand = 2
HighAccuracy = 3
HighDensity = 4
MediumDensity = 5
.
.
.
.
.
.
.
.
.
# Using preset HighAccuracy for recording
if args.record_rosbag or args.record_imgs:
depth_sensor.set_option(rs.option.visual_preset, Preset.HighAccuracy)- Step 5 Fragment Construction (submaps )
In the GUI2.py Click on Fragment construction
after fragment / submap creation is done it will show with the time taken
- Step 6 Scene 3D reconstruction python API
Now in the GUI.py Click on 3D construct option
After the scene recostruction
- Step 7 View
Now in the GUI.py Click on View option
Your high resolution 3D model is ready in.ply point cloud format !!!!
Playingwithpresets :
Python API presets
Open3D-for-Jetson/examples/Python/ReconstructionSystem/config/realsense.json
{
"name": "Captured frames using Realsense",
"path_dataset": "dataset/realsense/",
"path_intrinsic": "dataset/realsense/camera_intrinsic.json",
"max_depth": 3.0,
"voxel_size": 0.05,
"max_depth_diff": 0.07,
"preference_loop_closure_odometry": 0.1,
"preference_loop_closure_registration": 5.0,
"tsdf_cubic_size": 3.0,
"icp_method": "color",
"global_registration": "ransac",
"python_multi_threading": true
}
CUDA presets :
Open3D-for-Jetson/examples/Cuda/ReconstructionSystem/config/intel/test.json
{
"name": "intel D435i Test",
"path_dataset": " python dataset path of intel capture",
"path_intrinsic": " intel d435i intrinsics either from CUDA config file or captured dateset intrinsics file",
"n_frames_per_fragment": 100,
"n_keyframes_per_n_frame": 5,
"max_depth": 3.0,
"voxel_size": 0.05,
"max_depth_diff": 0.07,
"depth_factor": 1000.0,
"preference_loop_closure_odometry": 0.1,
"preference_loop_closure_registration": 10.0,
"tsdf_cubic_size": 3.0
}
Ensure common parameters are same in both presets
you can adjust
frames per fragments
max depth
voxel size
tsdf cubic size
for varying results and speed
Results : few discussion on results aquiredcompared to normal open3D CPU based pipeline wei dong's GPU pipeline (https://github.com/theNded/Open3D) gave ultrafast results comparitively 35 times the baseline
averaging all the algorithm timings
The quality of high density 3D mapping was relatively superb and of content quality
Few 3D models exported in meshlab :
After RGBD sequence aquiring the model reconstruction pipeline took around
30s to 240s for 3D reconstruction
Sketch fab links
https://sketchfab.com/3d-models/jetscaned-model-d05f70083567470d96036281a2fb2ae2
https://sketchfab.com/3d-models/jetscaned-model-2-f38741b92f8a4faebb6a97a4fdb01966
https://sketchfab.com/3d-models/jetscan-model-chair-2-3e41dbbc71974fc58d36282489995cf9
https://sketchfab.com/3d-models/jetscaned-model-dr-apj-abdul-kalam-da3b6295554b49b38736803566fc9574
Initial jetscan stages
Final stages:
Future work:Implementing high end deeplearning on the edge.........
- Kaolin : Nvidia
- Pytorch3D
- Mesh -RCNN
After this my prime aim would be Intel realsense l515 and
Jetson Xavier AGX integration and implement High res 3D moodel by online realtime reconstruction
- Team Nvidia embedded
https://www.nvidia.com/en-us/autonomous-machines/embedded-systems/
- Wei dong : https://github.com/theNded/Open3D
- Team Open3D
https://github.com/intel-isl/Open3D
https://github.com/intel-isl/Open3D
- Jetsonhacks
- Intel Intelligent Systems Lab


_t9PF3orMPd.png?auto=compress%2Cformat&w=40&h=40&fit=fillmax&bg=fff&dpr=2)

Comments
Please log in or sign up to comment.