


Hardware components | ||||||
 |
| × | 1 | |||
 |
| × | 1 | |||
 |
| × | 1 | |||
 |
| × | 1 | |||
 |
| × | 2 | |||
| × | 1 | ||||
 |
| × | 1 | |||
 |
| × | 1 | |||
 |
| × | 2 | |||
Software apps and online services | ||||||
| ||||||
 |
| |||||
 |
| |||||
| ||||||
The booming trends in IOT has made its way throughout each and every chores making every cumbersome tasks within our fingertips easier. Controlling any device from anywhere in the world, IOT is for sure a boon to industries for their smooth working. This project involves getting instant temperature from an office or any industry whenever user asks for the temperature from google assistant.Additionally, the project also involves controlling lights, alarms and also to give emergency alerts by the user to the required place call it office/home.
BENEFITS:1)Easy to turn on/off lights, alarms, give emergency alarms
2)Get instant temperature value
3)Can be controlled from anywhere
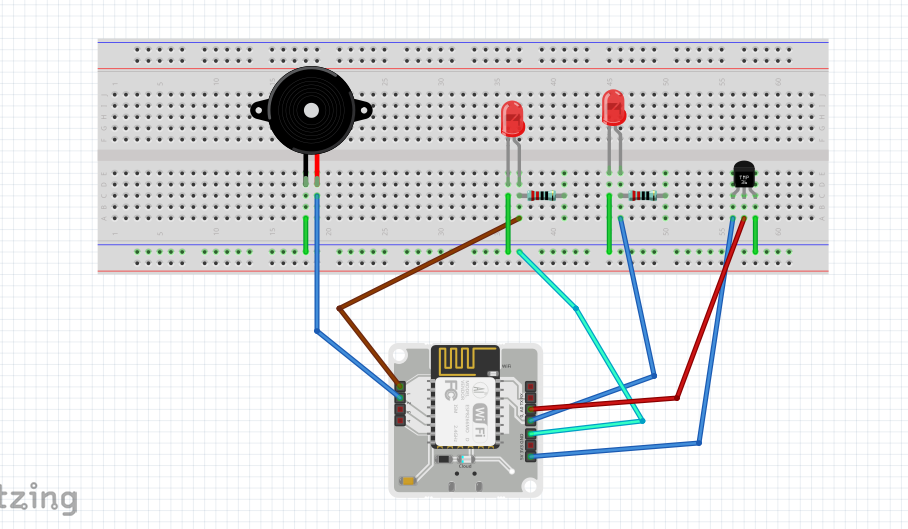
STEP 1: HARDWARE CONNECTIONSSTEP 1.1 : Connecting LED's to the bolt module
Take two LED's and two resistors.
In the positive leg of LED connect the resistor.
From the resistor it is to be connected to pin 0 and 1 respectively of Bolt IOT.
Negative legs of LED's must be given to GND of bolt IOT.
STEP 1.2:Connecting buzzer
The positive pin(longer pin) of buzzer must be conncected with pin 3 of Bolt IOT.
The negative pin of buzzer must be given to GND in IOT.
STEP 1.3: Connecting Temperature sensor
Connect the supply pin(+5v pin) to 5V in Bolt IOT.
Output pin to ;A0' since sensors reads analog values.
GND to ground of IOT.
Step 1.4: Integrate all the 3 circuits to a single breadboard.
STEP 2: FINDING BOLT ID AND DEVICE ID
Login to https://cloud.boltiot.com. And if you haven't generated API key click on generate API key and make sure to enable it then copy and paste it somewhere safely your API key.
For device ID click on the Devices on the left side. Copy the Bolt ID ans paste it for easy reference.
Select docs from the menu and scroll down to API => GPIO commands.
Step 3.1: For LED's
LED is a digital output device, we will need to get a Digital Write command that can be sent to Bolt over the Internet to switch on the LED. Since we are using 2 LED's choose the digitalMultiWrite commands.
The command URL to switch on will look like this:
The command URL to switch on will look like this:
NB: Don't forget to change the pins to the ones you have connected the LED to also replace with API and Device ID we have gained from previous step.
Step 3.2 :For buzzer
Buzzer is a digital output device, we will need to get a Digital Write command that can be sent to Bolt over the Internet to switch on the Buzzer. Since it's a single device use digitalWrite command.
To switch on the buzzer -URL:
To switch off the buzzer- URL:
NB: Replace the pins with ones you have used in Bolt wifi module also the API and device ID fetched drom step2.
Step 3.3 : For Temperature sensor
Temperature sensor is a Analog input device, we will need to get a AnalogRead command that can be sent to Bolt over the Internet to get value from the sensor .
The command URL will be:
NB: Replace the API and Device ID fetched from step 2.
STEP 4:CONFIGURING IFTTT ACCOUNTGo to https://ifttt.com and if you are a new user create an account.
Click the create option.
Click the + button.
Step 4.1: Turn on lights request for LED
Choose google assistant.
Then select a type of phrase you want to trigger the google assistant with.
Built a command to be given to the google assistant. Response from google assistant once command is triggered.
Then press create trigger.
Now select the + that button.
Select action service as Webhooks.
Make a web request.
Give the URL attained from step 3.1.
Method is GET.
Content type is application/json.
Click create action.
Click Finish.
Make sure it's connected.
Step 4.2 :Turn off lights request for LED.
Follow step 4.1. Give URL for switching off the LED obtained from step 3.1.
Step 4.3 :Turn on the buzzer request.
Follow step 4.1. Give URL for turning on the buzzer obtained from step 3.2.
Step 4.4 :Turn off the buzzer request.
Follow step 4.1. Give URL for turning on the buzzer obtained from step 3.2.
Step 4.4 :Turn on the emergency alert request.
Follow step 4.1. Give URL for turning on the lights and buzzer obtained the url will be: https://cloud.boltiot.com/remote/44b2de6b-7e68-40e7-a27f-814b58afe008/digitalMultiWrite?pins=0, 1, 2&states=HIGH, HIGH, HIGH&deviceName=BOLT13819450
NB:Replace API and Device ID obtained from step 2.
Step 4.4 :Turn off the emergency alert request.
Follow step 4.1. Give URL for turning on the lights and buzzer obtained the url will be: https://cloud.boltiot.com/remote/44b2de6b-7e68-40e7-a27f-814b58afe008/digitalMultiWrite?pins=0, 1, 2&states=LOW, LOW, LOW&deviceName=BOLT13819450
NB:Replace API and Device ID obtained from step 2.
Step 4.5 :Getting current temperature request
Step 4.5.1 : CreateTwilio account.
Get in the URL https://www.twilio.com/. If new user signup.
Similar page will be obtained.
Make a note of your TRIAL NUMBER, ACCOUNT SID visible on the dashboard section in the login page.Your AUTH TOKEN will not be visible.Click on the "Show" button and make a note of it.
Step 4.5.2 :Create an account in integromat.
Get in https://www.integromat.com/en/ and signup if first time user.
Log in to the account.
The initial page would look like this. Click 'Create a new scenario'.
Search for IFTTT, HTTP, Twilio and select these three.
Press continue after selecting.
- IFTTT module
Click on the question mark visible and select the IFTTT module.
Choose Receive data.
Give a suitable webhook name and save it.
'Copy the address to clipboard' for further reference.
- HTTP module
Click on the add module in IFTTT.
Select HTTP module.
Choose make request option.
Give the URL obtained for AnalogRead of temperature sensor.
URL: https://cloud.boltiot.com/remote/api-key/analogRead?pin=A0&deviceName=BOLTXXXXXXX.
Use Method as GET.
NB: Replace API key and Bolt device ID with your own obtained from step 2.
- Adding Router.
Select add module from HTTP.
Search for flow control and select it.
Choose Router from the options.
- Add Twilio module
Select add module from Router.
Select Twilio.
Select 'Create a Message'.
Give a connection name. Input SID and Auth token obtained from twilio step 4.5.1 .
Turn on the map to give correct phone number obtained from Twilio step 4.5.1.
Give your phone number in TO number.
In the body give the message and select 'A' from the side menu and select substring from it.
Add data after substring from the side menu.
Numbering: Give 11 after semicolon ';' after second semicolon give 1 4.
Press ok.
Step 4.5.3 : Connecting to Google assistant to IFTTT.
Get into the IFTTT account.
Create new Applet with a simple phrase.
Choose google assistant as service.
Then it asks for trigger command.
NB:The URL to be given here is the one copied from integromat IFTTT module in step 4.5
Give the method as 'POST',
Now create the trigger.
Go to my applets and make sure all triggers are connected.
Step 5.1:
- Turning on the lights.
- Turning off the lights
(Lights go off)
Step 5.2:Turning on the buzzer.
(Buzzer is on)
Similarly, to off the buzzer give the trigger to Google assistant.
Step 5.3 :
Turning on the emergency alert
(Lights and alarm switches on simultaneously)
Turning off the emergency alert:
(The lights and alarm goes off simultaneously)
Step 5.4:
Getting the current temperature.
The current temperature value is obtained by message.


Comments
Please log in or sign up to comment.